


Echoflex Solutions Installation Guide
SmartSpace Controller–Gen 2
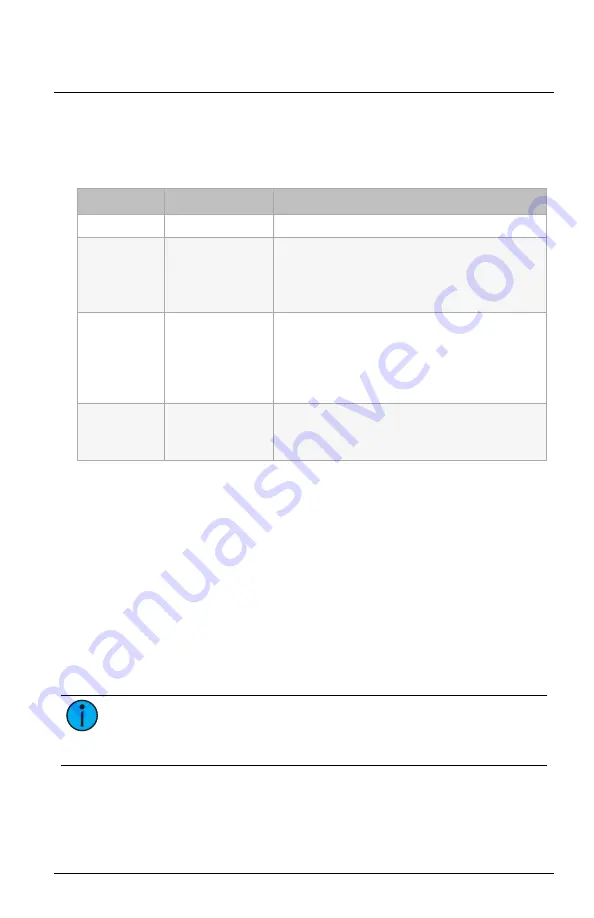
Set the Sensor Type
Press and release the Aux Input Mode button repeatedly to cycle through
the available sensor types. The LED indicator shows the currently selected
sensor type.
LED Indicator
Sensor Type
Description
Red
Disabled
Green
Occupancy
(default after con-
tact detected)
•
Closed contact: Activates Preset 1 for all Elaho
power controllers in the space.
•
Open contact: Triggers vacancy and plays the Off
Preset.
Amber
Photo
•
Closed contact: Assumes a dark state and plays
Preset 1 for all Elaho power controllers in the
space.
•
Open contact: Assumes a bright state and plays
the Off Preset.
Off
Not configured
(and no contact
detected)
If the LED indicator is Off, press the
Aux Input
Mode
button to cycle through the available
sensor types.
Troubleshooting
Restore Defaults
To return the SmartSpace Controller–Gen 2 to factory defaults, set both
rotary switches to 16 and then press and hold the Restore Defaults button
for 10 seconds. The LED will blink red quickly to indicate that the factory
defaults have been restored.
When you return the SmartSpace Controller–Gen 2 to factory defaults, the
sensor type is set to Off. The sensor type will return to the default setting
(Occupancy) after contact closure is detected, or you can reset the sensor type
to the desired setting by pressing the Aux Input Mode button to cycle
through the available sensor types. See
Set the Sensor Type on page 11
Note:
After you return the SmartSpace Controller–Gen 2 to factory
defaults, reset the rotary switches to the appropriate values for the
controller zone and space.
SmartSpace Controller–Gen 2
Page 11 of 12
Echoflex Solutions


