background image

35

XRGI® 15 COMMISSIONING INSTRUCTION

VERSION 1.0 2019

5.2.8 

G A S   &   A I R   M I X T U R E   A D J U S T M E N T

Allow the Power Unit to heat up for approx. 30 minutes before starting to adjust the 
flue gas.


Operate the flue gas analyser in line with the manufacturer’s instructions and 
measure the flue gas emission.


Allow the XRGI® system to run for approximately 15 to 20 minutes.


If the flue gas emissions lie outside the required range, adjust the values as follows:

A I R   M I X T U R E   A D J U S T M E N T


To adjust the air mixture, insert a 

5 mm

 Allen key into the gas nozzle in the mix-

ing chamber – it is accessible through the housing opening beside the flue gas 
pressure gauge.


On the gas nozzle, set the residual oxygen O

2

 in the flue gas to 7.1 to 7.3 % at a 

power of 15.2 kW – stepper motor position to 144 – maximum power.
- leaner (on the left) 

 less NO

X

, more O

2

- richer (on the right) 

 more NO

X

, less O

2

TECHNICIAN MENU

1/1

 

Log

 

System info

 

IO status

 

Heat pumps

 

Configuration

 

Q-network statistics

 

Production

PRODUCTION

1/3

Current production:

Total:

Generator:

Power step:

0.0 kW

3 Wh

0

On

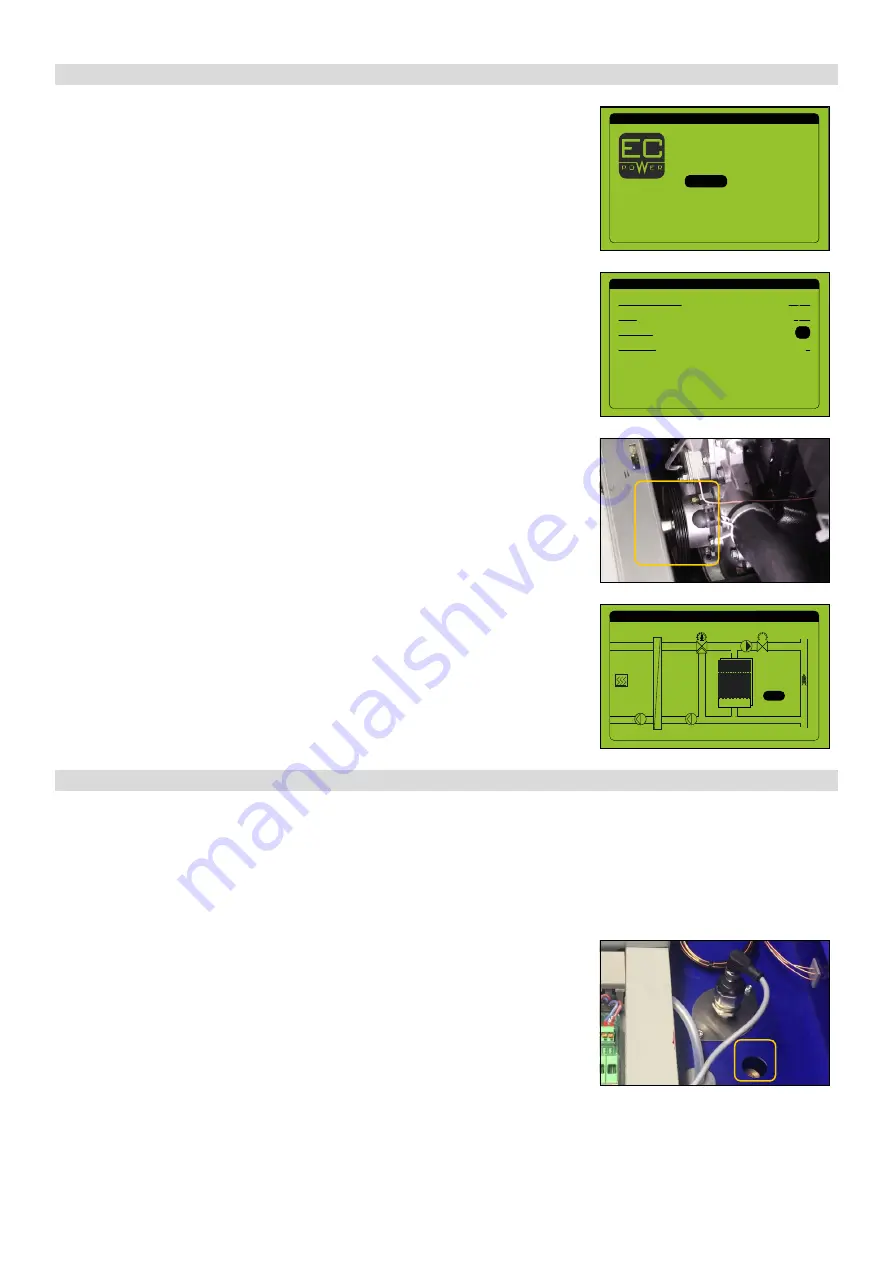
5.2.7  P R O D U C T I O N


In the technician menu, move the cursor to 

Production

 by using the 

▲▼

 but-

tons and press 

OK

 on the user interface.

C H E C K I N G  T H E   D I R E C T I O N   O F   R O TAT I O N


While the cursor is on 

Generator

, press 

OK

 on the user interface to start the 

generator.

Check the direction of engine rotation in the Power Unit.


The crankshaft rotates to the right

 (front view of the Power Unit)

– clockwise 

 OK

The direction of rotation is correct and you can continue with 

Gas & air mixing 

adjustment


The crankshaft rotates to the left 

(front view of the Power Unit)

– counter-clockwise 

 phases are reversed.

The direction of rotation is incorrect and you need to turn off the generator again; 
while the cursor is on 

Generator

, press 

OK

 on the user interface to stop the 

generator.


Swap two phases in the iQ-Control Panel and recheck the direction of rotation of 
the generator; while the cursor is on 

Generator

, press 

OK

 on the user interface 

to start the generator.


Use the 

▲▼ 

buttons to move to the page 

Heat Status

.


Monitor the operating temperatures of the XRGI® system.


TMV


TVL


TMK


TLK


TRETURN

           83.8 C

          78.0 C

  68.9 C


91.8 C


84.1 C


o92.00 C


0.92 l/s


32.4 kW


4.1 kW/K


69.9 C


38.1 C


o70.0 C

HEAT STATUS

3/3

        87.7 C

         87 %

        60.7 C

s70.0 C

39.1 C

83.9 C

Summary of Contents for XRGI 6

Page 1: ...VERSION 1 0 2019 01DOC1075 01 COMMISSIONING INSTRUCTION...

Page 2: ......

Page 3: ...BY IMPROPER USE OF AND OR UNSUITABLE TOOLS 9 2 3 12 MODIFICATIONS IN THE VICINITY OF THE XRGI SYSTEM 9 2 3 13 OPERATION WITH LIQUID GAS 9 2 3 14 WORKING ON THE ELECTRICAL SYSTEM 10 2 3 15 SAFETY EQUIP...

Page 4: ...N 35 5 2 8 GAS AIR MIXTURE ADJUSTMENT 35 5 2 9 MODEM CALL 36 5 2 10 COMPLETION 36 6 COMMISSIONING XRGI 20 37 6 1 INSTALLATION CHECK 37 6 2 COMMISSIONING 37 6 2 1 BLEEDING 38 6 2 2 ELECTRONICS COMPARTM...

Page 5: ...g iQ CONTROL PANEL The iQ Control Panel has two rating plates These are located on the inside of the iQ Control Panel door and on the left side of the iQ Control Panel below the main switch disconnect...

Page 6: ...G This warning symbol refers to a potentially dangerous situation that could lead to serious personal or fatal injury 2 2 I N T E N D E D U S E The intended use includes compliance with the applicabl...

Page 7: ...s Do not use the XRGI system if this is the case Keep children away from the XRGI system at all times Only allow persons who have been trained in the handling of the system or who have provided eviden...

Page 8: ...y Immediately inform the gas supply company even if there is only a slight smell of gas and you cannot locate identify the origin of the smell If you smell gas from areas you cannot access directly im...

Page 9: ...switch disconnecter red switch is located on the left hand side of the iQ Control Panel When it is switched on there is a risk of you getting an electric shock if touching any of the control component...

Page 10: ...ls dry cleaning premises etc then the supply of combustion air has to be solely supplied from an uncontaminated area 2 3 9 M O D I FI C AT I O N S TO T H E X R G I S YS T E M CO M P O N E N T S Do not...

Page 11: ...rain pipe for the heating water Structural objects that could affect the operational safety of the XRGI system 2 3 13 O P E R AT I O N W I T H L I Q U I D G A S Venting the liquid gas tank when instal...

Page 12: ...switch disconnecter Sound insulation panels all casing panels Makesurethatthewarninginformationlabels stickers ontheXRGI systemarealwaysclearlyvisible undamagedand complete Replace damaged or dirty w...

Page 13: ...ly allow personnel trained and authorised by EC POWER to perform regular servicing on the unit in accordance with the current servicing instructions Warranty exclusions The guarantee excludes damage o...

Page 14: ...XRGI COMMISSIONING INSTRUCTION VERSION 1 0 2019 12...

Page 15: ...as site connections Flue gas site connections Electrical connections All relevant steps for the installation check are included in the commissioning protocol as part of the service booklet 3 2 CO M M...

Page 16: ...rcuit at the air pot on the Power Unit Attach a hose to the bleed screw to divert any leaking XRGI Engine Coolant and then use an 11 mm wrench to loosen the bleed screw Bleed until only XRGI Engine Co...

Page 17: ...g process is completed refill XRGI Engine Coolant to the max imum mark TECHNICIAN LOGIN 1 1 ID no Password 00000 00000 Log in TECHNICIAN MENU 1 1 Log System info IO status Heat pumps Configuration Q n...

Page 18: ...r interface M O D E M S E T T I N G S Move the cursor to Obtain an IP addr automatically by using the buttons and press OK on the user interface to activate the field Select Yes or No by using the but...

Page 19: ...CY RESPONSE 6 6 Type Frequency treshold Droop setting Activation delay Reg belov min load Return gradient Reference power 50 40 Hz Rated power Continue 0 0 Sek 10 10 0 G98 2018 The XRGI 6 system is de...

Page 20: ...on the user interface The correct maintenance interval for the XRGI system will be displayed TECHNICIAN MENU 1 1 Log System info IO status Heat pumps Configuration Q network statistics Production PRO...

Page 21: ...ge by using the buttons Move the cursor to Desired production by using the buttons and press OK on the user interface to activate the field Change the value to 4 0 kW by using the buttons Press ESC to...

Page 22: ...er Unit s electronics com partment and replace the cover on the Q Heat distributor 3 2 8 M O D E M C A L L MAIN MENU 1 1 Start Stop Heat pumps Technician Settings Operating info Storage status Modem c...

Page 23: ...as site connections Flue gas site connections Electrical connections All relevant steps for the installation check are included in the commissioning protocol as part of the service booklet 4 2 CO M M...

Page 24: ...rcuit at the air pot on the Power Unit Attach a hose to the bleed screw to divert any leaking XRGI Engine Coolant and then use an 11 mm wrench to loosen the bleed screw Bleed until only XRGI Engine Co...

Page 25: ...process is completed refill XRGI Engine Coolant to the max imum mark TECHNICIAN LOGIN 1 1 ID no Password 00000 00000 Log in TECHNICIAN MENU 1 1 Log System info IO status Heat pumps Configuration Q ne...

Page 26: ...Move the cursor to Obtain an IP addr automatically by using the buttons and press OK on the user interface to activate the field Select Yes or No by using the buttons Yes The IP address is obtained a...

Page 27: ...2018 FREQUENCY RESPONSE 6 6 Type Frequency treshold Droop setting Activation delay Reg belov min load Return gradient Reference power 50 40 Hz Rated power Continue 0 0 Sek 10 10 0 G98 2018 The XRGI 9...

Page 28: ...he user interface The correct maintenance interval for the XRGI system will be displayed TECHNICIAN MENU 1 1 Log System info IO status Heat pumps Configuration Q network statistics Production PRODUCTI...

Page 29: ...cursor to Desired production by using the buttons and press OK on the user interface to activate the field Change the value to 6 0 kW by using the buttons Press ESC to save the entry Allow the XRGI s...

Page 30: ...nics com partment and replace the cover on the Q Heat distributor 4 2 8 M O D E M C A L L MAIN MENU 1 1 Start Stop Heat pumps Technician Settings Operating info Storage status Modem call Finally check...

Page 31: ...ctions Gas site connections Flue gas site connections Electrical connections All relevant steps for the installation check are included in the commissioning protocol as part of the service booklet 5 2...

Page 32: ...ircuit at the air pot on the Power Unit Attach a hose to the bleed screw to divert any leaking XRGI Engine Coolant and then use an 11 mm wrench to loosen the bleed screw Bleed until only XRGI Engine C...

Page 33: ...ing process until you are sure that no more air is in the engine Once the bleeding process is completed refill XRGI Engine Coolant to the max imum mark 5 2 2 E L E C T R O N I C S CO M PA R T M E N T...

Page 34: ...sor to the address you want to change by using the buttons and press OK on the user interface Change the address by using the buttons and press ESC to save the entry Go to the next page by using the b...

Page 35: ...component FREQUENCY RESPONSE 6 6 Type G98 2018 FREQUENCY RESPONSE 6 6 Type Frequency treshold Droop setting Activation delay Reg belov min load Return gradient Reference power 50 40 Hz Rated power Co...

Page 36: ...elay No start Forced standby Fire alarm OK INACTIV OK INACTIV INPUTS 1 3 Aux alarm Gas alarm Prot eng switch T1 T2 T2 Oil pressure OK OK NO PRESSURE COLD COLD COLD OK 5 2 4 M A I N T E N A N C E 5 2 5...

Page 37: ...0 0 kW 3 Wh 0 On 5 2 7 P R O D U C T I O N In the technician menu move the cursor to Production by using the but tons and press OK on the user interface C H E C K I N G T H E D I R E C T I O N O F R O...

Page 38: ...0 Step 144 NOX GAS AIR MIXTURE 7 2 7 2 7 2 7 2 6 2 5 8 6 0 200 ppm 5 2 10 CO M P L E T I O N Once all values have been adjusted correctly close the Power Unit s electronics com partment and replace th...

Page 39: ...Gas site connections Flue gas site connections Electrical connections All relevant steps for the installation check are included in the commissioning protocol as part of the service booklet 6 2 CO M M...

Page 40: ...ircuit at the air pot on the Power Unit Attach a hose to the bleed screw to divert any leaking XRGI Engine Coolant and then use an 11 mm wrench to loosen the bleed screw Bleed until only XRGI Engine C...

Page 41: ...g process is completed refill XRGI Engine Coolant to the max imum mark 6 2 2 E L E C T R O N I C S CO M PA R T M E N T Remove the cover for the electronics compartment on the Power Unit with a 5 mm Al...

Page 42: ...sor to the address you want to change by using the buttons and press OK on the user interface Change the address by using the buttons and press ESC to save the entry Go to the next page by using the b...

Page 43: ...ctions of the respective component FREQUENCY RESPONSE 6 6 Type G98 2018 FREQUENCY RESPONSE 6 6 Type Frequency treshold Droop setting Activation delay Reg belov min load Return gradient Reference power...

Page 44: ...he user interface The correct maintenance interval for the XRGI system will be displayed TECHNICIAN MENU 1 1 Log System info IO status Heat pumps Configuration Q network statistics Production PRODUCTI...

Page 45: ...r Desired production to 20 0 kW Use the buttons to move to the page Heat Status Monitor the operating temperatures of the XRGI system PRODUCTION 1 3 Current production Total Generator Desired producti...

Page 46: ...s Modem call Finally check whether the XRGI system sends data correctly via internet connection to the EC POWER service database In order to test the internet connection or to update the service datab...

Page 47: ...XRGI COMMISSIONING INSTRUCTION VERSION 1 0 2019 45 N OT E S...

Page 48: ...XRGI COMMISSIONING INSTRUCTION VERSION 1 0 2019 46 N OT I Z E N...

Page 49: ......

Page 50: ...01DOC1075 01 09 2019 CO M M I S S I O N I N G I N S T R U C T I O N...

Reviews: