19
DE
EN
FR
ES
IT
5
6
4
2
3
1
7
D
C
217 mm
187 mm
26
7
m
m
29
2
m
m
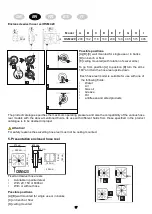
OSM420mitMontageplatte(optional)
Wall mounting with optional bracket
After choosing the ideal position, checking the consistency and thickness of the wall, making sure that the
holes for the plugs do not interfere with water pipes or electrical cables, fix bracket [C] to the wall as shown in
fig. 7.
Screw the nuts [D] 3 – 4 turns only on the top part of the bracket. Insert the hose reel in the special seats (fig.
7).Tighten the 4 fixing nuts [D].
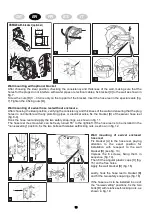
Wall mounting of swivel hose reel without enclosure
After choosing the ideal position, verifying the consistency and thickness of the wall and ensuring that the plug
holes do not interfere with any plumbing pipes or electrical wires, fix the bracket [B] of the swivel hose reel
(fig. 8-9).
Hook the hose reel and apply the two safety snap-rings, as shown in fig. 11.
The hose reel thus mounted, can be freely turned 55° to the right/left. If the hose reel is to be installed in the
"non-swivelling" position, fix the two bolts with relative selflocking nuts, as shown in fig. 12.
B
B
8
9
10
11
12
9
10
11
12
B
A
13
14
C
15
A
B
16
-34-
B
A
13
14
C
15
A
B
16
19
17
18
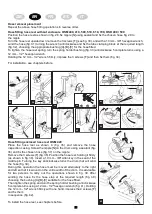
Wall mounting of swivel enclosed
hose reel
Fix bracket [A] to the hose reel, paying
attention
to
the
exact
position
for
installation with resepect to the wall
bracket [B] (see fig. 13).
Impress the 6 screws, fixing them in
sequence (fig. 14).
Then fit the angular plastic caps [C] (fig.
15) on the free holes.
Apply the wall bracket [B] (fig. 16).
Lastly, hook the hose reel to bracket [B]
and fit the two safety snap-rings (fig. 18).
If the hose reel is to be installed in one of
the "non-swivelling" positions, fix the two
bolts [D] with relative self-locking nuts, as
shown in fig. 19
with bracket (optional)
Summary of Contents for OSM Series
Page 54: ...54 Notizen notes notas note...
Page 55: ...55...


