background image

PRINTING

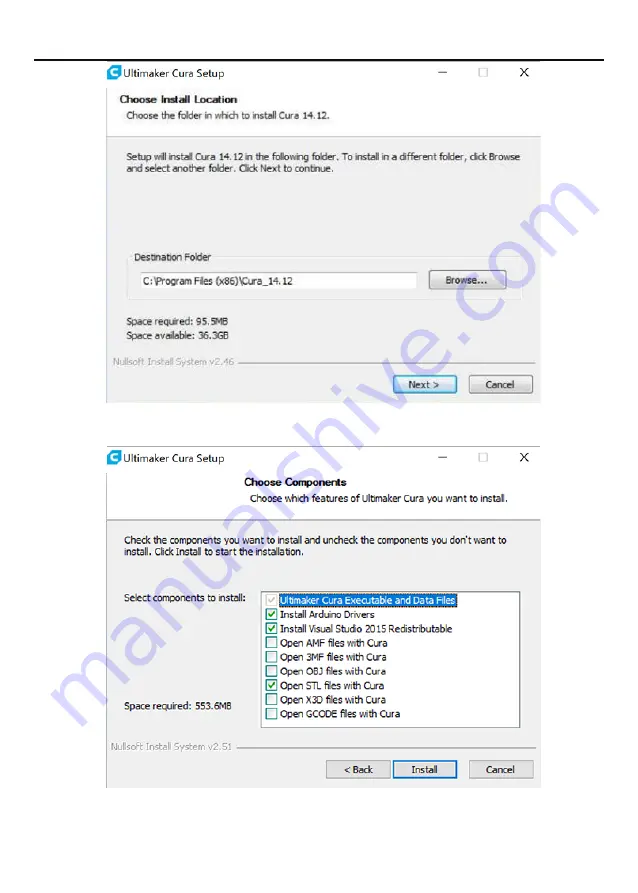
4.Select the associated file format, it is recommended to keep the default, click Install:

5.The installation process will pop up a window to install the arduino driver. Please keep 

the default installation and follow the prompts to complete the installation.

* Refer to your computer manual of further instructions on the above steps if required.

17

Summary of Contents for Zero

Page 1: ...Eazao Zero INSTRUCTION MANUAL MODEL NUMBER Eazao Zero DESKTOP CERAMIC 3D PRINTER...

Page 2: ......

Page 3: ...t you had expected please contact us at Eazao before returning the item to the store It is likely that we can resolve any problems for you via phone or email We can be reached through your local distr...

Page 4: ...The benefits conferred by this warranty are in addition to all rights and remedies in respect of the product that the consumer has under the China laws In case you purchase from Eazao distributor your...

Page 5: ...ge will occur The printer is designed to be used with ambient temperature ranging 15 C 30 C and humidity ranging 20 50 Operating outside these limits may result in low quality models In case of emerge...

Page 6: ...ic Push Rod Screw Extrusion 1 5mm 2mm 3mm 10mm s 40mm s Porcelain Clay etc Software Operating systems Slicer Software Input Formats Output Format Connectivity Windows Mac Linux Cura SLic3r Simplify3D...

Page 7: ...Card 1 x Tube 1 x Hex Key Set 1 x Printing Platform 1 x Barrel 1 x Getting Started Guide Not shown 1 x Needle Set 1 x Instruction Manual Not shown 1 x Microwave Kiln Optional 1 x Glaze Set Optional T...

Page 8: ...rt 12 PRINTING 13 4 1 Printing a file 13 4 2 Good 3D Printing Practices 14 4 3 Removing 3D objects from the print bed 15 4 4 Materials 15 4 5 Clay 15 4 6 Storage 15 4 7 Creating and Printing your own...

Page 9: ...6 1 2 Polishing 33 6 1 3 Surface Glazed 33 MAINTENANCE 33 7 1 Maintenance 33 DISPOSAL OF PACKAGING 34 TROUBLE SHOOTING 35 9 1 Troubleshooting 35 9 1 1 Printing Problems 35 9 1 2 Connectivity Problems...

Page 10: ...gns that can be downloaded and printed for personal use Websits such as Thingiverse com Pinshape com and YouMagine com are a good place to start but there are many more available Alternatively you can...

Page 11: ...inting the nozzle will move along the X and Y axis as each layer is printed This can take some time depending on the size of the 3D model print speed of the 3D printer and resolution of each layer Her...

Page 12: ...PRODUCT OVERVIEW 2 1 Printer Front View 1 Extruder 2 X Axis Frame 3 G 1 2 Tube Quick Connect 4 Needle 5 Print Bed 6 Z Axis Frame 7 SD Card Slot 8 Full Color Touch Screen 1 2 3 4 5 6 7 8 3...

Page 13: ...PRODUCT OVERVIEW 2 2 Printer Rear View 1 Microsd 2 Electric Putter Connection Cable 3 USB Port 4 Power Switch 5 Plug Socket 1 2 3 4 5 4...

Page 14: ...4 Electric Putter 2 3 1 4 5 6 7 8 10 9 1 57 Stepper 2 Threaded Push Rod 3 Anti Rotation Flange 4 Reducer 5 Cartridge Fixing Ring 6 Cartridge 7 Fixed Screw 8 Thrust Block 9 Finger Screw Nut 10 Rubber...

Page 15: ...holding the Print Bed to the X Axis Frame 3 Ensure the power switch is in the OFF position then the power supply cable into the back of the 3D Printer Insert the other end into a nearby mains power o...

Page 16: ...point Printing After inserting the SD card select the file from the SD card to print Extrusion Extruder and electric putter control Leveling Print platform leveling settings before printing Settings S...

Page 17: ...ngs Option After entering this option you can control the XYZ axis to zero In this option the print bed can be leveled by manual In this option you can control the push rod motor and extrusion motor S...

Page 18: ...nd cannot be omitted otherwise it will cause printing failure 2 Install the cartridge filled with clay in the order shown in the figure above and connect the two ends of the cartridge and the extruder...

Page 19: ...ay can be squeezed out smoothly from needle Installation matters 3 First select the return ratio 10 200 2000 then select PrePutter and finally click the In option the electric putter pushes the clay f...

Page 20: ...e in place 1 Clean off any excess clay residue from the tip of the needle 2 Put the board on the print bed and clamp it with clamps 3 Enter the main interface and select Leveling option 4 In this opti...

Page 21: ...d observe whether the distance between the needle and the print bed is correct 3 If the distance is correct tighten the Z axis limit lock nut if it is too large or too small repeat the above steps Z a...

Page 22: ...inting option will display no SD card no files will be available to print If your file is not printing correctly select Stop from the screen Ensure the extruder is raised prior to removing the print o...

Page 23: ...itor the first layer being printed Most problems like poor adhesion and warping will occur in the first layer If problems occur stop the 3D Printer in the menu or power off the printer 2 Do not leave...

Page 24: ...Extra clay including multiple colors and clay types are available from the online store at https www eazao com Extruder Setting Temp 0 C Official Name Eazao Clay Printing Level Basic Advantages Good l...

Page 25: ...ree open source slicer software relesed on the AGPLv3 license It is available on MacOS X and windows Eazao Zero supports a variety of slicing software Cura Slic3r and Simplify3d Different software has...

Page 26: ...efault click Install 5 The installation process will pop up a window to install the arduino driver Please keep the default installation and follow the prompts to complete the installation Refer to you...

Page 27: ...om type Eazao Zero in the printer name and then click Add Printer the printer setting interface will pop up select the Custom FFF printer Set the printer parameters as shown below 2 Select custom and...

Page 28: ...in endstops G1 Z15 0 F1500 move the platform down 15mm G92 E0 zero the extruded length G1 F200 E3 extrude 3mm of feed stock G92 E0 zero the extruded length again M302 G1 F1500 M302 S0 always allow ext...

Page 29: ...ze the gcode generated by cura you need to import the slice configuration file and operate as shown below 1 Select Print Settings Configuration File Manage Configuration File 2 Select Import to import...

Page 30: ...ebsite https www eazao com Configure Cura s parameter slice print settings as shown below or import the configuration file directly eazao_zero_cura silcing setting curaprofile If you cannot import you...

Page 31: ...PRINTING Shell 22...

Page 32: ...PRINTING Infill Material 23...

Page 33: ...PRINTING Speed Special modes 24...

Page 34: ...3 Top Bottom Thickness Determines the thickness of the bottom top of the model 4 Filling Density Determines the degree of density of the mesh fill inside the model generally set below 15 5 Print tempe...

Page 35: ...needs to be sliced Cura supports models in the STL OBJ AMF format NOTE Files in grey are outside of the print area and need to be moved or scaled to fit 2 Model slice Adjust the model Left click on t...

Page 36: ...3 View slice details After setting the slice parameters select Slice Preview PRINTING 27...

Page 37: ...Note The SD card used for offline printing must be Fat32 and the capacity is no more than 2G 3 Start printing Click the drop down menu in the lower right corner and select Save to File PRINTING 28...

Page 38: ...necting the printer to the computer the operation is the same as above Note Please start Cura after the machine is connected to the computer and powered on Some computers may need to install driver su...

Page 39: ...e clay outlet of the cartridge and place it in a cool place 5 1 Servicing your Eazao Zero 5 1 1 Extruder cleaning 5 1 2 Electric putter cleaning If the clay is used up please refer to this step to ret...

Page 40: ...t printing or replace the cartridge make sure that the electric putter is in the back position and use the electric putter back function To select the stroke click the button 10 200 2000 twice to make...

Page 41: ...e electric putter in the pre extrusion mode Direction selection click the button In to push the electric putter forward and push the clay into the tube and extruder When the extruder has extruded the...

Page 42: ...l be visible Sponge dipped in water will reduce these step marks in the model 1 Ensure that safety goggles and a mask are worn of protection 2 Wipe dry prints with a sponge dipped in water being caref...

Page 43: ...arding the disposal of packaging and dispose of it appropriately for recycling Contact your local authorities for advice on recycling facilities in your area Observe any local regulations regarding th...

Page 44: ...ting your SD Card and reloading the GCODE file NOTE Reformatting will delete all files on your SD card Not moving when starting to print Make sure that the temperature settings in cura are all 0 C and...

Page 45: ...the menu 9 1 3 Other Problems Display Provides the main interface for operating the 3D Printer Firmware Software that is programmed into the electronic board GCODE Code that is produced using the sli...

Page 46: ...softness and hardness of the clay during printing Moderate At the same time clean the clay in the extruder and make sure that there is no too hard clay to block the extruder or the feeding tube every...

Page 47: ...APPENDIX References Some of the 3D Models used in this manual and other included materials were sourced from the below https www thingiverse com 38...

Page 48: ...u save this data elsewhere prior to sending the product for repair You should also be aware that rather than repairing goods we may replace them with refurbished goods of the same type or use refurbis...

Page 49: ...40...

Page 50: ......

Reviews: