39
Operation
EATON TFX INSTALLATION AND OPERATION MANUAL
6046279-001
September 2019
www.eaton.com
3
3
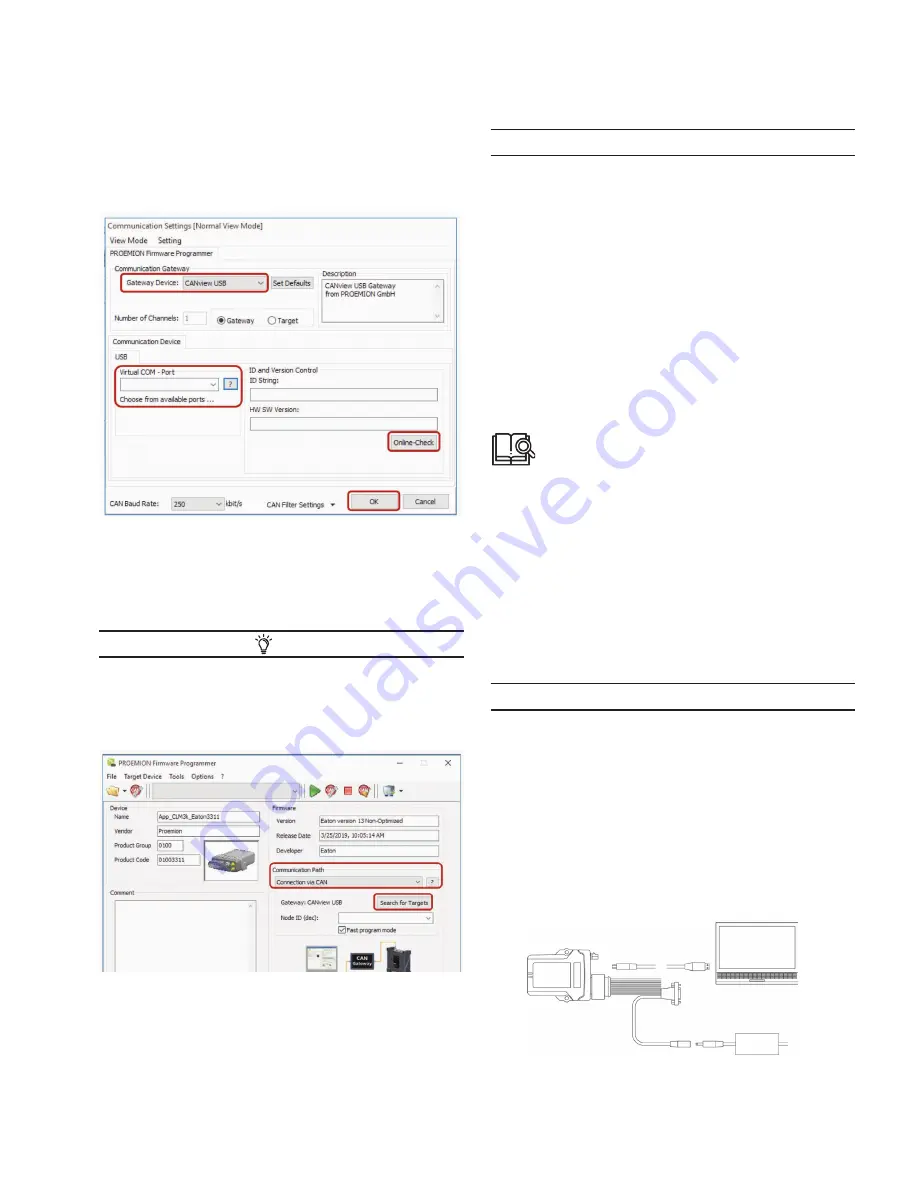
If there is a connection to the TFX Support Tool, the
device name and software version will be shown in
the corresponding fields.
9. Click on the OK button to save the settings.
10. In the list in the
C
ommuniCation
p
ath
field, select the
interface
C
onneCtion
via
C
an
.
11. Click on the
s
earCh
for
t
argets
button.
3
3
The device’s node ID is adopted.
TIP
If you use a CANviewUSB as a gateway, check the FAST
PROGRAM MODE box.This increases the speed of the
update process.
12. Click on the
s
tart
f
irmware
D
ownloaD
button.
13. Wait until the update is finished.
NOTICE
Device defect due to power failure.
Destroyed file system on the device. Repair by
PROEMION necessary.
•
Do not disconnect the device from the power supply until
the process has been completed.
3
3
During the firmware update, the LEDs light up green
in the same sequence.
3
3
In the field
f
irmware
D
ownloaD
l
og
, the message
f
irmware
D
ownloaDeD
s
uCCessfully
appears when the
firmware update is complete.
3
3
The device restarts automatically.
3
3
After the restart, the device uses the updated
firmware version.
You can find a tutorial on how to install the firmware
to the device in the download area of our website.
See also chapter Service and support.
5.9.3 Micro-USB-A
In order to load the firmware update (*.FWBIN) to the device
via the micro-USB port, the device must be connected to a
PC with a USB connection using a USB A to micro-USB-A
cable. Additionally, the PROEMION Firmware Programmer
must be installed on your PC. If you do not have a USB A
to micro-USB-A cable, perform the firmware update either
remotely or by CAN
If you use the micro-USB-A cable the device automatically
starts in bootloader mode.
NOTICE
Risk of property damage
Pay attention that the micro-USB plug is correctly aligned to
the micro-USB port of the TFX before being plugged in and
that it is plugged in without using excessive force. Incorrect
alignment during connection or the use of excessive force
could cause damage to the micro-USB port.
1. Connect the device to a PC with the USB cable, USB
A-Micro USB A, 1.8 - 2 m.
2. Connect the device to the power supply grid with the
CLM3 start cable, 6 open, 2 dsub, 1 pw, 2 m and the
power supply unit from the starter kit.
Fig 10. Connecting the TFX to a PC


