SHIPPING THE UPS IN A RACK
Eaton 9910 UPS and EBM Installation Guide (6000 VA Models)
S
P-164000007 Rev 1
34
3.
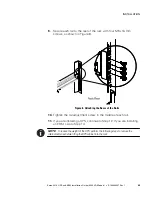
Remove the four screws that secure the front of the UPS to the
rack cabinet. Keep the four screws.
4.
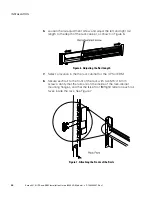
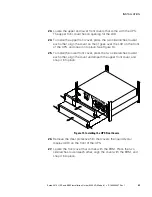
Align the shipping bracket with the front of the UPS, with the
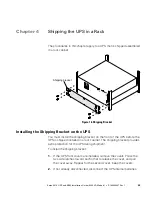
support lip under the UPS. See Figure 16.
5.
Secure the shipping bracket and the UPS to the rack cabinet with
the four screws that you removed in Step 3, as shown in Figure 16.
6.
To attach the lower front cover, press the two side latches toward
each other, align the cover over the shipping bracket and snap into
place. To attach the upper front cover, press the two side latches
toward each other, align the cover over the LCD, and snap it into
place.
Removing the Shipping Bracket from the UPS
If the UPS was shipped installed in a rack cabinet, a shipping bracket is
installed to provide extra protection for the UPS during shipment. Before
using the UPS, remove the shipping bracket on the front of the UPS.
To remove the shipping bracket:
1.
If the UPS front covers are installed, remove the covers. Press the
two side latches toward each other to release the cover, and pull
the cover away. Repeat for the second cover. Keep the cover.
2.
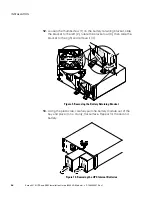
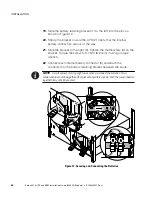
Remove the four screws that secure the shipping bracket and the
UPS to the rack cabinet. Keep the four screws. See Figure 16.
3.
Remove the shipping bracket and save it in case you have to ship
the UPS in the rack cabinet in the future.
4.
Secure the front of the UPS to the rack cabinet with the four
screws that you removed in Step 2.
5.
Connect the UPS internal batteries, if appropriate to your installation
process. See Step 22 on page 26 for detailed instructions.
6.
To attach the upper front cover, press the two side latches toward
each other, align the cover over the LCD, and snap it into place. To
attach the lower front cover, press the two side latches toward
each other, align the cover underneath the upper cover, and snap it
into place.


