CALIBRATION CHECK
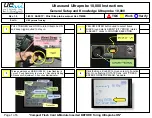
Use the program Values to check if the detector readings are within specified tolerances.
Quick check
1. Tap to zero set the value.
2. Place a shim under the magnet base to lift the M-unit 1 mm (100 mils). The M-unit’s reading shall correspond to
the movement within 1 % (1 mil ± 1 digit) (0.01 mm ± 1 digit).
3. Remove the shim from the M-unit.
4. Tap to zero set value.
5. Make a mark to mark out the position of the detector.
6. Place the shim under the magnet base of the S-unit. The S-unit’s reading shall correspond to the movement
within 1 % (1 mil ± 1 digit) (0.01 mm ± 1 digit).
A. Make sure that the distance is kept.
B. Parallel lift to a known distance. Shim exactly 1 mm.
NOTE!
The shim must be exactly 1 mm. In this example it is only the M-unit that is checked.
Precision check
1. Fasten one of the measuring units in a machine tool.
2. Tap to zero set value.
3. Move the unit a known distance. Use the movement of a machine tool spindle.
4. The fastened unit’s reading shall correspond to the movement within 1 % (1 mil ± 1 digit) (0.01 mm ± 1 digit).
Move the unit a known distance.
NOTE!
In this example it is only the unit fastened in the machine that is checked.
31
VALUES
Summary of Contents for XT11
Page 1: ...User Manual English 05 0835 EN Revision 2 0 User Manual last built 9 12 2017...
Page 2: ......
Page 6: ...This page intentionally left blank to ensure new chapters start on right odd number pages...
Page 32: ...32...
Page 58: ...A Offset B Angular C Both offset and angular misalignment 58 BELT...
Page 74: ...Part No 12 0985 Camera removed from XT11 74 TECHNICAL DATA...


