51
Phone:(910) 392
‐
2490
Fax: (910) 392
‐
2123
416 Landmark Drive
Wilmington, NC 28412
www.easterninstruments.com
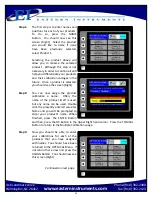
Step 6:
You
should
now
see
the
I/O.WEIGHT.SP page. The WEIGHT
TARGET
Bu on is highlighted in
Yellow. You can change the Weight
Target by pressing the current
Weight Target value twice. The
fi
rst
press will outline the value in black,
as shown. The second press will
bring up a numeric keypad and the
Target Weight can be changed. The
acceptable range for a Weight
Target is displayed at the bo om of
the WEIGHT TARGET Bu on.
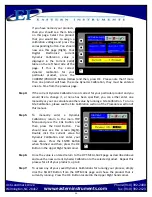
Step 7:
Now return to the I/O.ALARM.SP
page by pressing the OK Bu on in
the upper right hand corner of the
screen. You must now choose
which type of Weight Output you
would like to u lize. Press the
WEIGHT OUTPUT Bu on for your
op ons. You should now be on the
I/O.WEIGHT.OUT page. More infor
‐
ma on on the two types of Weight
Output, Pulse and Latch, can be
found on the I/O.WEIGHT.OUT page
in the Screen Guide sec on of the
manual.
Step 8:
If a Pulsed Weight Output is chosen, you should enter a dura on for the Pulsed
Alarm. This is accomplished by pressing the DURATION Bu on, double clicking on
the old dura on value and entering your new dura on value via the numeric
keypad as before and press the OK Bu on.
Step 9:
Return to the I/O.ALARM page by pressing the TO ALARM Bu on on the upper
right hand corner of the screen. You must now select your logic. Press the LOGIC
Bu on and select your logic. Details on the LOGIC Bu on can be found in the HMI
Screen Guide for the I/O ALARM PAGE.
Step 10:
Return to the I/O.ALARM page once more. To turn the alarm on, press the ENABLE
Bu on un l “YES” is displayed in the blue display box to the right of the ENABLE
Bu on.


