background image

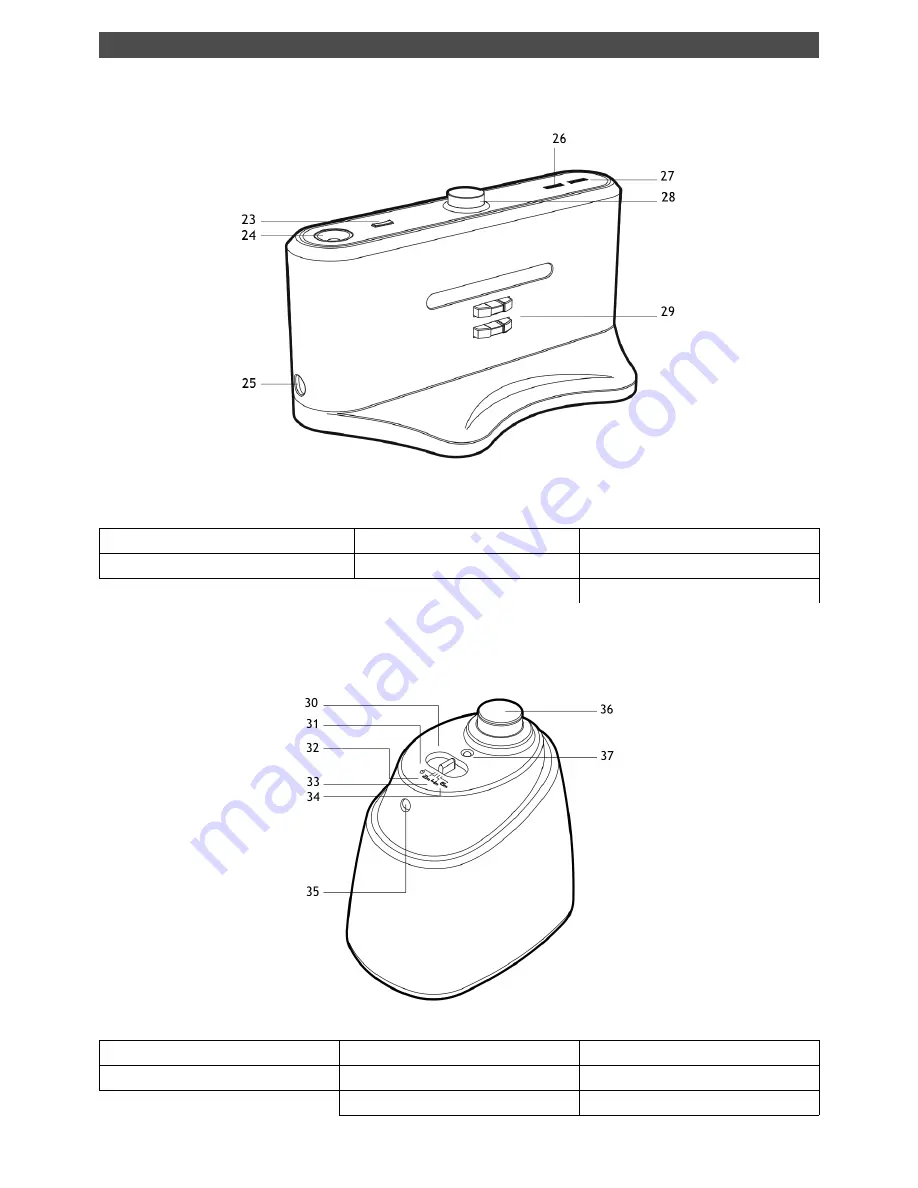
 5. Name of e.ziclean FURTIV parts

C. DOCKING STATION

23. Swith ON of Decorative Light

25. Charging Power socket

27. Charging Indicator

24. Decorative Light

26. Power Led

28. IR Signal
29. Charging Connectors

D. IR BARRIER

30. Main switch

32. 2 meters range

35. IR Signal

31. OFF position

33. 4 meters range

36. IR Emitter

34. 6 meters ranges

37. Power led

Summary of Contents for FURTIV

Page 1: ...e ziclean e ziclean FURTIV Vacuum Cleaning Robot User Manual ...

Page 2: ...Welcome to E ZICOM ...

Page 3: ...EKLY SCHEDULE INFORMATION 12 8 Navigation functions of e ziclean FURTIV 12 9 Maintenance of your e ziclean FURTIV robot 13 A HOW TO CLEAN THE DUST BOX AND FILTERS 13 B USAGE OF THE CLEANING MOP 14 C MAINTENANCE OF MAIN BRUSHES 14 D MAINTENANCE OF THE SIDE BRUSH 15 E CLEANING STAIR SENSORS AND INFRARED DETECTOR 15 10 batteries Installation 16 A INSTALLATION OF IR BARRIERS BATTERIES 16 B INSTALLATIO...

Page 4: ...ase visit our www e zicom com website Topic Register your robot 3 Precautions of use e ziclean FURTIV vacuum robot is only intended for domestic use Please carefully read the following use instructions No one other than personal service designated by our company is allowed to disassemble repair or alter this product otherwise fire electric shock or personal injury may be caused Do not use any char...

Page 5: ...4 Box content e ziclean FURTIV Robot Dock Station IR Barrier Remote Control Charger Supply Mopping Kit 2 Mops 1 additional HEPA Filter 1 additional side brush Cleaning tool ...

Page 6: ...g lamp 2 Infrared signal receiver 9 Battery cover 16 Left wheel 3 Auto charging electrode 10 Side cleaning brush 17 Floor brush 4 Dustbin key 11 Ground detection sensor 18 Main brush 5 Display screen 12 Right wheel 19 Trailing bar 6 Sensor window 13 Power switch 20 Mop pad 7 Front wheel 14 DC socket 21 Dustbin 22 Air outlet window ...

Page 7: ...corative Light 25 Charging Power socket 27 Charging Indicator 24 Decorative Light 26 Power Led 28 IR Signal 29 Charging Connectors D IR BARRIER 30 Main switch 32 2 meters range 35 IR Signal 31 OFF position 33 4 meters range 36 IR Emitter 34 6 meters ranges 37 Power led ...

Page 8: ...ion button 50 Saturday In Scheduling Mode 51 Cleaning Speed Option 52 Back to Dock Station 53 Sunday In Scheduling Mode 54 ON OFF UV Lamp 55 Wednedsay In Scheduling Mode 56 ON OFF Full Go Option Continuous Cleaning F SCREEN DISPLAY 57 Weekly Schedule Display 58 UV Lamp Status 59 ERROR Occured 60 Day Display 61 Automatic Mode Display 62 Hour ERROR Code n 63 Spot Mode Display 64 Battery Status 65 Ch...

Page 9: ...r socket of the Dock Station Tidy up the electric wire along the wall to avoid obstructing the robot navigation B MANUAL CHARGING OPTION You can directly charge the cleaner with its power adapter or with the charging dock station When charging directly through the power adaptor please connect the output plug of the adapter within the charging socket of the robot When charging with the charging doc...

Page 10: ... charging status information are displayed as follow While charging e ziclean FURTIV battery display will blink gradually Once fully charged the battery display will stop blinking showing 3 full grades Advises e ziclean may fail to find the docking station due to some obstacles Placing the dock station in a wide space will enhance the robot s docking action ...

Page 11: ...he corresponding Day button from your remote control The selected days will be displayed as follow SUN Sunday MON Monday TUE Tuesday WED Wednesday THU Thursday FRI Friday SAT Saturday m Press to start editing the departure hour n Press to select the minutes Then confirm with o Press to select the hour p Finish your weekly schedule setting up pressing Note e ziclean FURTIV will leave its dock stato...

Page 12: ...ctions of e ziclean FURTIV e ziclean FURTIV provides an optimized cleaning coverage navigation thanks to a clever moving system combining different patterns of moves SPIRAL The robot will focus on a small area turning in circles SQUARE The robot will focus on a specific area and enlarge its cleaning coverage moving in square ZIG ZAG The robot will go back and forth all along the room m ALLONG THE ...

Page 13: ...o continue to use you robot in the best performing conditions here are some procedures to take into account A HOW TO CLEAN THE DUST BOX AND FILTERS Press the eject button of the dust box Attention Do not wash your dust box using water Take off the HEPA filter as described in the scheme below Clean it out replace the filter into the dust box correctly Advises You can use the cleaning tool to ease t...

Page 14: ...iciency especially on hard floors such as linoleum tiles After using just pull the holder out It s recommended to wash and twist dry the mopping cloth before each use of the mopping function In case of not using the mop simply detach the compartment from the back of the robot C MAINTENANCE OF MAIN BRUSHES Take out the brushes using the swith button as above Once cleaned out replace them correctly ...

Page 15: ...ive back your side brush shape putting them into water for few minutes E CLEANING STAIR SENSORS AND INFRARED DETECTOR The sensors and infrared detector should be cleaned by using a cotton swab or soft cloth The wall following sensors are installed in the front of bumper of the cleaner the ground detection sensors are installed at the front bottom of the cleaner see the figure above ...

Page 16: ... is powered by two 1 5V batteries Simply unscrew the cover at the base of the IR Barrier and close it once the batteries are properly installed in accordance with the direction indicated on the bottom cover B INSTALLATION OF REMOTE CONTROL BATTERIES Simply insert two AAA batteries ...

Page 17: ...D MAINTENANCE AND SAFETY INSTRUCTIONS Remove batteries from your appliances if not used for a long time Switch off your apliance while operating a battery change Once batteries are out of used through them into a trash provided for this purpose 11 IR Barriers settings A FUNCTIONS OF THE IR BARRIER ICONS WALL STATUS WALL RANGE Off 0m 2m Short 2m 4m Medium 4m 6m Long 6m ...

Page 18: ...IR Barrier generally must be placed at the entrance of the room to be cleaned It is also possible to place it on a spot where you do not want the robot vacuum cleaner to operate Finally make sure no obstacles may block the infrared communication between e ziclean robot and the IR Barrier Now just turn the IR Barrier ON and select the appropriate operating distance The more the selected distance is...

Page 19: ...d enough any more Do not use e ziclean vacuum robot on thick or fringe carpets Avoid using the robot in particularly congested cables areas or anything else likely to get bogged down in the brush of your device Make sure the robot is fully charged before starting its cleaning work If the device is not used for a long period remove the battery from the unit and store it in a safe place ...

Page 20: ...e Clean the overall main brush compartment Make sure that both brushes are running correcly E004 Left wheel engine issue Check the left wheel status E005 Right wheel engine issue Check the right wheel status E006 Both main wheels problem Check both wheels status E007 Robot is lifted up Place the robot back on the ground E008 Overheating battery While charging check if the battery is not overheatin...

Page 21: ...cleaner Wipe the IR sensor or the beam sensor of the controller using clean and dry cloth Keep proper distance between the cleaner and the remote control and then operate the controller functions targeting the IR receiver located on your robot cover To ensure a more effective cleaning of this robot please clean the sensors regularly D The robot fails to fulfill self charging Check whether the powe...

Page 22: ...r Sales Conditions For more information Warranty and After Sale Service Please contact us through our official website http www e zicom com How to use e ziclean vacuum robot cleaner Contact with your retailer or visit our website Discover all accessories to equip e ziclean FURTIV robot All e ziclean accessories are available on our website http www e zicom com ...

Page 23: ......

Reviews: