background image

Tutorials
Cakewalk Sonar LE

28

Creative Professional

8.

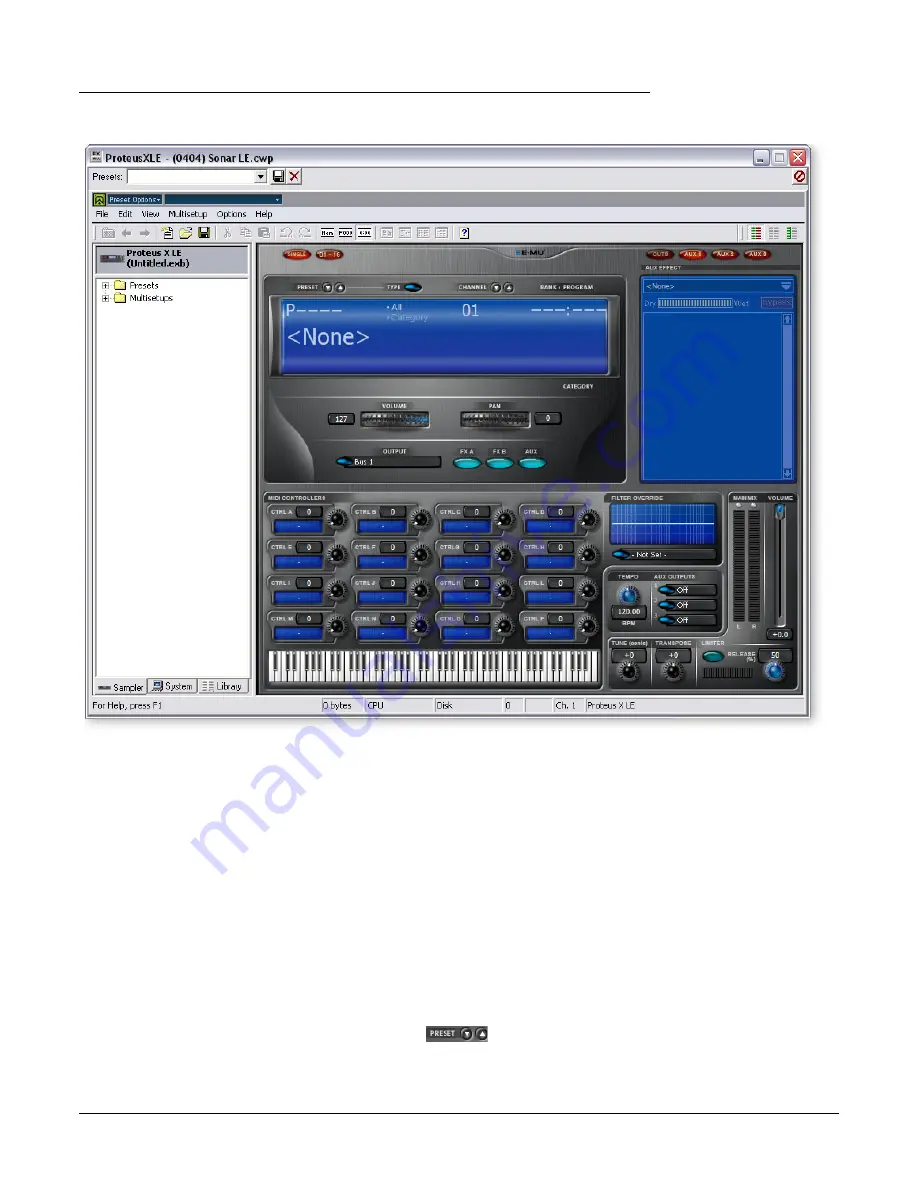
The Proteus X LE editor screen shown below appears.

Load the Proteus X Composer Bank

9.

Proteus X LE is now running, but you need to load a bank of sounds.

10.

Choose 

Open

 from the 

File

 menu on Proteus X LE. Locate and load the Proteus X 

Composer bank, which is located here: (“Program Files/Creative Professional/E-MU 
Sound Central”) The bank takes a few seconds to load.

Play the Proteus X Composer Bank

11.

Click on the mini keyboard

 at the bottom of the window. You should be hearing 

sound. If not, close Sonar LE, and verify that you have the PatchMix DSP 

Product 

Default 

session loaded. Then close and restart Sonar LE.

12.

Play your MIDI keyboard

 (if connected) and verify that it plays Proteus X LE.

13.

Change the Preset 

using the preset inc/dec keys. 

14.

Feel free to play around for awhile and don’t worry about losing anything. Nothing 
is made permanent until you 

Save

 the bank, so have fun.

Summary of Contents for 404

Page 1: ...X LE Steinberg Cubase LE Steinberg WaveLab Lite Cakewalk Sonar LE Ableton Live Lite 4 for E MU Digital Audio System Digital Audio System Tutorials E MU Proteus X LE Steinberg Cubase LE Steinberg WaveL...

Page 2: ...eserved Software Version 1 8 E MU 0404 Digital Audio System E MU World Headquarters E MU Systems 1500 Green Hills Road Scotts Valley CA 95067 0015 USA Europe Africa Middle East Creative Labs Ballycool...

Page 3: ...14 To Record a MIDI Track on another MIDI Channel 14 Steinberg WaveLab Lite 15 1 Setting up WaveLab Lite 15 2 Turning on the PatchMix WAVE Send 16 3 Recording 17 Cakewalk Sonar LE 19 1 Setting up Son...

Page 4: ...4 Creative Professional Recording Monitoring with Effects 39 The Order of Effects 39 About PatchMix DSP 40 About ASIO 40 IMPORTANT Activating ASIO 40 An Example 40 ASIO Channels are STEREO 40...

Page 5: ...ds coming out of the E MU hardware and your speakers when you play a CD or an MP3 using Windows Media Player If not make sure your E MU hardware is properly connected according to the diagrams in the...

Page 6: ...n Cubase LE from the Start menu or by double clicking the desktop icon An ASIO multimedia driver test dialog box will pop up to ask if you want to run the ASIO test Choose No because you won t be usin...

Page 7: ...ct window shown below appears Five empty tracks are ready to record Each track is already connected to an input in PatchMix 4 Select the Track that matches the inputs you ve connected to the Digital A...

Page 8: ...he new track If you wish to record multiple tracks simultaneously simply turn Record Enable on for each track you wish to record f A quick way to record additional tracks using the same input is to si...

Page 9: ...Mixer Track Cubase LE ASIO 31 32 Monitor Digital Audio System Hardware PatchMix Input Strip PatchMix Strip ASIO Out 31 32 PatchMix Main Mix PatchMix Main Mix VST Inputs Aux Bus 1 ASIO Send 7 8 Digital...

Page 10: ...tracks recorded 1 Drag the Right Locator little blue triangle to the right Keep dragging until the blue Locator Bar encompasses the entire song or section you want to mix down See above Mix your Song...

Page 11: ...n appears First choose a location for your file 6 Next choose the file type Cubase LE can export as WAVE wav AIFF aif MPEG Layer 3 mp3 RealAudio G2 rm or Windows Media Audio wma WAVE is a good choice...

Page 12: ...sing the setup diagrams and instructions that came with your E MU Digital Audio System Without a keyboard you will only be able to play one note at a time using the mini keyboard on Proteus X LE 1 Fro...

Page 13: ...channels at once It s far more CPU efficient to have multiple MIDI channels playing on one instance of Proteus X LE rather than to have multiple VSTi s running 6 Take a look at the Inspector area on t...

Page 14: ...ng 15 Press Stop when you re finished recording the first track and press the Return to Zero button 16 Press Play on the Cubase Transport to play back your track To Record a MIDI Track on another MIDI...

Page 15: ...ow latency multi track recording After you have finished the tutorial we encourage you to read the WaveLab Lite pdf manual in order to learn about all the features of this powerful program 1 Setting u...

Page 16: ...ult from the list f The TV screen shows the details of whichever insert you click on In the example at left the Insert Send highlighted in yellow is shown is the TV screen Supply Audio to PatchMix 3 C...

Page 17: ...e two mono inputs as a stereo pair simply turn up the Aux 1 Sends for both mono channels To record in mono just turn up one channel 3 Recording 1 Click the red Record button on the WaveLab Lite transp...

Page 18: ...possible audio quality Record 5 Click the red Record button on the record dialog box Recording begins 6 Click the Stop button to stop recording A new untitled window appears with your recording Normal...

Page 19: ...the first time Sonar LE will remember these settings so you ll only have to do this once Setup the Audio Options 1 Choose the 0404 Sonar LE session from the Start Programs menu The path is Program Fi...

Page 20: ...lowing screen appears 8 Select the E DSP MIDI Ports for inputs and outputs then click OK to close the window E To Set the Location of your Audio Files 1 Select Global from the Options menu then 2 Sele...

Page 21: ...ck is already connected to an input or pair of inputs in PatchMix 3 Click the Zoom In Vertical button repeatedly to enlarge the tracks as in the Project Window below 4 Select the Track which matches t...

Page 22: ...o PatchMix on the ASIO Out 31 32 Strip Go look and see 12 If you want to dump the track and start over Right click over the waveform display in the track and choose Delete Record Another Track 13 Pres...

Page 23: ...sic components a a physical input strip for your input source b a send from this strip to an ASIO input so that Sonar LE can receive your input c an ASIO output strip for Sonar LE to output its audio...

Page 24: ...r multitrack project to stereo Sonar LE has a special function Export Audio that makes this a simple job The Sonar LE Project window below shows a short song with 3 stereo tracks recorded Mix your Son...

Page 25: ...Sonar LE pdf manual for details Export Audio 3 From the Sonar LE Project window select Export from the File menu and choose Audio 4 The following screen appears First choose a location for your file 5...

Page 26: ...came with your E MU Digital Audio System Without a keyboard you will only be able to play one note at a time using the mini keyboard on Proteus X LE Select the Virtual Instrument 1 From the Sonar LE P...

Page 27: ...f the MIDI tracks 6 Select E DSP MIDI Port as the MIDI input and select MIDI Omni as shown at right MIDI Omni allows Proteus X LE to receive all 16 MIDI channels Proteus X LE is multitimbral and can a...

Page 28: ...Sound Central The bank takes a few seconds to load Play the Proteus X Composer Bank 11 Click on the mini keyboard at the bottom of the window You should be hearing sound If not close Sonar LE and veri...

Page 29: ...rt as the MIDI input for the new MIDI track Select MIDI Omni as you did before 22 Select Proteus XLE as the Output destination for the track 23 Bring up Proteus X LE again and select MIDI Channel 2 us...

Page 30: ...lly to ensure that Ableton Live Lite 4 runs smoothly the first time Ableton Live Lite 4 will remember these settings so you ll only have to do this once 1 Open Ableton Live Lite 4 from the Start menu...

Page 31: ...SEND in that strip The ASIO Channels will be displayed in the PatchMix TV screen 10 After you have made your selections click OK to close the dialog box Set up Plug ins The following steps allow Ablet...

Page 32: ...the Preferences dialog box The following screen appears 18 Select Wav as the File Type in the Audio Recording section of the dialog box 19 Select 24 as the Bit Depth in the Audio Recording section of...

Page 33: ...strument 1 If you began with Tutorial 1 Setting up the Preferences you should have a new set open with two audio tracks and two MIDI tracks such as the one shown below If you have another set open sel...

Page 34: ...of the window You should be hearing sound If not close Ableton Live Lite 4 and verify that you have the PatchMix DSP Product Default session loaded Then close and restart Ableton Live Lite 4 9 Change...

Page 35: ...Find some other MIDI loops and drop them into the other slots of the track Hint look in different folders Click on the Clip Launch Buttons to switch between clips Add Another MIDI Track Ableton Live L...

Page 36: ...into the Proteus X LE editor 29 Double click on one of the currently playing MIDI clips The Clip View appears at the bottom of the window 30 Select the Show Hide Notes Box located in the lower left co...

Page 37: ...the top of Track 3 then click the Wrench icon on the Device Title Bar Make sure you re changing the sound on channel 2 Ready to Record 40 Start up the bass line on track 3 MIDI and practice playing a...

Page 38: ...cord into Recording begins immediately The circle turns into a green triangle 7 To stop recording press the spacebar and turn off the red Record Enable button 8 Set the Monitor to Auto to and click th...

Page 39: ...allows you to hear your performance with effect to get the proper feel but gives you the flexibility to add or modify effects later during mixdown This way if you don t like the way the effect sounds...

Page 40: ...need this additional power right away Use PatchMix in the background if you prefer and come back to it whenever you re ready About ASIO ASIO stands for Audio Stream In Out and is a standard communicat...

Page 41: ...ning Proteus X LE in 12 setting up 6 tutorial 6 D Device Setup Cubase LE 6 Devices 12 menu Cubase LE 6 Sonar MIDI 20 Direct Monitoring box 6 E E DSP MIDI Ports Sonar LE 20 E DSP Wave WaveLab Lite 15 E...

Page 42: ...ar LE 21 into WaveLab Lite 18 Recording Effects or Recording Dry 39 Recording Mono Inputs as Stereo Cubase LE 9 WaveLab Lite 17 S Save Audio File WaveLab Lite 18 Save Live Set Ableton Live Lite 36 Sav...

Reviews: