


10
④
Turn the device upside down and
then turn the screws in firmly.
⑤
Fix the HDD firmly
.
⑥
Connect the HDD cable and
power cable.
⑦
Put the cover in accordance with the
clip and then place the upper cover
back.
⑧
Secure the screws in the rear panel
and the side panel.
Important:
You can connect the HDD data cable and the power cable first and then fix the HDD in the device.
Please pay attention to the front cover. It adopts the vertical sliding design. You need to push the
clip first and then put down.
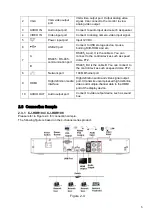
3.4
Connecting Power Supply
Please check input voltage and device power button match or not.
We recommend you use UPS to guarantee steady operation, DVR life span, and other peripheral
equipments operation such as cameras.
3.5
Connecting Video Input and Output Devices
3.5.1 Connecting Video Input
The video input interface is BNC. The input video format includes: PAL/NTSC
BNC
(
1.0V
B
P- P
,
B
75Ω.
)
The video signal should comply with your national standards.
The input video signal shall have high SNR, low distortion; low interference, natural color and suitable
lightness.
Guarantee the stability and reliability of the camera signal:
The camera shall be installed in a cool, dry place away from direct sunlight, inflammable, explosive
substances and etc.
The camera and the DVR should have the same grounding to ensure the normal operation of the
camera.
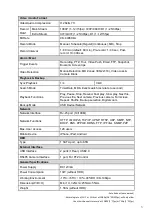
Summary of Contents for CJ-HDR104
Page 1: ...HD Analog Recorder User s Manual Model No CJ HDR104 CJ HDR108 Version 1 0 4...
Page 6: ...v 6 FAQ 150 APPENDIX A HDD CAPACITY CALCULATION 155...
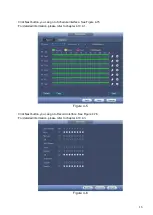
Page 76: ...68 Figure 4 74 Figure 4 75...
Page 80: ...72 Figure 4 79 Figure 4 80...
Page 86: ...78 Figure 4 89 Figure 4 90...
Page 94: ...86 Figure 4 99 Figure 4 100...


