


Chapter 5:Connection Mode
57
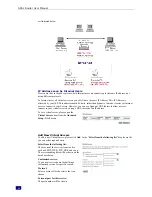
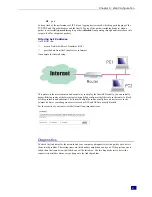
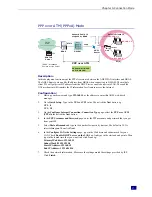
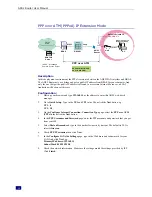
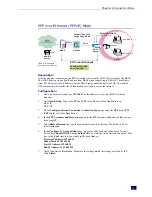
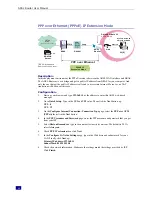
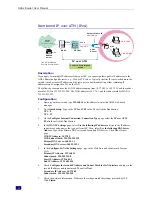
PPP over ATM (PPPoA) Mode
RDAIUS
Server
AAA
BRAS
STM-1
DSLAM
Loop
Dynamic Public IP
assigned by BRAS
PPPoA+NAT+DHCP
on Private LAN
Hub
ADSL
Router
Ethernet
PC(S)
192.168.1.3
192.168.1.2
PPP over ATM
Default Private IP
192.168.1.1
ISP
(Internet Service Provider)
*BRAS: Broadband
Remote Access Server
Description:
In this deployment environment, the PPPoA session is between the ADSL WAN interface and BRAS.
The ADSL Router gets a public IP address from BRAS when connecting to DSLAM. The multiple
client PCs will get private IP address from the DHCP server enabled on private LAN. The enabled
NAT mechanism will translate the IP information for clients to access the Internet.
Configuration:
1.
Start up your browser and type
192.168.1.1
as the address to enter this ADSL web-based
manager.
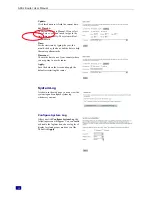
2.
Go to
Quick Setup
. Type in the
VCI
and
VPI
value. Then click the
Next
button. eg:
VPI – 0
VCI – 38
3.
On the
Configure Internet Connection -Connection Type
page, select the
PPP over ATM
(PPPoA)
then click the
Next
button.
4.
In the
PPP Username and Password
page, enter the PPP username and password that you got
from your ISP.
5.
Select
Dial on Demand
and type in the number for inactivity timeout. The default is 20. Or
select
Always on
Then click
Next
.
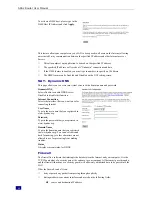
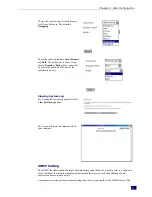
6.
In the
Configure LAN side Settings
page, type in the IP address and subnet mask for your
LAN. Check
Enable DHCP Server on the LAN
box. And type in the start and end points. Then
type in the leased time that you want. And click
Next
. eg:
Primary
IP address:192.168.1.1
Subnet Mask:255.255.255.0
Start IP Address:192.168.1.2
End IP Address: 192.168.1.254
7.
Check the network information. Make sure the settings match the settings provided by ISP.
Click
Finish
.
Summary of Contents for RTA230
Page 1: ...User Manual RTA230 ADSL Router Modem ...
Page 6: ...ADSL Router User Manual vi Appendix 78 Software 78 Hardware 79 ...
Page 75: ...Chapter 5 Connection Mode 67 9 Now the router is well configured You can access into Internet ...
Page 79: ...Chapter 5 Connection Mode 71 ...
Page 85: ...Chapter 7 Glossary 77 ...
Page 88: ...ADSL Router User Manual 80 ...