background image

7

Using the Label Maker for the First Time

The first time you turn on the power, you are asked to 
select the language and label width. These selections 
remain set until you change them.

To set up the label maker

1

Press 

 to turn on the label maker.


The first time you turn on the label maker, the 

system may take a few moments to start up.

2

Select the language and tap 

Next

.

3

Select the width of the label cassette currently in the 
label maker and tap 

Done

.

You are now ready to print your first label.

To print a label

1

Using the keyboard, enter text to create a simple 
label.

2

Press .

The label prints and is 
automatically cut. To turn off the 
auto-cut feature, see 

Turning 

off Auto-Cut

 on page 14.

3

Remove the backing from the 
label to expose the adhesive, 
and then attach the label.

Congratulations!

 You printed your first label. Continue 

reading to learn more about the features available for 
creating labels.

Getting to Know the Label Maker

Become familiar with the location of the function keys on 
your label maker. Refer to Figure 1 on page 5. The 
following sections describe each feature in detail.

Power

The 

 key turns the label maker power on and off. To 

save power, the label maker goes into standby mode 
after two minutes of inactivity. Pressing the 

 key once 

exits standby mode.

To turn the power completely off, press and hold the 


key for five seconds.

When the charging adapter is connected, a clock 
appears in the display while the label maker is in standby 
mode. 

When the charging adapter is not connected, the clock 
does not appear and the label maker remains in standby 
for two additional minutes before the power is turned off.

When the label maker power is turned off automatically, 
the current label text and formatting are remembered and 
will be displayed when power to the label maker is turned 
back on.

When the label maker power is turned off manually or 
when the battery pack is removed and the power 
adapter is disconnected, the current label text and 
formatting are lost.

Home

The 

 key displays the Home screen or cancels any 

dialog box or pop-up message.

Touch Screen Display

You can create and format labels using the touch 
screen display. 

Navigation Keys

You can review and edit your label using the left and right 
navigation keys. You can move through menu selections 
using all four navigation keys, and then press 

 to 

make a selection.

Caps Lock

The 

 key toggles capitalization on or off. When Caps 

Lock is on, the Caps Lock key is illuminated and all the 
letters entered are in uppercase. When Caps Lock is off, 
all the letters entered are in lowercase. The default setting 
is Caps Lock off.

Shift

The   key toggles Caps mode on or off for a single alpha 
character. 

Split backing

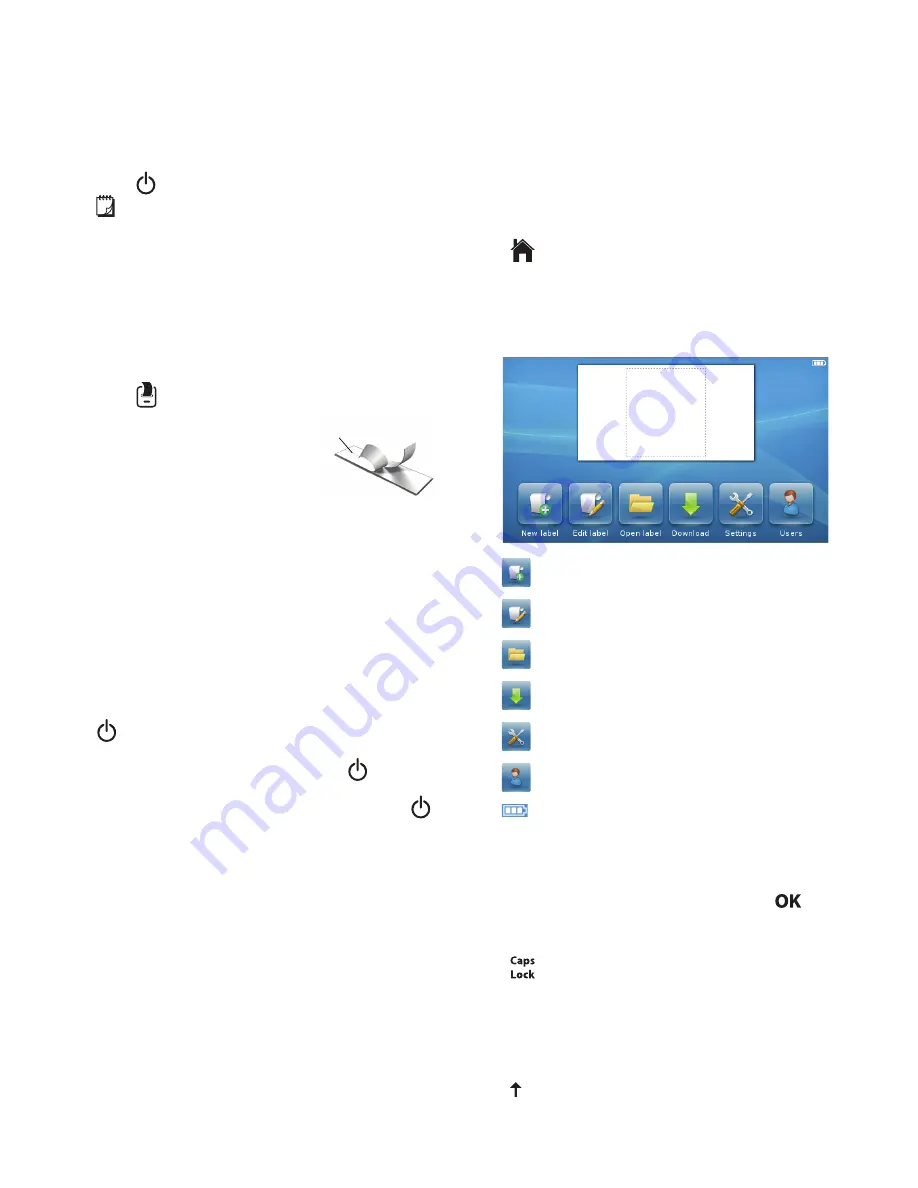
Create a new label.

Edit the current label.

Open a saved or recently printed label.

View downloaded labels.

Change the label maker settings.

Select a user, create new users, and manage 
user settings.

Displays the status of the battery pack.

Summary of Contents for LabelManager 500 Touch Screen Label Maker

Page 1: ......

Page 2: ...the prior written consent of Sanford L P Trademarks DYMO DYMO Label and LabelManager are registered marks in the US and other countries All other trademarks are the property of their respective holder...

Page 3: ...erting Symbols 9 Inserting Clip Art 9 Using Auto Numbering 9 Inserting the Date and Time 9 Inserting Barcodes 10 Inserting Days Months or Quarters 10 Inserting International Characters 11 Using Word S...

Page 4: ...r 15 Cleaning Your Label Maker 15 Calibrating the Touch Screen 15 Using the Label Maker with Your Computer 16 Installing DYMO Label Software 16 Connecting the Label Maker to Your Computer 16 Using DYM...

Page 5: ...ctuation 2 Power connector 9 Symbols Currency 16 Home 3 Touch screen 10 Delete 17 On Off 4 OK 11 Accented characters 18 Cutter 5 Print 12 Space bar 19 Label exit slot 6 Print preview 13 Shift 20 Navig...

Page 6: ...19 Removing the Battery Pack Remove the battery pack when the label maker will not be used for a long period of time Make sure the charging adapter is disconnected before handling the LiPo battery pa...

Page 7: ...e charging adapter is connected a clock appears in the display while the label maker is in standby mode When the charging adapter is not connected the clock does not appear and the label maker remains...

Page 8: ...ng Text You can quickly select text to edit or delete Scrolling a List Dragging a scroll bar moves you quickly through a menu or list Editing Your Label You can choose from several format options to e...

Page 9: ...he Insert tab 2 Select the symbol to insert on your label You can quickly access the punctuation symbols by pressing or the currency symbols by pressing on the keypad Inserting Clip Art The label make...

Page 10: ...Insert tab 2 Tap Barcode The Insert Barcode dialog box appears 3 Select a barcode type from the Barcode type list 4 Enter the data for the barcode in the Barcode data box To insert a symbol tap Add sy...

Page 11: ...Settings list 3 Clear the Use word suggestion check box To delete available word suggestions 1 Tap on the Home screen 2 Select Word Suggestion from the Settings list 3 Tap Manage words The Manage word...

Page 12: ...then tap Save Downloading Labels Using DYMO Label software on your computer you can create labels from a database file and download the labels to the label maker See Using the Label Maker with Your Co...

Page 13: ...ker See Using the Label Maker with Your Computer on page 16 for more information about downloading clip art To delete custom clip art 1 Tap on the Home screen 2 Select Manage Files from the Settings l...

Page 14: ...tte is actually inserted in the label maker To change the label width 1 Tap on the Home screen 2 Select Label from the Settings list 3 Select the width of the label currently inserted in the printer f...

Page 15: ...Clean your label maker and calibrate the screen regularly to keep your label maker working properly Cleaning Your Label Maker Clean your label maker regularly to keep it working properly To clean the...

Page 16: ...tion screen appears 4 Click Install and follow the instructions in the installer To install the software on a Mac OS system 1 Download the latest version of DYMO Label software from the Support sectio...

Page 17: ...and battery pack is charging printing is not possible Label maker is connected and battery pack is not charging Label maker is connected and battery pack is not charging printing is not possible Labe...

Page 18: ...Print Quality Attach the charging adapter to the label maker to recharge the battery pack See Charging the Battery Pack Clean the print head See Cleaning Your Label Maker Ensure the label cassette is...

Page 19: ...entally sound way The crossed bin symbol marked on your device indicates you should use these systems If you need more information on the collection reuse and recycling of this product please contact...

Reviews: