background image

6

About Your New Label Maker

With the DYMO LabelManager 500TS label maker, you 
can create a wide variety of high-quality, self-adhesive 
labels. You can choose to print your labels in many 
different font sizes and styles. The label maker uses 
DYMO D1 label cassettes in widths of 1/4”, 3/8”, 1/2”, 
3/4”, or 1”. Labels are available in a wide range of colors.

Visit 

www.dymo.com

 for information on obtaining labels 

and accessories for your label maker. 

Registering Your Label Maker

Visit 

www.dymo.com/register

 to register your label 

maker online. 

During the registration process, you will need the serial 
number, which is located inside the back cover of the 
label maker.

Getting Started

Follow the instructions in this section to set up your 
label maker.

Connecting the Power

The label maker is powered by a rechargeable, Lithium 
Polymer (LiPo) battery pack.

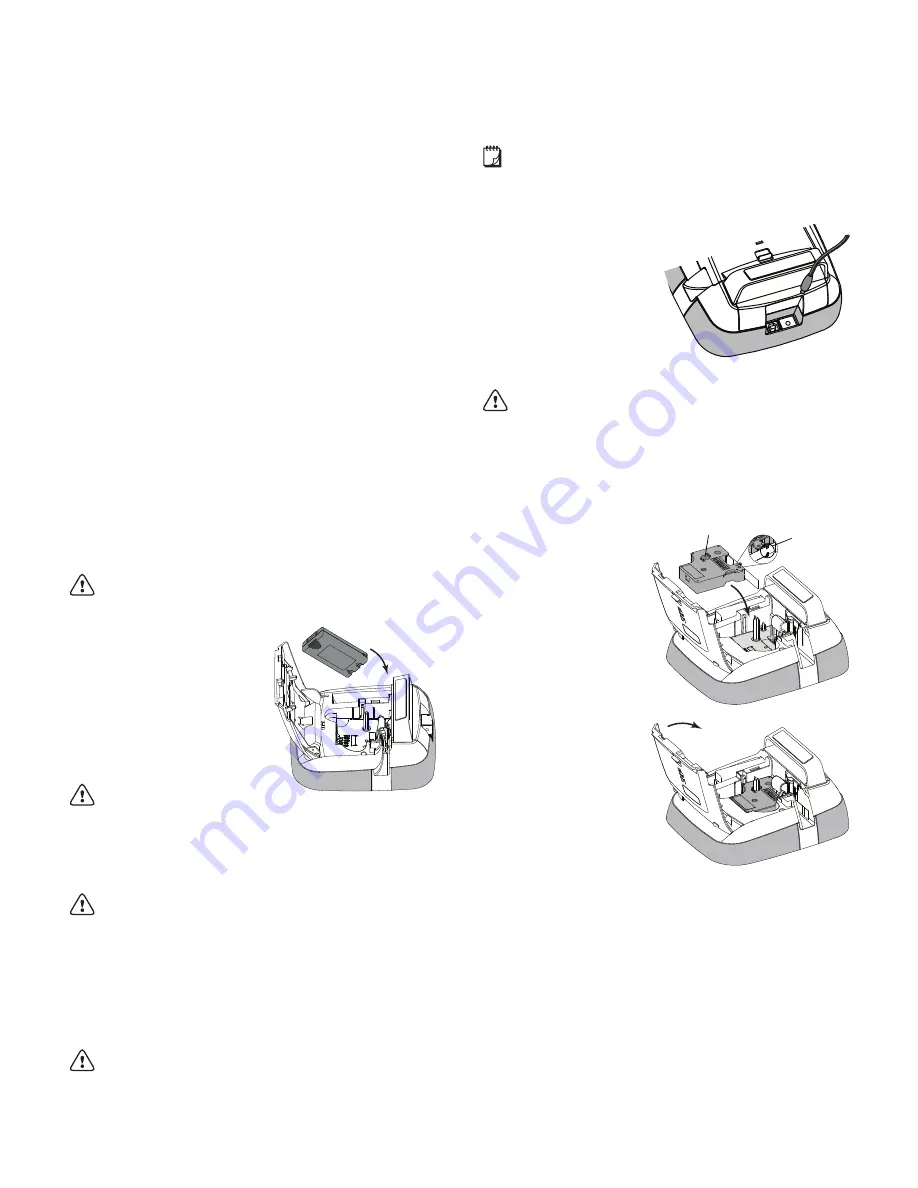
Inserting the Battery Pack

The battery pack included with your label maker comes 
partially charged.

Make sure the charging adapter is disconnected 

before handling the LiPo battery pack.

To insert the battery pack

1

Lift the back cover of the 
label maker.

2

Insert the battery pack into 
the battery compartment 
as shown.

3

Close the back cover of 
the label maker.

Make sure to read the 

LiPo Safety Precautions on page 19.

Removing the Battery Pack

Remove the battery pack when the label maker will not be 
used for a long period of time.

Make sure the charging adapter is disconnected 

before handling the LiPo battery pack.

To remove the battery pack

1

Unplug the charging adapter.

2

Lift the back cover of the label maker.

3

Remove the battery pack from the battery 
compartment.

Make sure to read the LiPo Safety Precautions on 

page 19.

Charging the Battery Pack

Use the charging adapter included with your label maker 
to recharge the battery pack. Charging the battery pack 
will take approximately three hours.

The charging adapter is only used for recharging the 

battery pack.

To recharge the battery pack

1

Turn the label 
maker over.

2

Plug the charging 
adapter into the power 
connector at the top 
of the label maker.

3

Plug the other end of 
the charging adapter 
into a power outlet.

Make sure to read the LiPo Safety Precautions found 

on page 19.

Inserting the Label Cassette

Your label maker uses DYMO D1 label cassettes.

To insert the label cassette

1

Lift the back cover 
of the label maker to 
open the label 
compartment.

2

Make sure the tape 
and ribbon are taut 
across the mouth of 
the cassette and 
that the tape passes 
between the 
label guides.

If necessary, turn 
the ribbon rewind 
spool clockwise to 
tighten the ribbon.

3

Insert the cassette 
and press firmly until 
the cassette clicks 
into place.

4

Close the back 
cover of the label maker.

Label 
guides

Ribbon 
rewind spool

Summary of Contents for LabelManager 500 Touch Screen Label Maker

Page 1: ......

Page 2: ...the prior written consent of Sanford L P Trademarks DYMO DYMO Label and LabelManager are registered marks in the US and other countries All other trademarks are the property of their respective holder...

Page 3: ...erting Symbols 9 Inserting Clip Art 9 Using Auto Numbering 9 Inserting the Date and Time 9 Inserting Barcodes 10 Inserting Days Months or Quarters 10 Inserting International Characters 11 Using Word S...

Page 4: ...r 15 Cleaning Your Label Maker 15 Calibrating the Touch Screen 15 Using the Label Maker with Your Computer 16 Installing DYMO Label Software 16 Connecting the Label Maker to Your Computer 16 Using DYM...

Page 5: ...ctuation 2 Power connector 9 Symbols Currency 16 Home 3 Touch screen 10 Delete 17 On Off 4 OK 11 Accented characters 18 Cutter 5 Print 12 Space bar 19 Label exit slot 6 Print preview 13 Shift 20 Navig...

Page 6: ...19 Removing the Battery Pack Remove the battery pack when the label maker will not be used for a long period of time Make sure the charging adapter is disconnected before handling the LiPo battery pa...

Page 7: ...e charging adapter is connected a clock appears in the display while the label maker is in standby mode When the charging adapter is not connected the clock does not appear and the label maker remains...

Page 8: ...ng Text You can quickly select text to edit or delete Scrolling a List Dragging a scroll bar moves you quickly through a menu or list Editing Your Label You can choose from several format options to e...

Page 9: ...he Insert tab 2 Select the symbol to insert on your label You can quickly access the punctuation symbols by pressing or the currency symbols by pressing on the keypad Inserting Clip Art The label make...

Page 10: ...Insert tab 2 Tap Barcode The Insert Barcode dialog box appears 3 Select a barcode type from the Barcode type list 4 Enter the data for the barcode in the Barcode data box To insert a symbol tap Add sy...

Page 11: ...Settings list 3 Clear the Use word suggestion check box To delete available word suggestions 1 Tap on the Home screen 2 Select Word Suggestion from the Settings list 3 Tap Manage words The Manage word...

Page 12: ...then tap Save Downloading Labels Using DYMO Label software on your computer you can create labels from a database file and download the labels to the label maker See Using the Label Maker with Your Co...

Page 13: ...ker See Using the Label Maker with Your Computer on page 16 for more information about downloading clip art To delete custom clip art 1 Tap on the Home screen 2 Select Manage Files from the Settings l...

Page 14: ...tte is actually inserted in the label maker To change the label width 1 Tap on the Home screen 2 Select Label from the Settings list 3 Select the width of the label currently inserted in the printer f...

Page 15: ...Clean your label maker and calibrate the screen regularly to keep your label maker working properly Cleaning Your Label Maker Clean your label maker regularly to keep it working properly To clean the...

Page 16: ...tion screen appears 4 Click Install and follow the instructions in the installer To install the software on a Mac OS system 1 Download the latest version of DYMO Label software from the Support sectio...

Page 17: ...and battery pack is charging printing is not possible Label maker is connected and battery pack is not charging Label maker is connected and battery pack is not charging printing is not possible Labe...

Page 18: ...Print Quality Attach the charging adapter to the label maker to recharge the battery pack See Charging the Battery Pack Clean the print head See Cleaning Your Label Maker Ensure the label cassette is...

Page 19: ...entally sound way The crossed bin symbol marked on your device indicates you should use these systems If you need more information on the collection reuse and recycling of this product please contact...

Reviews: