DuraComm HE1U-5012-BC-MU Product User Manual Download Page 18


18

   of   23   

August   3,   2016


Alarm Setup 

To   set   up   analog   alarms,   first   you   must   select   the   alarm   channel   to   set.   This   is   accomplished   by   selecting   the   custom   
name   of   the   channel   in   the   dropdown   box   next   to   the   “Analogs”   label.   For   example,   we   are   looking   at   the   settings   for   

the   “Module   #1   Amps”   channel   in   the   screen   above.   Firmware   2.0   includes   additional   settings   for   alarms.   
   
This   screen   is   where   thresholds   are   set   to   define   alarm   conditions   for   the   analog   channels.   You   can   choose   to   set   an   
email   notification   when   the   alarm   conditions   are   met.      
   

Note:   The   maximum   temperature   of   the   temperature   sensor   is   +300   F.   The   low   range   of   the   sensor   is   about   +36   F.   
   
Firmware   2.3   added   the   ability   to   log   alarms.   The   “Log   Alarms”   setting   on   the   “Device   Setup”   Page,   is   the   same   as   the   
“Global   Settings”,   “Log   All   Alarms”   setting   on   this   page.   
   

Digital   output   alarm   conditions   can   be   set   to   “Never   Alarm”,   “Alarm   on   <user   name   for   inactive   state>”,   “Alarm   on   <user   
name   for   active   state>”,   “Alarm   on   (both   states)”.   
   
E-­‐mail   notifications   can   be   set   for   each   analog   alarm   threshold,   as   well   as   digital   alarm   conditions.   Recovery   thresholds   
do   not   send   notifications.   

Firmware   2.7   adds   the   ability   to   configure   Alarm   recovery   notifications.   


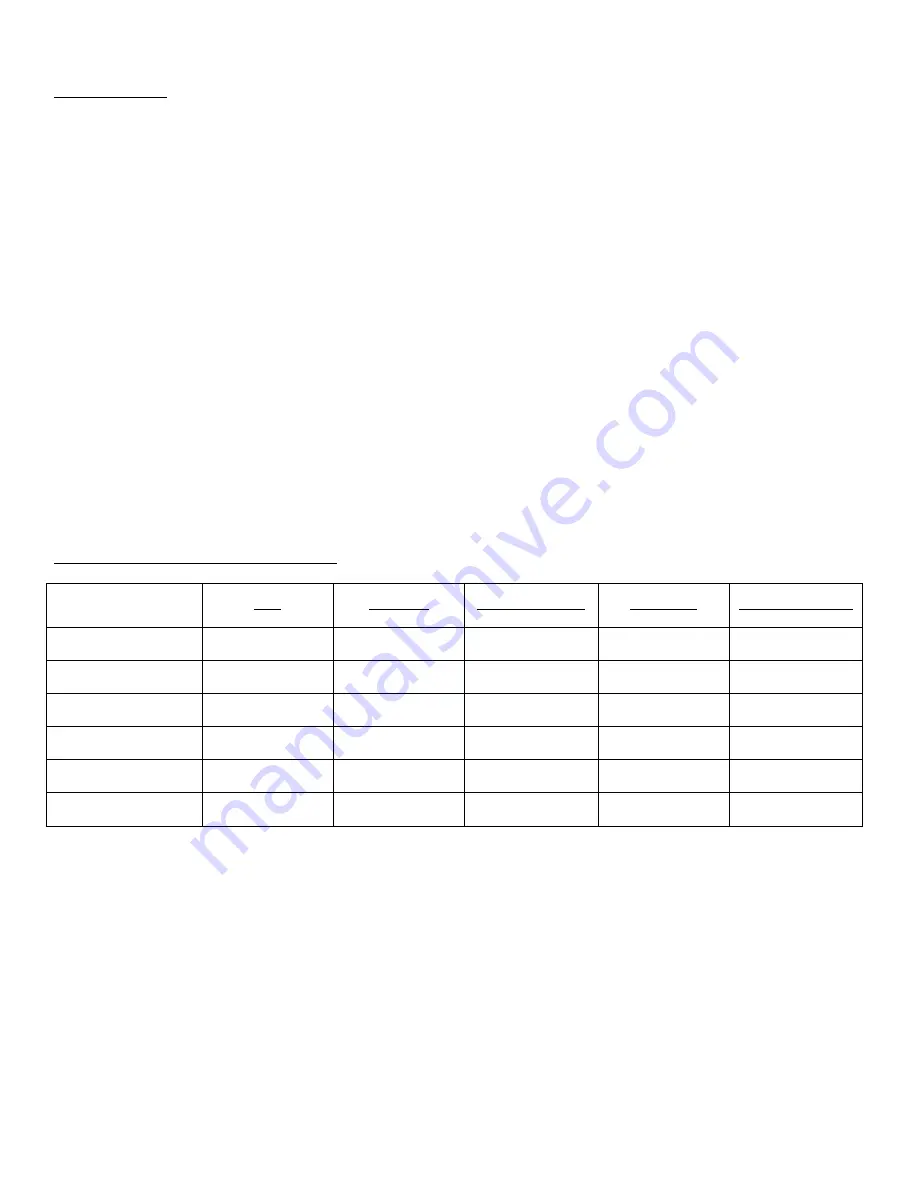
Factory Default Alarm Settings 

MEASUREMENT 

UNITS 

OVER ALARM 

OVER ALARM RECOVER 

UNDER ALARM 

UNDER ALARM RECOVER 

AC   Line   Voltage   

Volts   

140   

135   

100   

107   

Temperature   

Fahrenheit   

150   

145   

40   

45   

Amps   Power   Supply   

Amps   

-­‐1000   

0   

1000   

0   

Amps   From   Battery   

Amps   

-­‐1000   

0   

1000   

0   

Volts   Power   Supply   

Volts   

16   

15   

8   

13   

Volts   Battery   

Volts   

15   

14.8   

12   

13   

Summary of Contents for HE1U-5012-BC-MU

Page 1: ...ply ON OFF remote control and DC OK The HE1U 5012 BC MU comes with a 3 year warranty The new internal Remote Monitoring and Control Unit RMCU provides the ability to remotely monitor the AC voltage po...

Page 2: ...19 W x 14 D Weight 9 1 lbs RMCU SPECIFICATIONS Hardware Revision 2 0 Firmware Revision 2 7 Network Connector RJ 45 10 100 Ethernet with activity LEDs Backup Battery CR2032 Memory Card 4GB Micro SD Vol...

Page 3: ...isconnect voltage INSTALLER NOTES NOTE DO NOT block any of the cooling vents on the sides and top and always allow adequate ventilation by not installing the unit inside tightly closed spaces Physical...

Page 4: ...arm ON LOW Shorted Alarm OFF HIGH Open HE1U 5012 BC MU Wiring Layout This system setup will provide continuous power to the load and maintain the battery bank with a float charge circuit while AC powe...

Page 5: ...5 of 23 August 3 2016...

Page 6: ...ress of 70 B3 D5 6B 3 Write down the IP address of the HE1U 5012 BC MU then proceed to the section in this manual named Open a Web Connection to the HE1U 5012 BC MU Using Static HE1U 5012 BC MU IP and...

Page 7: ...fox internet Explorer etc and enter the IP address of the power supply on your network into the URL box on the browser see the screenshot below If you are unable to connect to the device with the brow...

Page 8: ...Login Enter the user name and password Factory default username and password are as follows Admin Users have full control of the device Username admin cannot be changed Password admin Control users ha...

Page 9: ...9 of 23 August 3 2016 NETWORK SETUP...

Page 10: ...SNMP traps you can search for training material online under SNMP Traps MIB Browsers and SNMP Monitoring The MIB file for the HE1U 5012 BC MU can be downloaded from the HE1U 5012 BC MU after you conn...

Page 11: ...ail Setup Enter the required email setup parameters given to you by your System Administrator You can also send a test email from this screen Firmware 2 7 adds the ability to configure a periodic stat...

Page 12: ...12 of 23 August 3 2016 DEVICE SETUP...

Page 13: ...e file size reaches 5MB Download all log files before deleting them With REV 2 3 Firmware the ability to log readings when an alarm occurs has been added To turn off periodic logging just enter 0 as t...

Page 14: ...14 of 23 August 3 2016 SENSOR SETUP...

Page 15: ...ee the Alarm Setup section for more information In the HE1U 5012 BC MU the Digital Output 1 is an alarm output and Digital Output 2 controls the ON OFF state of the power supply The user must be logge...

Page 16: ...16 of 23 August 3 2016 ALARM SETUP...

Page 17: ...17 of 23 August 3 2016...

Page 18: ...added the ability to log alarms The Log Alarms setting on the Device Setup Page is the same as the Global Settings Log All Alarms setting on this page Digital output alarm conditions can be set to Nev...

Page 19: ...be taken when changing any of these settings NOTE To hard reset your device back to factory settings press the red button on the HE1U 5012 BC MU PCB and hold it for more than 30 seconds You will need...

Page 20: ...August 3 2016 REMOTE MONITORING AND CONTROL STATUS PAGE Status screen This screen shows the status of all analog and digital inputs A user can also download the Log file from this page AC Voltage is a...

Page 21: ...devices Just use the same IP address and add m for example 192 168 100 220 m HE1U 5012 BC MU MAINTENANCE Battery The battery on the HE1U 5012 BC MU is used to back up the real time clock for logging p...

Page 22: ...Copper ferrules prevent the current transfer from being influenced by dissimilar metals and remove the risk of corrosion Always use the correct tool to crimp the ferrule RECOMMENDED COPPER WIRE SIZE F...

Page 23: ...prior to inclusion of such changes DuraComm requires any product needing in or out of warranty service to be returned to DuraComm All requests for warranty service must be accompanied by proof of pur...

Reviews: