7
BL600 LED Operation & Maintenance Manual
ENVELOPE INSTALLATION INSTRUCTIONS
Unpack your new envelope.
•
Unfold the envelope on a smooth, clean surface.
•
Open the zipper.
When REPLACING an old envelope, FIRST remove
original envelope.
•
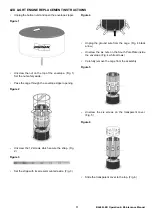
Unplug the balloon unit and open the envelope zipper.
Figure 1
•
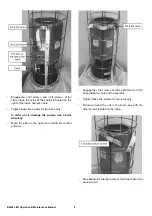
Unscrew the nut on the top of the envelope. (Fig. 1)
Set the nut safely aside.
•
Pass the cage through the envelope zipper opening.
Figure 2
•
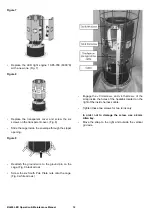
Unscrew the 12 screws which secure the strap. (Fig.
2)
Figure 3
•
Set the strap with its screws mounted aside. (Fig. 3)
Figure 4
•
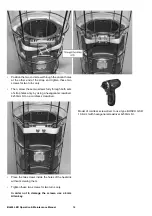
Unplug the ground wire from the cage. (Fig. 4 black
arrow)
•
Unscrew the six nuts on the South Pole Plate inside
the envelope. (Fig. 4 white arrows)
•
Carefully remove the cage from the assembly.
•
Detach the old envelope from the assembly by sliding
up along the equipment.
•
Put the envelope back in place.
Figure 5
•
Take care of the gasket: DO NOT lose it. (Fig. 5)
•
Position the zip in front of the ground wire.
•
Slide the cage inside the envelope through the zipper
opening.
Figure 6
•
Reattach the ground wire to the ground pin on the
cage. (Fig. 6 black arrow)
•
Screw the six South Pole Plate nuts onto the cage.
(Fig. 6 white arrows)
Summary of Contents for BALLOON LIGHT LED 6x100W
Page 2: ......
Page 19: ...19 BL600 LED Operation Maintenance Manual PARTS SECTION ...
Page 20: ...BL600 LED Operation Maintenance Manual 20 FRAME AND ENVELOPE ...
Page 22: ...BL600 LED Operation Maintenance Manual 22 LEDs AND FAN ...
Page 24: ...BL600 LED Operation Maintenance Manual 24 HOUSING AND BASEPLATE ASSEMBLY ...
Page 26: ...BL600 LED Operation Maintenance Manual 26 CIRCUIT BOARD ASSEMBLY ...
Page 28: ...BL600 LED Operation Maintenance Manual 28 ELECTRICAL PLUGS VARIANTS ...
Page 30: ...BL600 LED Operation Maintenance Manual 30 ACCESSORIES ...
Page 32: ...BL600 LED Operation Maintenance Manual 32 TELESCOPIC STAND OPTIONAL ...
Page 34: ......
Page 35: ......
Page 36: ......

