BL600 LED Operation & Maintenance Manual
8
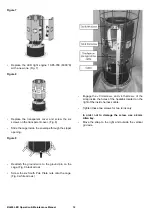
•
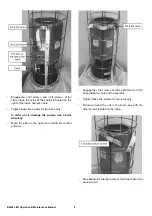
Engage the « 3rd screw » and « 4th screw » of the
strap inside the holes of the heatsink located on the
right of the inside harness cable.
•
Tighten these two screws for two turns only.
In order not to damage the screws, use a 4mm
Allen key.
•
Move the strap to the right and outside the vertical
grid wire.
•
Engage the « 5th screw » and the « 6th screw » of the
strap inside the holes of the heatsink.
•
Tighten these two screws for two turns only.
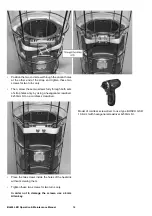
•
Proceed around the unit in the same way with the
other screws located on the strap.
•
Stop before the two last holes of the strap that do not
have screws.
Summary of Contents for BALLOON LIGHT LED 6x100W
Page 2: ......
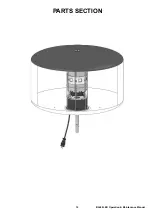
Page 19: ...19 BL600 LED Operation Maintenance Manual PARTS SECTION ...
Page 20: ...BL600 LED Operation Maintenance Manual 20 FRAME AND ENVELOPE ...
Page 22: ...BL600 LED Operation Maintenance Manual 22 LEDs AND FAN ...
Page 24: ...BL600 LED Operation Maintenance Manual 24 HOUSING AND BASEPLATE ASSEMBLY ...
Page 26: ...BL600 LED Operation Maintenance Manual 26 CIRCUIT BOARD ASSEMBLY ...
Page 28: ...BL600 LED Operation Maintenance Manual 28 ELECTRICAL PLUGS VARIANTS ...
Page 30: ...BL600 LED Operation Maintenance Manual 30 ACCESSORIES ...
Page 32: ...BL600 LED Operation Maintenance Manual 32 TELESCOPIC STAND OPTIONAL ...
Page 34: ......
Page 35: ......
Page 36: ......

