background image


Doble TDR900 User Guide  


72A-2612-01 Rev. A 09/06 


5

2.2 

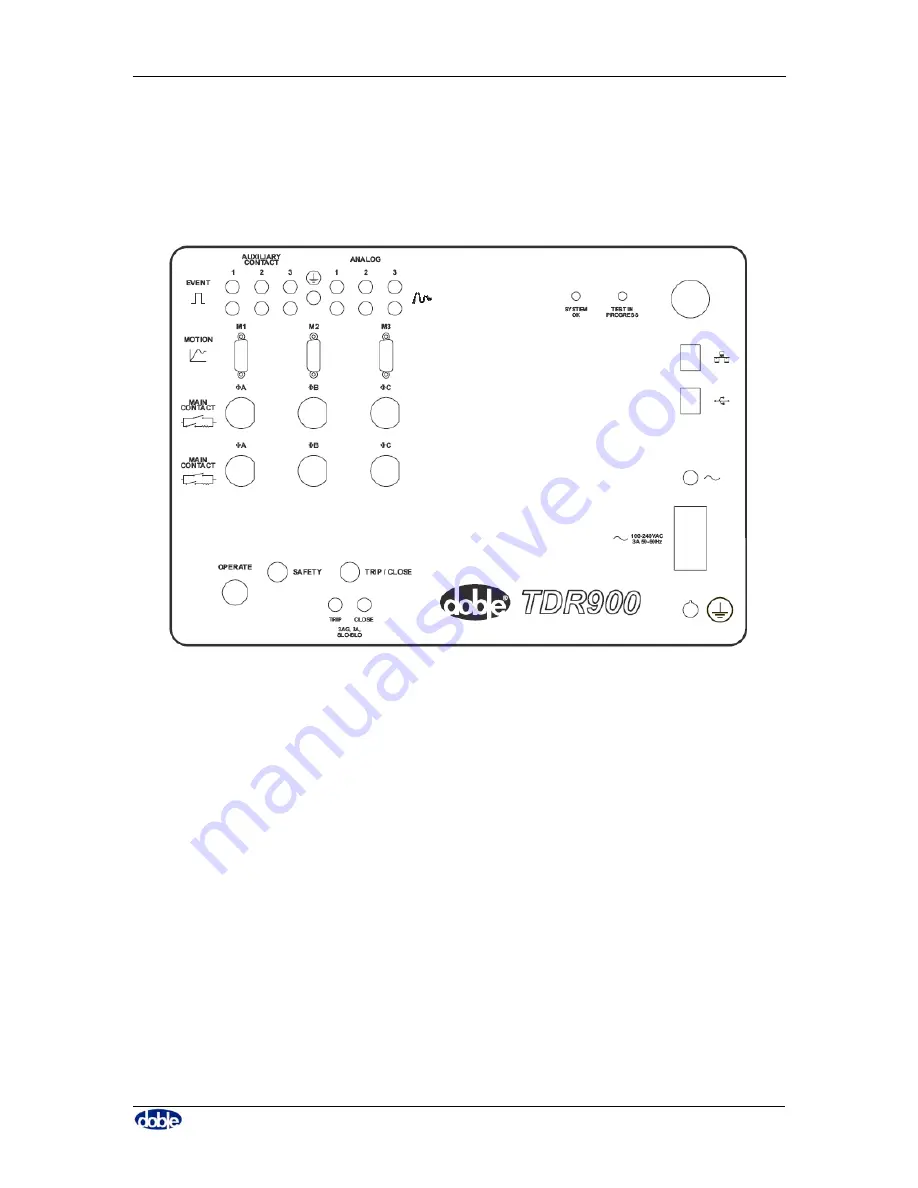
Front Panel Connections 

 
Figure 3 gives a schematic view of the front panel connections on the TDR900. 


Figure 3. Schematic of Front Panel Connections 


2.3 

Basic Cables and Accessories 

 
The TDR900 comes with basic cables to allow communication with the PC, safety 
grounding and control. 
 

Summary of Contents for TDR900

Page 1: ...PN 500 0652 72A 2612 01 Rev A 09 06 Doble TDR900 User Guide Doble Engineering Company 85 Walnut Street Watertown Massachusetts 02272 9107 USA Telephone 617 926 4900 Fax 617 926 0528 www doble com ...

Page 2: ...ents contained herein relating to safety represent minimum guidelines and should never be compromised however it is foreseeable that the minimum safety guidelines may be supplemented in order to conform to User s company safety and compliance regulations User is responsible for applying the information contained herein in strict accordance with industry as well as User s company compliance and saf...

Page 3: ...HEREIN ANY INCIDENTAL OR CONSEQUENTIAL DAMAGES EXPENSES LOST PROFITS LOST SAVINGS OR OTHER DAMAGES ARISING OUT OF THE USE OF OR INABILITY TO USE THIS INFORMATION SUCCESSFULLY Some states do not allow the limitation or exclusion of liability for incidental or consequential damages so the above limitation or exclusion may not apply Copyright 2006 By Doble Engineering Company All Rights Reserved ...

Page 4: ...Doble TDR900 User Guide 72A 2612 01 Rev A 09 06 iv This page intentionally left blank ...

Page 5: ... a caution or a warning could cause a dangerous condition Warning Symbol The WARNING icon identifies information that denotes a potentially hazardous condition this condition may result in death or serious injury Ground Symbol THE PROTECTIVE CONDUCTOR GROUND is the primary ground for equipment protection Note Symbol The NOTE icon signifies a cautionary statement operating tip or maintenance sugges...

Page 6: ...Doble TDR900 User Guide 72A 2612 01 Rev A 09 06 vi This page intentionally left blank ...

Page 7: ... Ground 6 2 3 2 Safety Switch Flag 6 2 3 3 Fuses 6 2 4 Software 6 2 5 Overall Test Cable Option OCB Dead tank 6 2 6 Sectional Test Cable Option EHV Live tank 7 2 7 Motion Option 7 2 8 Analog Event Cable Option 8 Chapter 3 Safety and Personnel 9 3 1 Safety 9 3 2 General Rules 9 3 3 Grounding 9 3 4 Personnel Safety 10 Chapter 4 11 Breaker Operation and Testing Theory 11 4 1 The Role of a Breaker 11 ...

Page 8: ...eparing the Breaker Off Line Tests 19 5 3 Preparing the Breaker On Line Tests 20 5 4 Preparing the Doble TDR900 Instrument and PC 20 5 5 Connect Test Leads to Breaker 21 5 5 1 Overall Test Dead Tank or OCB test 21 5 5 2 Sectional Test live Tank or EHV test 22 5 6 Install Motion Transducer 23 5 7 Perform a Test 24 5 7 1 Pre test Check List 24 5 7 2 Running a Test 25 5 8 Powering Down the Doble TDR9...

Page 9: ...56 6 6 7 Reports 57 6 6 8 Preferences 58 6 6 9 Help 59 6 7 Connect to a TDR900 Instrument 60 6 8 Running a Test 63 6 9 Transferring Data between PC s 63 6 10 Closing the Software 63 Chapter 7 Technical Support and Troubleshooting 65 7 1 PC 65 7 2 Installing Software on a PC 65 7 3 Checking Communication between PC and TDR900 65 7 4 Field Repairs 66 7 5 Parts List 66 ...

Page 10: ...21 Sorting Files by Manufacturer 34 Figure 22 Recently Opened Files 34 Figure 23 Breaker Tab Nameplate Sub Tab 35 Figure 24 Breaker Timing Limits Sub tab 36 Figure 25 Breaker Travel Limits Sub tab 36 Figure 26 Breaker Velocity Limits Sub tab 37 Figure 27 Test Plan Test Setup Sub tab 38 Figure 28 Test Plan Main Contact Channels Sub tab Default 39 Figure 29 Test Plan Main Contact Channels Sub tab OC...

Page 11: ...Red Button 55 Figure 49 Overlay Tab with Two Results Added 56 Figure 50 Instruments Tab 57 Figure 51 Reports Tab 57 Figure 52 Preferences Display Units Sub tab 58 Figure 53 Preferences Plotting Sub tab 58 Figure 54 Preference Files 59 Figure 55 Help Tab 59 Figure 56 Instruments tab to connect PC to TDR900 60 Figure 57 No TDR900 instrument found 61 Figure 58 Instruments Tab Connect to TDR900 62 Fig...

Page 12: ...Doble TDR900 User Guide 72A 2612 01 Rev A 09 06 xii List of Tables Table 1 Minimum PC Requirements 65 Table 2 Parts List 66 ...

Page 13: ... damage to the breaker or the TDR900 test set 1 2 Timing Tests with the TDR900 This guide allows the user to perform timing tests with the TDR900 test set Most users will be testing circuit breakers However there is no reason why the user cannot use the same test set to time circuit switches LTC contacts or other devices For simplicity this guide refers to breaker timing throughout 1 3 Terminology...

Page 14: ... breaker is energized and or carrying load when it operates Do not make any connections to any line terminal as system voltages appear on those terminals A First trip test requires the breaker be energized when it trips Motion Motion is measured through a transducer this is a record of the movement of the mechanical part of the breaker as it opens or closes the breaker also called travel Motion ca...

Page 15: ... and cables as shown in Figure 1 This section provides an introduction to the various parts and accessories that comprise the Doble TDR900 Instrument Figure 1 TDR900 Test Set and Basic Cables The TDR900 instrument measures and records breaker switch and relay timing parameters It accomplishes this using the hardware components packaged in a rugged field instrument as shown in Figure 2 ...

Page 16: ...Doble TDR900 User Guide 72A 2612 01 Rev A 09 06 4 Figure 2 TDR900 Instrument Front View ...

Page 17: ... Connections Figure 3 gives a schematic view of the front panel connections on the TDR900 Figure 3 Schematic of Front Panel Connections 2 3 Basic Cables and Accessories The TDR900 comes with basic cables to allow communication with the PC safety grounding and control ...

Page 18: ...ety flag allow the software to actually run a test 2 3 3 Fuses The TDR900 uses a 3 amp fast blow fuse as indicated on the panel and instrument label 2 4 Software Software to control the TDR900 must be run on a PC the PC is connected to the TDR900 via a USB cable or an Ethernet cable 2 5 Overall Test Cable Option OCB Dead tank This cable option allows for an overall test also known as an OCB or dea...

Page 19: ...test on a breaker and measures each contact independently for multiple breaks per phase The EHV cables are one per phase each spanning two breaks Figure 6 TDR900 EHV Connections two sets of three 2 7 Motion Option The Motion option allows for a motion travel measurement on a breaker A transducer is needed to introduce the motion measurement to the TDR900 Figure 7 TDR900 Motion Connections OCB test...

Page 20: ...log Event Cable Option The Analog and Event Cables allow for measurements using external sensors Event channels are also called Auxiliary channels This is where an analog sensor such as a clip on CT would be connected Figure 8 TDR900 Analog Event Connections ...

Page 21: ...at the apparatus terminals are isolated from the power system Because the apparatus under test may fail precautions such as barriers or entrance restrictions to the test area must be taken to avoid harm in the event of a violent failure All of your company rules for safe practice in testing must be strictly conformed to including all practices for tagging and isolating apparatus during testing and...

Page 22: ...ing the tests to be performed the apparatus and the voltage test levels involved potential hazards involved with the work and the individual assignments should all be reviewed with the crew members Test personnel need to remain aware of the work activity taking place around them and alert to the possibility that non test personnel may enter the test area A consistent and uniform set of signals bot...

Page 23: ... the ANSI definition it seems clear that there is a mechanical element to a breaker and that the breaker has three roles to perform To interrupt break current which is flowing in a conductor when required To allow current to flow in a conductor when required to do so To carry current The definition also states that these must be performed under Normal conditions Specified abnormal conditions 4 2 B...

Page 24: ...tures of a Breaker 4 4 1 Tank The mechanical parts of the breaker that perform the opening and closing functions will be housed in a tank or compartment A breaker design where the tank is grounded is called a dead tank breaker Where the tank itself is at a voltage during breaker operation the breaker is known as live tank Usually live tank breakers have the tank supported by insulated columns and ...

Page 25: ...breakers and became known as Extra High Voltage or EHV breakers The tank is usually live Thus another name used for EHV breakers is live tank breakers As technology has progressed the number of breaks per phase has been reduced though voltages have continued to increase But the term of EHV for multiple breaks per phase breakers is still common 4 4 5 Capacitors and Resistors Breakers with multiple ...

Page 26: ...ther designs may have different components and arrangements 4 6 Things That Can Go Wrong With a Breaker Serious problems may include Failure to operate Failure to interrupt arc Catastrophic failure Less serious problems may include Slow close Slow open Bushings Guide Assembly Tank Liner Contact Assembly Interrupter Lift Rod Oil Lift Rod Guide Moving Contacts ...

Page 27: ...utes in an expected thirty or more years of operation However when it is called on to operate in fault conditions it is imperative that the fault is cleared to prevent system issues which could lead to major incidents local or widespread loss of service for example 4 8 Main Contact Timing Tests The breaker main contacts are timed to ensure they perform to specification Main contacts are the contac...

Page 28: ...supplied to each phase Contacts closing are determined when current supplied during the test set starts to flow through the breaker The time of contact opening is determined when current supplied by the test set stops flowing 4 8 2 Performing a Sectional Test EHV or live tank Set up for a sectional test is more complex than an overall test as test leads are needed for each break The TDR900 can per...

Page 29: ...tery current and voltage during an operation with the breaker energized and usually under load This can be performed using the analog channels on the TDR900 4 10 Other Tests The TDR900 is also a data recorder and may be configured to record data under a variety of conditions and in response to given events These can be configured using the standard software to control the input channels and record...

Page 30: ...Doble TDR900 User Guide 72A 2612 01 Rev A 09 06 18 This page intentionally left blank ...

Page 31: ...re and powering down the TDR900 5 1 General Set Up Information The TDR900 is ruggedly designed for field use however care should be taken during transportation use and storage of the equipment Do not drop or throw the TDR900 Do not use the TDR900 or any transducer as a step or a platform Do not expose the TDR900 to rain snow sand excessive heat or dust Always transport the TDR900 with protective c...

Page 32: ...ests The breaker to be tested will be energized and may be under load Connections are made at the breaker control cabinet by authorized personnel 5 4 Preparing the Doble TDR900 Instrument and PC Place the TDR900 on a firm clean level surface Turn on the power switch located on the front of the TDR900 instrument without connecting it to the user PC The power light should come on Both LED s will com...

Page 33: ...reaker Control Cable should have its two Trip leads connected across the Trip switch on the breaker the two Close clips should be attached across the Close switch on the breaker Figure 11 General Control Schematic Caution To minimize the chance of the conductors becoming energized due to static electricity Doble Engineering Company recommends attaching all test set leads to the instrument while th...

Page 34: ...ed breaker bushings one to each Figure 12 Contact Monitor Cable for Overall Test 5 5 2 Sectional Test live Tank or EHV test One cable is required for each pair of contacts for the sectional test on each phase The common lead should attach to the center of the breaker section with the contacts attached to the bushing terminals as shown in Figure 13 Two further cables will be needed for the other tw...

Page 35: ...upplied with the TDR900 the transducer may be secured directly to the tank 4 Insert the Transducer Connecting Rod into the threaded hole in the circuit breaker operating lift rod Various thread sizes are available from Doble 5 Mount the transducer if there are separate motion mechanisms there may be three separate motion transducers 6 Position the transducer on the platform so that the Connecting ...

Page 36: ...0 and connected to the breaker ground Is proper AC power available for the TDR900 Has one end of each phase of the breaker been grounded Have all DC power knife switches been opened in the Breaker Control cabinet Was the breaker in the closed position when the motion Transducer Connecting Rod was installed Has the Transducer Cable been connected to the secured Motion Transducer Have the Contact Mo...

Page 37: ...ist Follow the instructions for the selected test When the test is complete data will be displayed in the test Results tab It will automatically be saved 5 8 Powering Down the Doble TDR900 Instrument Power down the TDR900 using the power switch 5 9 Closing the T Doble Software The software automatically saves data Close the software using standard Windows procedures Alt F4 or click on the X at the...

Page 38: ...Doble TDR900 User Guide 72A 2612 01 Rev A 09 06 26 This page intentionally left blank ...

Page 39: ... that data be saved to a network path If a network path is specified then data may not be saved in the field if the network is not accessible When testing in the field using a TDR900 the PC where the software is installed should not be connected to any other network and should not have a wireless network enabled or switched on Firewall and virus software should be disabled or turned off while maki...

Page 40: ...ure 17 Figure 17 T Doble Initial Screen Files 6 4 Dealing with Data Test Plans and Test Results There are three distinct but closely related types of data handled by the T Doble software A library test plan A breaker test plan A test result A library plan is a generic test plan for a breaker type It contains generic limits for travel and timing ...

Page 41: ...led through tabs Each of the main tabs at the top of the screen for example the Files tab shown in Figure 17 has sub tabs which are appropriate to it The Files tab has two sub tabs Browse Files Recently Opened Files Each main tab also has a number of buttons which are appropriate to the main tab for the Files tab these are New Plan Open Overlay E mail The Open and Overlay are only active when a fi...

Page 42: ...als displayed by dragging and dropping legend entries The sign at the right hand side of the legend reduces the entry for that group to a single line In Figure 19 several things have happened through use of legend controls several signals have been minimized through the buttons some signals have been removed from the display through check boxes the order of signals has been changed to allow for co...

Page 43: ...tton takes the user to a blank breaker nameplate tab A new Library or Breaker Test Plan may be entered 6 5 2 2 Open Button Having highlighted a file list entry by clicking on it once clicking Open or double clicking the entry will then open the file Any data will be displayed on the Results tab where results from any one single breaker test are shown 6 5 2 3 Overlay Button Ads the data in a file t...

Page 44: ...o run a single breaker test 6 5 2 7 Apply and Cancel Buttons The Apply and Cancel buttons are used in the Preferences tab to apply preferences or cancel any changes made 6 6 Software Main Tabs and Sub tabs This section looks at each of the main tabs and sub tabs available for that main tab The main tabs available are Files Breaker Test Plan Test Results Overlay Signals Instruments Reports Preferen...

Page 45: ...n the file entry to open the file By double clicking on the column header data is sorted according to entries in that column For example the data in Figure 20 is opened in default order sorted by file name By double clicking on the manufacturer column header data is sorted by alphabetical order of manufacturer as shown in Figure 21 Repeat the double click to put the list in reverse alphabetical or...

Page 46: ...e 21 Sorting Files by Manufacturer The Recently Opened Files tab shows files which have been opened on the PC where the software is running This list as shown in Figure 22 is in the order files were opened and is not sortable Figure 22 Recently Opened Files ...

Page 47: ...e four sub tabs Nameplate Timing Limits Travel Limits Velocity Limits Each of these allows entry of data for a specific breaker type for a library plan or for a specific breaker Serial Number or Spec ID required for a breaker plan 6 6 2 1 Nameplate The Nameplate tab is shown in Figure 23 Edit field contents by clicking in that field 6 6 2 2 Timing Limits The default settings for the Timing Limits ...

Page 48: ...72A 2612 01 Rev A 09 06 36 Figure 24 Breaker Timing Limits Sub tab 6 6 2 3 Travel Limits The Travel Limits tab as shown in Figure 25 allows entry of specific timing values for a breaker Figure 25 Breaker Travel Limits Sub tab ...

Page 49: ... 6 6 3 Test Plan The Test Plan tab is where specific test details are set up There are six sub tabs Test Setup Main Contact Channels Other Channels Timing Event Special tests Notes Details may be entered for all test set ups but individual tests may be performed as required 6 6 3 1 Test Setup The Test Setup tab Figure 27 allows set up of many of the test parameters for any individual breaker test ...

Page 50: ...ecording Time Sample Time Pre trigger Duration Bounce Discrimination Bounce Reporting Figure 27 Test Plan Test Setup Sub tab 6 6 3 2 Main Contact Channels The default Main Contact channels tab Figure 28 allows for selection of either EHV or OCB type of measurements ...

Page 51: ...efault If an overall test OCB test type of measurement is required check the phases to be measured This disables the sectional EHV test options as shown in Figure 29 Figure 29 Test Plan Main Contact Channels Sub tab OCB Selected If any sectional test EHV is checked the OCB options are disabled Figure 30 ...

Page 52: ...0 Figure 30 Test Plan Main Contact Channels Sub tab EHV Selected 6 6 3 3 Other Channels The TDR900 comes complete with 3 Motion channels 3 Analog inputs 3 Event digital inputs Configuring these channels is through the Other Channels tab see Figure 31 ...

Page 53: ...ide 72A 2612 01 Rev A 09 06 41 Figure 31 Test Plan Other Channels Sub tab 6 6 3 4 Timing Event The initiation point for each timing event may be configured separately see Figure 32 Figure 32 Test Plan Timing Event Sub tab ...

Page 54: ...Doble TDR900 User Guide 72A 2612 01 Rev A 09 06 42 The timing event may be selected by clicking on the down arrow at the right of the timing event column Figure 33 Timing Event Selection ...

Page 55: ...t the right of the detail column or by entering an actual value Trip Current Or Close Current Or Analog Auxiliary 6 6 3 5 Special Tests Special Tests include First Trip tests were the breaker is triggered while energized Details of such tests are entered in the Special Tests tab Figure 34 Figure 34 Test Plan Special Tests Sub tab ...

Page 56: ... and pictures The Notes tab has a set of controls at the top of the notes area which assist with content control These controls are self explanatory and similar to standard text and image processing tools Figure 35 Test Plan Notes Sub tab 6 6 4 Test Results The test results tab as shown in Figure 36 is where individual breaker results are plotted and tabulated for review ...

Page 57: ... at Resistor Open Close Other Channels Notes 6 6 4 1 Signals The Signals sub tab is a graphical representation of the test results as shown in Figure 36 It features a Legend as discussed in section 6 5 1 The Legend is used to control signal display order overlay of individual signals etc 6 6 4 2 Main Contacts Results for the Main Contacts are shown on the Main Contacts tab in Figure 37 ...

Page 58: ...d against specifications if available in the breaker test plan In the results in Figure 37 a Close measurement on an overall OCB test is compared with the 142 0 ms maximum specified in the test plan Each value is acceptable and a green check mark tick mark is shown next to the result Figure 38 Symbols for OK and Investigate ...

Page 59: ... is for a close measurement to lie between 40 0 and 44 0 ms The actual values lie at between 52 0 and 53 0 ms and each entry is marked by a warning triangle signifying that investigation is needed Within each set the variation is within specification as by the green check marks in the synchronization column Figure 39 Test Results showing Investigate for Close Results ...

Page 60: ...ecification then these are used to assign OK or Investigate values Figure 40 Test Results Resistor Contacts Sub tab 6 6 4 4 Motion Results of motion measurements are given in the Motion tab shown in Figure 41 Motion results include Total Travel Over Travel Rebound Contact Wipe Damping Where specification values exist for these an analysis is made to provide OK or Investigate for each value ...

Page 61: ...6 4 5 Motion at Main Open Close Motion at Main Open Close tab reports average velocity at operation using travel distance and timing measurements for calculations as shown in Figure 42 If a rotary transducer is used then results are in degrees rather than linear measure as shown in Figure 42 ...

Page 62: ...6 4 6 Motion at Resistor Open Close As with Motion at main contacts section 6 6 4 5 the Motion at Resistor Open Close tab reports on average velocity at resistor open close times as shown in Figure 43 If measurements are made using a rotary transducer results are given in degrees rather than linear measurement ...

Page 63: ...Doble TDR900 User Guide 72A 2612 01 Rev A 09 06 51 Figure 43 Test Results Motion at Resistor Open Close ...

Page 64: ...ry Channels If data is recorded on auxiliary channels it is displayed on the Other Channels tab as in Figure 44 In the case shown the Aux channels were recorded and the rows for each channel show what event was recorded and the duration Figure 44 Test Results Other Channels Sub tab ...

Page 65: ...ble TDR900 User Guide 72A 2612 01 Rev A 09 06 53 6 6 4 8 Notes The Notes tab Figure 45 acts in the same way as the Test Plan Notes tab as described in section 6 6 3 6 Figure 45 Test Results Notes Sub tab ...

Page 66: ...m of the legend in the Test Results Signals sub tab Figure 46 Overlay Signals Tab Default Setup Signals may be added to the overlay in two ways Clicking on Add to Overlay on the Test Results Legend tab Click on the Overlay button on the Files tab Figure 47 shows a single result added to the Overlay tab the legend is slightly different in that the lowest box has a check box to show or remove the en...

Page 67: ...Doble TDR900 User Guide 72A 2612 01 Rev A 09 06 55 Figure 47 Overlay Tab with Single Result Added Figure 48 Overlay Tab Legend Check Box and Red Button ...

Page 68: ... be seen in Figure 49 the Legend can become quite extensive Signals of corresponding format may be overlaid on each other by dragging and dropping the legend entry 6 6 6 Instruments The Instruments tab as shown in Figure 50 allows for connection and communication between the PC and the TDR900 Instrument ...

Page 69: ...2612 01 Rev A 09 06 57 Figure 50 Instruments Tab 6 6 7 Reports Reports are user configured to include as much detail as necessary Click on To Excel to export results and charts to an Excel file See Figure 51 Figure 51 Reports Tab ...

Page 70: ...900 User Guide 72A 2612 01 Rev A 09 06 58 6 6 8 Preferences User preferences relate to a particular PC See Figures 52 53 and 54 Figure 52 Preferences Display Units Sub tab Figure 53 Preferences Plotting Sub tab ...

Page 71: ...Doble TDR900 User Guide 72A 2612 01 Rev A 09 06 59 Figure 54 Preference Files 6 6 9 Help This is a work in progress as shown in Figure 55 Figure 55 Help Tab ...

Page 72: ...not communicate with a TDR900 To connect to a TDR instrument click on the instruments tab to bring up the tab in Figure 56 connect the TDR900 to the PC using either the USB cable or the Ethernet Cable with Crossover adapter Click on Search for Instruments to attempt a connection as shown in Figure 56 Figure 56 Instruments tab to connect PC to TDR900 A confirmation message is shown when connection ...

Page 73: ...ide 72A 2612 01 Rev A 09 06 61 Figure 57 No TDR900 Instrument Found This will happen if there is no cable connection between the PC and TDR900 or if there are firewalls or virus software enabled which prevent communication ...

Page 74: ...ctions to a TDR900 and verify that you have a good connection as shown in Figure 58 Figure 58 Instruments Tab Connect to TDR900 The TDR900 should be Initially powered on without connection to a PC Show the indicator LED s system ready light on test light off Connected to the PC via USB or Crossover Ethernet cable ...

Page 75: ...ument selected 6 9 Transferring Data between PC s There are two simple methods for transferring data between PC s both require that the files to be transferred are identified using the Files tab of the T Doble software Either click on E mail to send the files via e mail or use the file name and location to pick the files in Windows Explorer and copy them to a disk or suitable medium To see files s...

Page 76: ...Doble TDR900 User Guide 72A 2612 01 Rev A 09 06 64 This page intentionally left blank ...

Page 77: ...on a PC The T Doble software is loaded on to your PC using standard software load procedures As part of the load the Microsoft Net framework is installed on your machine if it is not already present This will fail to load if there is insufficient disk space available Do NOT install the software to a network drive or to an image of a network drive these will not be available in the field and data w...

Page 78: ...rom power supply Remove power leads and test cables Remove main cover of TDR900 Disconnect power supply from input connector on front pane Unscrew main circuit board assemblies complete with power supplies Before returning any defective modules to Doble call or e mail Customer Service to receive an RMA number Return the main modules to Doble in padded and protective packaging 7 5 Parts List Table ...

Reviews: