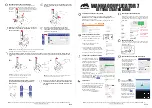
background image


40 

Manage Accounts 
2. Create User 

Edit User s Name 
[RALPH   ] OK? 

Enter PWD 
[0   ] OK? 

User Ralph 
Added! 

Manage Accounts 
3. Edit User Info 

Edit User Info 
1. [ADMIN   ] 

Edit User s Name 
[RALPH   ] OK? 

Enter PWD 
[0   ] OK? 

User Ralph 
Changed! 

14.2 Create User  

This menu allows you to create additional user accounts. Each user has their own settings and hard drive 
partitions. During this process, you will be prompted to enter a new username and user password for a new 
account.   

Note: The User name consists of a maximum of eight alphanumeric letters or numbers.  
Note: The User password consists of four numbers. 
  

Press the Enter button to enter this menu.     

Enter the user s name using the instructions shown in  Setting Counters 
and Assigning Names  on page 12 . Press the Enter button to move on to 
the Enter Password stage.    

Enter the user s password using the instructions shown in  Setting 
Counters and Assigning Names  on page 12 .  
Press the Enter to complete.    

The autoloader will display a confirmation message and automatically 
return you to the Manage Accounts menu.     

14.3  Edit User Info  

The Edit User Info menu allows you to change the existing user s account name and password. During this 
process, you will be asked to select the existing account and then you will be prompted to enter the new 
user name and new user password for this account.   

Note: User  Admin  is the administrative account, you cannot change the user name for this 
account, but can change the password for this account.  
Note: The User name consists of a maximum of eight alphanumeric letters or numbers.  
Note: The User password consists of four numbers. 
   

Press the Enter button to enter this menu.     

Use the Up or Down button to scroll through the list of users. Press the 
Enter button to select user.   

Edit the user s name using the instructions shown in  Setting Counters 
and Assigning Names  on page 12. Press the  
Enter button to move on to the Enter Password stage.   

Enter the new password for this user via the instructions shown in 

Setting Counters and Assigning Names  on page 12. Press the Enter 

button to complete.   

The autoloader will display a confirmation message, and automatically 
return you to the Manage Accounts menu.  

Summary of Contents for ReflexAuto 8

Page 1: ...format 8 5 GB disc to another DVD9 format recordable DVD media but you cannot duplicate a DVD5 format disc on to a DVD9 format recordable media or vice versa Temperature Warning If the autoloader was...

Page 2: ...hough the autoloader has a sticky media separator function to prevent the sticky media but you should still follow these steps to prevent sticky media from disrupting your operation and protect your s...

Page 3: ...t slanted at an angle to ensure the picking arm can securely grab the disc with all 3 vacuum suction heads Be sure to not load too many discs onto the spindle as well as this may cause errors in place...

Page 4: ...robotic arm picks blank discs from Spindle 2 first and places the successful copies onto Spindle 1 Once Spindle 2 is empty it picks blank discs from Spindle 3 and places the successful copies onto Sp...

Page 5: ...ontrol Name Function Up Scroll up through the menu or list Down Scroll down through the menu or list Enter Execute the function Also called OK in the Menus ESC Go back to the previous function Master...

Page 6: ...as your blank media during the simulation the content on those discs will be permanently erased 3 Compare page 19 Use the Compare function to perform a bit by bit comparison between the content of you...

Page 7: ...Drive Setup on page 24 11 Setup page 27 Use the Setup menu options to control how the autoloader operates You can scroll between the various options using the Up or Down button 1 Language Use this se...

Page 8: ...nk disc s below it and other input spindle s if exists 10 DVD R Compatibility Mode This feature allows you to turn the DVD R High Compatibility Mode feature ON or OFF The purpose of this feature is to...

Page 9: ...ction Enabling Alignment Protection makes each drive tray quickly slide in and out after a disc has been loaded into it This ensures that the disc sits properly in the disc indentation of the tray by...

Page 10: ...word for each authorized person on this autoloader Refer to Create User on page 40 for additional information Enable the Manage Accounts feature by turning on the Password on Bootup setting Refer to P...

Page 11: ...the drives contains data in this case that would be the first disc the Master Disc for job A the autoloader will load entire content of this disc Master A into the reserve partition on the Hard Drive...

Page 12: ...ill see the next Specify Counter menu To specify the number of copies for your project you need to enter input a four digit number If you need to specify a number that is less than four digits fill th...

Page 13: ...s long and the characters can be any alpha A Z or numeric 0 9 value For example if you want to name the partition for your master disc as FUN Then follow this example Press the Down button repeatedly...

Page 14: ...n Single Master Mode continue on to the next section If you are making copies in Multi Master Mode jump ahead to Making Copies in Multi Master Mode on page 16 1 1 Making Copies in Single Master Mode T...

Page 15: ...happening In this case the loader has taken a disc from the input spindle and is placing it into Drive 1 The loader will continue to remove discs from the input spindle and place those into drives unt...

Page 16: ...ottom of the screen you will see the scrolling message Job Complete Press OK to Finish 1 2 Making Copies in Multi Master Mode This mode does not require you to manually load your master Simply place t...

Page 17: ...in sequence CD duplication jobs and DVD duplication jobs can be intermixed The autoloader will automatically detect a job s master and blank disc format and copy them when they match You should still...

Page 18: ...ete and the autoloader detects all Input Spindles are empty it presents you with the Input Bin Empty message Press the Enter button to continue and you will see the Access Log File screen Press the En...

Page 19: ...ose Partition Menu and you will see a screen similar to the following Use the Up or Down button to find the partition where your master disc is stored Press the Enter button to select that Partition N...

Page 20: ...n 4 Test Copy With the Test Copy menu option the autoloader simulates the copying process and then makes copies if everything works correctly If a failure is encountered on a disc during the simulatio...

Page 21: ...n Speed type menu similar to below There are two recording speed types that can be set HDD to CD Copy Hard Drive CD Content to CD R RW Discs speed HDD to DVD Copy Hard Drive DVD Content to DVD R RW Di...

Page 22: ...nu Press the Enter button on 8 Master Mode to enter the menu and you will see one of the following screens Use the Up or Down button to choose between Multi Master mode and Single Master mode Press th...

Page 23: ...ed As soon as the checking process completes the Erase RW process starts The 0 indicates that zero discs have been erased so far The 25 indicates the number programmed into the counter Once all the di...

Page 24: ...following Use the Up or Down button to find the 10 Hard Drive Setup Press the Enter button on 10 Hard Drive Setup to enter the menu Use the Up or Down button to select between those options 10 1 Selec...

Page 25: ...his will Overwrite FUN OK Enter a new partition name as described in Editing Names on page 13 For this example we will name it Happy Press the Enter button to overwrite the partition named FUN Before...

Page 26: ...enter the Partition Info menu and use the Up or Down button to find the partition that you want information about 2 From ADMIN FUN CD 21MB The 2 field indicates that it is the second partition on the...

Page 27: ...s the partition to the largest size that the installed CD DVD writers can accommodate If you have a 16x speed or higher autoloader with double layer dual layer DVD9 capabilities the hard drive partiti...

Page 28: ...f you believe that your master disc has a small insignificant error due to physical damage you can enable this setting to allow the autoloader to skip any read errors it encounters Note This function...

Page 29: ...d maximum writing speed for Audio VCD and CDG and press the Enter button to select that option Note The actual speed that is selected may be determined by the drives or by the blank media 11 5 Buzzer...

Page 30: ...choose whether you want to enable the Counter feature By enabling this feature the autoloader will prompt you to enter a counter amount and continuously burn discs until it reaches the value set into...

Page 31: ...he input spindle s with the required number of blank discs Place the Master disc on top of the stack in the first input spindle and press the Enter button to start the AUTOCOPY process The loader will...

Page 32: ...peated for each drive The copying process will continue until you run out of blank discs At this point you can either load more discs on to the input spindle s and press the Enter button to continue o...

Page 33: ...ype of disc and provide information about the data encoded on the disc For blank recordable discs it will tell you the media s format capacity and the Media s certified writing speed Note The Disc Inf...

Page 34: ...R media was placed in the third tray The 3 Indicates that the information is for the media inserted in tray 3 The DVD R indicates that the media inserted is a R type of recordable DVD The 4488M indica...

Page 35: ...of the options back to the manufacturer s default settings You should only perform this function if your autoloader is acting abnormally Use the Up or Down button to select the Load Default menu and p...

Page 36: ...o the robotic arm When the Drive Alignment function is selected the system picks a disc from the first input spindle and moves it to just 1 4 inch above the drive tray and holds it there To start the...

Page 37: ...Enter button to enter that menu The autoloader will proceed to the Please Select Spindle menu Use the Up or Down button to select the spindle that you want to check and press the Enter button to sele...

Page 38: ...ill allow the robotic arm to lower the disc off center from the front of the drives to clear any protruding obstacles like the bezels and then center the disc directly above the extended writer tray j...

Page 39: ...m the following tasks Use the Up or Down button to select the Manage Accounts menu and press the Enter button to enter that menu You will be shown the Enter Password menu The system will ask you for t...

Page 40: ...d automatically return you to the Manage Accounts menu 14 3 Edit User Info The Edit User Info menu allows you to change the existing user s account name and password During this process you will be as...

Page 41: ...ill display a confirmation message and automatically return you to the Manage Accounts menu 14 5 Password on Bootup This menu allows you to enable or disable the Password on Bootup feature During this...

Page 42: ...est the copied media Sometimes your DVD CD Player ROM may not be compatible with recordable DVD CD disc The failure rate is high Lower the write speed and try again See Select Burn Speed on page 21 Th...

Page 43: ...ng arm and the spindle where the disc can be placed securely onto the spindle This error indicates that an obstruction missing component or mechanical failure has prevented the vacuum picking arm from...

Page 44: ...ick up a disc from an input bin after 3 continuous attempts 80 Disc remaining on vacuum block not loaded on to the drive tray If error code 80 is shown it represents that a disc attempting to be place...

Page 45: ...guage 11 2 Read Error Skip 11 3 CD Writing Mode 11 4 Max Audio VCD and CDG Speed 11 5 Buzzer 11 6 Startup Menu 11 7 Screen Saver 11 8 Counter 11 9 AUTOCOPY Enabled 11 10 DVD R Compatibility Mode 11 11...

Reviews: