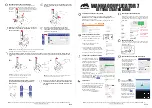


Click the Load the
object which would be
located in the build area.
NowClick “3D View” and
check and adjust the object
to ensure it is placed inside
the printing area. Press the
slice button to start
slicing operation.
Now open “Slice View” to
check that the fi rst layer of
every object is in contact
with the platform.
SLICE OBJECT
Go to confi gure slicing profi le Change the
slice thickness from 0.02 to 0.1; exposure
time 4000 to 12000(wanhao resin);
Bottom exposure time50000 to 200000
(wanhao resin). And Click
“ Apply Changes”
WANHAO DUPLICATOR 7
GETTING STARTED GUIDE
1
DOWNLOAD AND INSTALL SOFTWARE
Go to www.wanhao3dprinter.com and download “
Creation
Workshop
” located at “
Download software Duplicator 7
”. The
latest version is always online.
Extract the fi le and install the software by clicling on CW exe.
2
UNPACK AND CONNECT CABLES
With the printer switched off, connect:
A. Connect the HDMI cable to your
computer and printer.
B. Connect the USB cable to your
computer and Printer.
C. Set off mode the PC power& mode
during Printing process, The sleeping
mode may effects the printing quality.
D. Connect the power supply to printer.
3
CONFIGURE SCREEN RESOLUTION
Make sure you have the correct resolution on your
screen as 2560*1440. This may appears sometimes
as 1440*2560. Note that the right resolution is
2560*1440.
4
SWITCH ON PRINTER
Turn on the switch behind your computer and
printer. Open the software and load the object
(STL,OBJ or AMF)
CONNECT SOFTWARE AND PRINTER
In Creation Workshop, click on
“Confi gure”, and then open the
subfolder “Confi gure Machine”.
In the confi guration folder
connect the printer to the
computer by clicking on the
button“Confi gure”. Select the
port you have connected the
USB to and set the speed to
115200 and data bits to 8. “OK”
and fi nially press
“ Apply Change” To connect
your computer and the duplicator 7 by clicking the high light
connecting button . After connecting the discounting
button would be high light .
5
6
TIP:
If you experience any issue confi guring the screen resolution or usb port.Visit our ivdeo tutorial at WANHAO VIDEO at
www.wanhao3dprinter.com.
PREPARE DUPLICATOR 7 FOR PRINTING
Place vat on top of the LCD screen and tighten vat
screws to keep it tight on the printer. Make sure that
don’t tight the vat too hard that may damage
the LCD, tight enough that the vat shouldn't
be lift up during printing process.
9
Slide the building plate onto the building plate holder.
Make sure the build compound with groove side toward
the printer.
10
Tighten the Building plate knob and loosen the
four screws at the sides so the platform can move
freely up and down.
11
NOTE:
Ensure that building plate’s screws are completely free when
lowering the platform to avoide damage the screen.
Now click on the “Control” tab. Press the “Home”
button to lower the platform towards the screen.
The platform will move down to be set on the screen
(level 0 in Z axis.) and stop.
12
Press the the building platform smoothly with one hand and tighten 4 screws. All 4 screws should be now tighten. Now lift
the building plate and fi ll the vat with resin. Print don’t consume a lot of resin, a quarter full vat is enough for a medium sized
print.
13
NOTE
: Don’t push the build platform too hard
to avoid breaking the LCD screen.Make sure the
platform touches the screen suffi ciently.
NOTE
:once started, the print can’t be paused and refi lled
so it's safer to over-fi ll and reuse the resin.
a.
b.
c.
CONFIGURE BUILD SIZE AND SLICE OBJECT
Once connected the printer
to the computer. Go to
“ Confi gure Machine”
Change the build size
exactly to the following
Pic. By clicking the
display resolution 2560*1440,
then click to add the
display to software setting.
Finally click Apply to
admit the change.
7
8
14
Place the hood back onto the printer. In control
panel press Z home and place the platform on
home position
Z Axi S
Z Axi S
15
Now you are ready to print, Press play after you
sliced the model. Once the print has finished, The
CW software shows that “Print 100% complete” and
will stop.
TIP:
If you experience any issue confi guring the screen resolution or usb port.Visit our ivdeo tutorial at WANHAO VIDEO at
www.wanhao3dprinter.com.
REV.A
REV.A


