Fi
n
a
l C
h
e
c
kl
is
t
52
Final Checklist
For correct installation
Be familiar with the parts of the car seat.
(See pages 12-13)
LATCH Installations
:
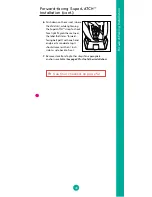
Be sure SuperLATCH™ connectors
are securely attached to correct anchors and strap is pulled
tight (
See pages 32-34 for rear-facing and pages 41-43 for
forward-facing
).
Seat Belt Installation
:
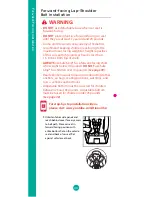
Be sure the seat belt is
LOCKED
and pulled tight (
See pages 35-37 for rear-facing and pages
44-48 for forward-facing
). If your vehicle was manufactured
before 1996, you may need to use a locking clip to lock the seat
belt (
See page 20).
DO NOT USE
the seat belt and the SuperLATCH™ together
for installation.
Rear-facing:
Grab at rear-facing belt path label, and give a
tug. If seat moves more than 1 inch side-to-side, front-to-back,
repeat steps for installation or choose another seating position.
Do not grab at top of seat to check for a tight fi t.
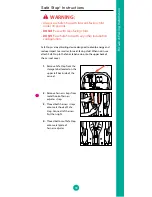
Forward-facing:
Grab at forward-facing belt path. If seat
moves more than 1 inch side-to-side, front-to-back, repeat steps
for installation or choose another seating position
.
Using the Top Tether Strap
for rear-facing and
forward-facing if appropriate place is available. This car seat
meets crash test standards with and without Top Tether
(See
pages 38 and 49).
Always check
for a tight installation before each ride.
There are certifi ed Child Passenger Safety Technicians across the
country available to help you.
Go to
http://safekids.org/events/fi eld-type/check_event
to
locate your nearest technician. Car crashes are the #1 cause of
unintentional death and injuries to children. Please be sure your
child’s car seat is installed properly. Buckle up all other passengers
Important:
If the car seat does not stay securely installed, it
means that the car seat installation is
NOT
safe. You
MUST
reinstall the car seat according to the car seat instructions and
the vehicle owner’s manual. In order to achieve proper
installation you may need to choose an alternate installation
method or seating location within the vehicle.
Check Your Work
For step-by-step installation videos,
please visit: www.youtube.com/DionoUSA
F
p
WARNING:
•
The video instructions referenced below are provided
for your reference to ease installation. YOU MUST read
and understand all information in this manual and on
the labels of your car seat for correct use.
Video Instructions
Summary of Contents for Radian R120
Page 13: ...13 9 12 13 14 10 11 16 15 18 19 22 21 20 23 17...
Page 62: ...Notes 62...
Page 63: ...Notes 63...


