


Copyright
© 2006 Digital Spectrum Solutions, Inc.
Page 54
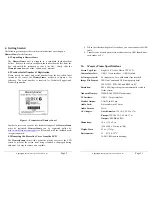
Connect the larger “standard USB” connector to the USB port of the PC.
Connect the smaller “mini-USB” connector to the “PC” connector of the
MemoryFrame
. See Figure 3.
Important!
For the PC application (Digital PixMaster) to communicate
to the
MemoryFrame
, you first need to prepare the
MemoryFrame
for
communicating to a PC by putting into Slideshow display mode.
17.4
Digital PixMaster Update Firmware Command
Use the Digital PixMaster (Digital PixMaster)™ software to transfer the
software update to the
MemoryFrame
. The Digital PixMaster icon
should be located on the Windows Desktop. To start Digital PixMaster
double-click on the icon.
Next, from the “
MemoryFrame
” pull-down menu of Digital PixMaster,
select “Update Firmware.” Follow the on-screen instructions to point to
the updated firmware file (with a “.bin” file extension) that you just
downloaded from the Digital Spectrum website to the hard-drive.
After you click on the OPEN box to select the .bin firmware update file,
Digital PixMaster will display a progress bar to indicate the transfer of the
file to
MemoryFrame
.
On the
MemoryFrame
’s LCD screen, the
MemoryFrame
will display a
sequence of messages to show the progress of the firmware update. The
first progress message is:
“FIRMWARE BEING DOWNLOADED, PLEASE WAIT”
Important!
When the progress bar shown in Digital PixMaster is
complete, it only signifies that the file has been transferred, and it is just
the beginning of the
MemoryFrame
’s actual process of updating its
firmware
.
If a transfer error occurs, the
MemoryFrame
will display the following
message:
“BAD FLASH DOWNLOAD, PLEASE RETRY”
If so, retry the update by select “Update Firmware” from the
“
MemoryFrame
” pull-down menu of Digital PixMaster.
When the
MemoryFrame
receives the updated firmware file, the
MemoryFrame
will erase the current firmware portion of its memory and
Copyright
© 2006 Digital Spectrum Solutions, Inc.
Page 2
MemoryFrame includes a patented “changeable frame” mechanism that lets
you install a standard 8x10 frame available nearly everywhere, in a style to
suit your décor. Frames can be changed in moments to be displayed on a desk,
mantelpiece, or hanging on a wall.
So let MemoryFrame free your imagination to explore the many ways you can
express yourself, not only with the photos you take, but the way you present
them.
1.1
Internal Storage
MemoryFrame
stores up to 80 images internally, playing on a 10.4” active
matrix TFT display at 800x600 pixel screen resolution. Stored images can
also be associated with audio clips (.wav files).
MemoryFrame
includes
built-in stereo speakers, with mute and volume control. The
MemoryFrame
also includes Audio Out connector for external speaker
connection, adding another dimension of impact.
1.2
Anywhere - Anytime
Network Enabled
-
MemoryFrame
is Ethernet and 802.11 wireless
enabled via the USB port. Digital Spectrum has certified a variety of
Ethernet and wireless adapters for use with the
MemoryFrame
. Many
units can be in the network displaying different slideshows. This also
allows the
MemoryFrame
to be mounted in a wall when a permanent
installation is desired.
Web Enabled - MemoryFrame
is also Web enabled so that the
MemoryFrame
can be a target in internet based photo sharing sites. After
registering the unit and “buddy list”, your guests can send their latest
pictures directly to the
MemoryFrame
where it will begin to play the
additional photos.
1.3
Broad Mounting Configurations
The front panel of the
MemoryFrame
is designed so that a standard
8”x10” wood frame can be easily mounted and secured.
MemoryFrame
includes built-in wall mount slots for landscape and portrait wall
mounting, along with a removable stand for desktop use.. Other mounting
accessories are available such as pole stands, VESA brackets, unique
decorative frames, etc.


