Digital Spectrum 1862-MF-61-7 User Manual Download Page 18


Copyright

© 2006 Digital Spectrum Solutions, Inc.


Page 12 

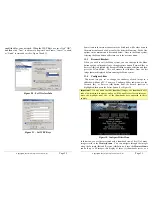
insert images into the Digital PixMaster™ template, or select images from 
any application, directory, CD, DVD, etc. to import via “drag and drop” or 
“copy/paste” into the template. When images are transferred into the 
Digital PixMaster template the image is automatically resized accordingly. 
The original source image is left unaltered. 

Repeat this process until all of the desired images are in the template. The 
figure below shows an example of a Digital PixMaster™ slideshow after 
images have been imported via “drag and drop” from other applications 
and directories. 

Below each image is the slide number, the time duration the image will be 
displayed, and whether or not a transition effect has been selected for that 
image. 

6.6


Pull-Down Menus, Controls, Commands 

Across the top of the Digital PixMaster application are the pull-down 
menus: File, Edit, View, Digital Frame, and Help.  All of the commands 
(except those in the Digital Frame pull-down) can be performed on the PC 
without the need for a 

MemoryFrame

 to be connected.  This allows you to 

create slideshows anytime. Table 1 below shows the various options under 
the File, Edit, and View pull-down menus. 

File

E dit

V iew

Digital Fram e

New

Ctrl-N

U ndo

Ctrl-Z

P review S lideshow S end S lideshow

O pen…

Ctrl-O

R edo

Ctrl-Y

S tatus B ar

Retrieve S lideshow

Close

Ctrl-F4

C ut

Ctrl-X

Toolbar

Update Firm ware

S ave

Ctrl-S

C opy

Ctrl-C

S lide P roperties

P roperties

S ave  A s…

P aste

Ctrl-V

S witch V iew

P references…

D elete

Del


Recent Files

S elect  A ll

Ctrl-A


E xit

A lt-F4

Insert

Ctrl-I


Insert E m pty S lide Ctrl-E


Table 1 – Application Commands: File, Edit, View, Digital Frame 

6.7


Naming and Saving Slideshows 

Create, name, and save different slideshows using naming conventions of 
your choice.  To save a slideshow, click on File then select “Save” or 
“Save As” to save the slideshow.  The file extension for 

MemoryFrame


slideshows created with Digital PixMaster is “.pd2” extension.  Digital 
PixMaster can have only one slideshow open at one time.  If you choose to 
open a new blank slideshow while another is already open, the program 
will close the first one (asking you if you want to save first) before 
opening the new blank one. 


Copyright

© 2006 Digital Spectrum Solutions, Inc.


Page 41 


Image Decompression takes about 5 seconds  


Scaling an image can take another 10 seconds  


Rotating images takes the same time as scaling images. Even if 
600x800 to begin with, preparing a portrait image adds another 10 
seconds  


Background tasks that occur immediately after power-on place a drain 
on performance until they complete  

To help homogenize the performance of the 

MemoryFrame

, images are 

cached for display. If an imager is available in the cache, it can be 
displayed immediately. The key to a fast slideshow is understanding how 
to keep the cache full. 

With a best case of 5 seconds per image to decompress, it becomes clear 
than it is nearly impossible to achieve the 1 second minimal duration that 
is allowed. However, strategically placing "pause" slides will allow the 
cache to become populated.  

Here are some tips on how to optimize performance: 


Do not have more than 2-3 consecutive slides with "minimum" 
durations  


Avoid long stretches of slides with durations of 5 or fewer seconds  


Throw in "pause" slides with content that the viewer will need time to 
study -- this will allow the cache engine to catch up  


If using odd-sized images, particularly those between 4:3 or 3:4 and 
square, pre-scale them before inserting them into Digital PixMaster. 


Make sure that images are no larger than 800 pixels wide and 600 
pixels tall or, if using Portrait Mode, 600 pixels wide and 800 pixels 
tall  


Use transition effects between slides -- transition effects add activity 
to the slideshow and provide extra time for image preparation  

12.2


Steps to Create 16:9 Content for 

MemoryFrame


(Landscape) 

The 

MemoryFrame

 is designed to show 4:3 aspect on the internal display. 

The VGA Out interface of the 

MemoryFrame

 allows simultaneous display 

to large format monitors. These may be a large 16:9 aspect display such as 
a plasma monitor or HDTV monitor. By following the steps below, images 
can be composed so that they appear correctly on a 16:9 display. 

Summary of Contents for 1862-MF-61-7

Page 1: ...ssor Speed ______________________________________________ Brand of Computer ____________________________________________ RAM Size __________________________________________________ Operating System __...

Page 2: ...olutions Inc Page 57 damage caused by this unit or its failure to work or any other incidental or consequential damages Damage caused by installation operating software which may or may not be supplie...

Page 3: ...hould be individually wrapped and placed in the same package Limitations The limited warranty provided by Digital Spectrum Solutions Inc does not cover The cost of returning the product to Digital Spe...

Page 4: ...in a business Imagine preloading the MemoryFrame with those just perfect photos and sending it as a personal gift It would leave an impression long after the gift is opened Copyright 2006 Digital Spec...

Page 5: ...le the MemoryFrame will erase the current firmware portion of its memory and Copyright 2006 Digital Spectrum Solutions Inc Page 2 MemoryFrame includes a patented changeable frame mechanism that lets y...

Page 6: ...022 1998 EN 55024 1998 EN 61000 3 2 2000 and EN 61000 3 3 1995 This Class B digital apparatus meets all requirements of the Canadian Interference Causing Equipment Regulations Cet appareil numerique d...

Page 7: ...assed all the required regulation tests for European CE compliance This equipment has been tested and found to comply with the limits for a digital device in a global EMC test These limits are designe...

Page 8: ...the Protective Cover from the LCD The MemoryFrame ships with a protective plastic cover over the LCD screen to prevent the screen from being scratched or damaged during shipment It is easy to remove a...

Page 9: ...T This will cause the unit to reformatting the Flash file system When it is finished it will prompt you to move to Step 6 6 When the MemoryFrame s screen says Please power the frame off on cycle the p...

Page 10: ...learn if the camera can be configured to store images JPEG jpg format You may also want to contact Digital Spectrum customer support at to see if there is a software upgrade available to support the c...

Page 11: ...from the card reader manufacturer for Windows to recognize and be able to utilize as a drive letter in Windows Explorer This specification allows you to drag images from the card reader onto the hard...

Page 12: ...of operation proprietary and standard driver less mode and the camera has menu items and or buttons that set the USB mode The standard driver less makes the camera look like a drive letter to Windows...

Page 13: ...e slideshows is fun and in business can make MemoryFrame a valuable tool for many applications Copyright 2006 Digital Spectrum Solutions Inc Page 7 simultaneous external display of the images in a sli...

Page 14: ...sure to pre scale them The MemoryFrame does an excellent job of scaling but is not as speedy as a professional image editing program If you are showing a Portrait slideshow you want all images to be...

Page 15: ...nu option in the Digital PixMaster Do not rotate the images 90 degrees to get a portrait slideshow using the menu option will do it correctly and show portrait thumbnails at the same time Copyright 20...

Page 16: ...Save Image as High Quality JPEG Use a good image editing program to save the image as a JPEG If the image is pasted into the MemoryFrame Digital PixMaster software and the image is either too large or...

Page 17: ...ook squished see Figure 35 for a comparison Figure 35 Image Resized to 800x600 Copyright 2006 Digital Spectrum Solutions Inc Page 11 Note Once the MemoryFrame USB driver is installed the Digital Spect...

Page 18: ...pen at one time If you choose to open a new blank slideshow while another is already open the program will close the first one asking you if you want to save first before opening the new blank one Cop...

Page 19: ...le in the Windows Clipboard for subsequent Paste 6 9 Inserting an Image into a Slideshow In addition to the Drag Drop and Paste functions discussed earlier you can also insert an image from a director...

Page 20: ...Default Random and Many Others This function is used to preset the default for Transition Style when uploading or playing images from the USB devices There are a multitude of styles from which to cho...

Page 21: ...d This gives you the ability to enable or disable the display of the text overlay this text can only be created with the Digital PixMaster application Copyright 2006 Digital Spectrum Solutions Inc Pag...

Page 22: ...d is complete the slideshow will begin to play and the USB device can be removed If no device is attached when selecting this function you will get a message that says Device Empty Not Connected 11 5...

Page 23: ...urbed when a Play Images from USB Port is performed Note DO NOT REMOVE THE USB DEVICE WHILE THE MemoryFrame IS PLAYING FROM THE DEVICE Use the Menu Button Copyright 2006 Digital Spectrum Solutions Inc...

Page 24: ...able at http www dsicentral com yupdate C Unknown Unit Alerts when an unknown unit is found Refer to Figure 14 below Figure 14 Preferences Settings Copyright 2006 Digital Spectrum Solutions Inc Page 3...

Page 25: ...eted changing the parameters of a slide you may use this function to select another slide for parameter changing 11 4 9 Exit Configuration Menu When you want to exit the Configure Slides sub menu sele...

Page 26: ...3 Set Background Fill Color The MemoryFrame will fill any unused portion of the screen with a background of your choice from the list of colors This reduces the black bar effect seen when images do no...

Page 27: ...given the choice to apply this Effect to either Only This Image or alternatively to All Images See Figure 19 Figure 19 Transition Effect 11 4 2 Set Slide Duration You can select the amount of time th...

Page 28: ...to highlight the Resume Slideshow menu selection and then press the Select button This will resume the slideshow from the last image that was displayed before entering the Menu system 11 4 Configure S...

Page 29: ...trum Solutions Inc Page 23 8 Configure MemoryFrame for Photo Sharing Because the MemoryFrame is web enabled images can be sent directly to the MemoryFrame from selected photo sharing sites This is a n...

Page 30: ...nit In this mode the user may upload new images alter the current slide show record voice or music or change MemoryFrame options as described in the following sections 11 1 Menu Navigation When enteri...

Page 31: ...menus in Digital PixMaster The four 4 commands in the Digital Frame pull down menu involve communication with the MemoryFrame and can only used when a MemoryFrame is connected directly to the PC or pa...

Page 32: ...be available If the MemoryFrame is not attached this function will be grayed out not available for selection This includes the functions Configure and Identify The Configure function brings up the Co...

Reviews: