background image

Digital Projection Ltd. Titan Laser WUXGA

Using the projector

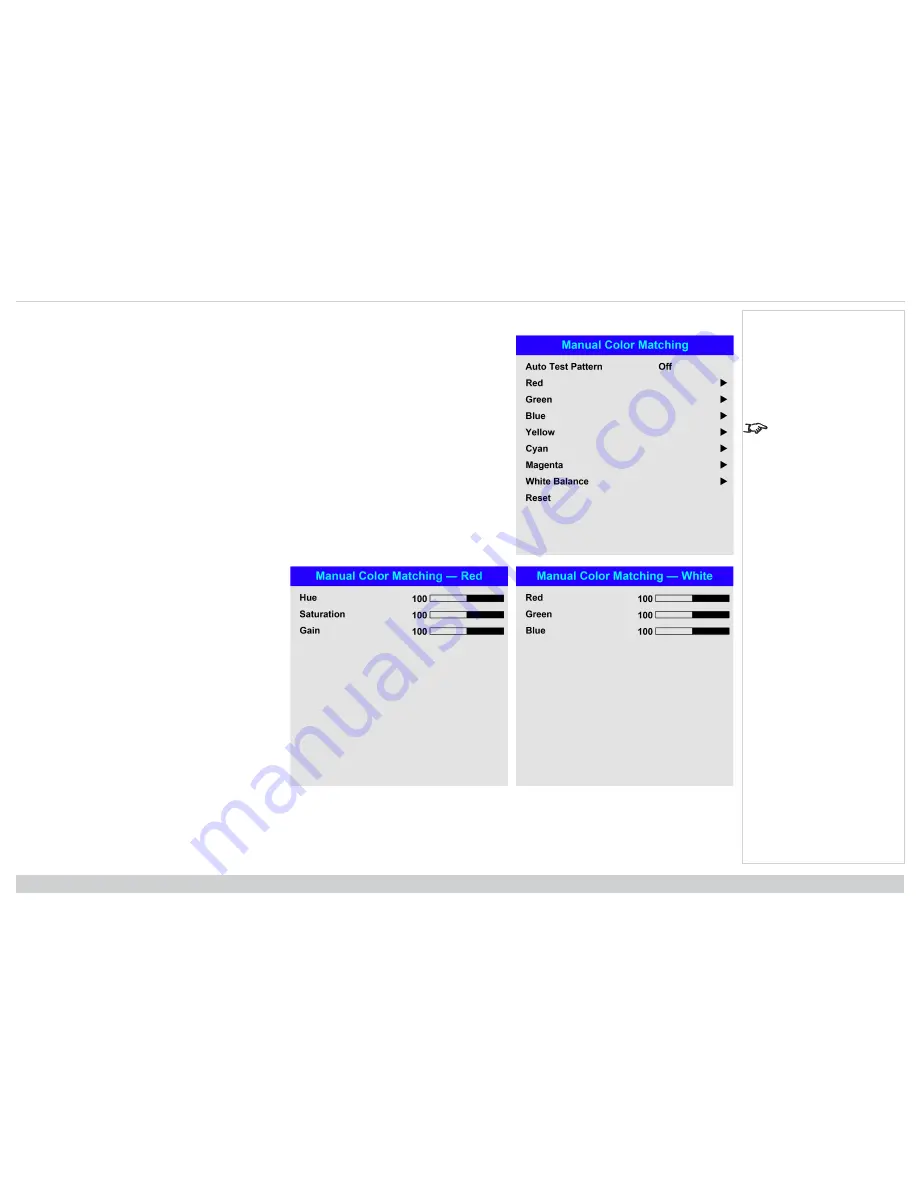
Manual color matching

1. Set

Color Mode

to

Manual Color Matching

.

2. Open the

Manual Color Matching

submenu.

Here you can do the following:

See Color matching
parameters explained on
the facing page for more
details about the Hue,
Saturation and Gain
settings.

l

Switch

Auto Test Pattern On

and

Off

.

l

Adjust

Hue

,

Saturation and

Gain settings for each individual color to improve the color balance of the

projected image.

l

Adjust white balance RGB values.

l

Reset all values.

Rev A January 2019

page 52

Operating Guide

Notes

Summary of Contents for TITAN LASER WUXGA

Page 1: ...Rev A January 2019 Titan Laser WUXGA High Brightness Digital Video Projector INSTALLATION QUICK START GUIDE CONNECTION GUIDE OPERATING GUIDE REFERENCE GUIDE 119 712 ...

Page 2: ...ed LASER WARNING this symbol indicates that there is a potential hazard of eye exposure to laser radiation unless the instructions are closely followed NOTE this symbol indicates that there is some important information that you should read Product revision Because we at Digital Projection continually strive to improve our products we may change specifications and designs and add new features with...

Page 3: ...ocedures other than those specified herein may result in hazardous radiation exposure Optical radiation Caution possibly hazardous optical radiation emitted from this product Do not stare at operating light source May be harmful to eyes This projector is tested according to IEC EN62471 5 2015 Photobiological safety of lamps and lamp systems Part 5 Image projectors standard to be Risk Group 3 high ...

Page 4: ...nce is the distance measured from the projection lens at which the intensity or energy per unit of surface is lower than the applicable exposure limit on the cornea or skin If the person is within the hazard distance the beam is considered unsafe for exposure Light Hazard Distances LENS HAZARD DISTANCE 0 67 1 Super Wide fixed 1 12 1 Wide Fixed 1 16 1 49 1 Super Wide Zoom 5 5m 1 39 1 87 1 Wide Zoom...

Page 5: ...nition Video up to 100 m from the source l 3G SDI with loop through l Edge Blend with black level correction l Blanking control for custom input window sizing l Cornerstone Vertical Horizontal Keystone Pincushion Barrel and Image Rotation l Control via LAN and RS232 l Motorised lens mount l Separate control of screen and source aspect ratio l Non linear warp for irregular projection surfaces A ser...

Page 6: ... a new lens 26 Removing the lens 26 Fitting a lens hood 27 Operating the projector 28 Switching the projector on 28 Switching the projector off 28 Selecting an input signal 28 Selecting a test pattern 28 Adjusting the lens 29 Lens menu 29 Remote control 29 Adjusting the image 29 Orientation 29 Geometry 29 Picture 29 Signal inputs 32 Digital inputs and outputs 32 EDID on the DisplayPort HDMI and HD...

Page 7: ...arameters explained 53 Color temperature 54 Gains and lifts 54 Geometry menu 55 Aspect ratio 55 Theaterscope setting 56 Digital zoom 57 Overscan 58 Blanking 59 Keystone 60 Keystone example 61 Keystone settings 62 4 corners 63 Top right corner example 64 Rotation 65 Rotation example 66 Pincushion barrel 67 Pincushion Barrel example 67 Arc 68 Custom warp 69 Edge blend menu 70 Blend width 71 Black le...

Page 8: ...8 Fitting the image to the display 108 WUXGA images displayed full width 108 WUXGA images displayed with a height of 1200 pixels 108 WUXGA images displayed full height 109 Diagonal screen sizes 109 Positioning the image 110 Aspect ratios explained 112 Aspect ratios examples 112 Source 4 3 112 Source 16 9 113 Source 16 10 native 113 Aspect ratio example TheatreScope 114 Appendix A lens part numbers...

Page 9: ...Contents Digital Projection Ltd Titan Laser WUXGA Appendix E glossary of terms 128 Introduction Rev A January 2019 page9 Notes ...

Page 10: ...Digital Projection Ltd Titan Laser WUXGA Rev A January 2019 This page is intentionally left blank ...

Page 11: ...Rev A January 2019 Titan LaserWUXGA High Brightness Digital Video Projector INSTALLATION QUICK START GUIDE 119 712 ...

Page 12: ...ied with the projector Projector P ic M u te O P E N C L O S E M E N U E X IT IN F O H D M I1 O K O F F O N AL T L E N S FO C U S ZO O M IN O U T IN O U T S H IF T 2 1 3 H D M I2 D V I D is pl ay Po rt 1 H D T 3 G S D I V G A C O M P 1 C O M P 2 H D M I3 T E S T H D M I4 D is pl ay Po rt 2 R G B A L L 3 D E Y E P IP S W A P 4 5 6 7 8 9 0 A L T A D D R O S D O F F O N D E F A U L T F R E E Z E R E ...

Page 13: ...ection as this equipment MUST be earthed Handle the power cable carefully and avoid sharp bends Do not use a damaged power cable Rest of the World 1 2 1 Firmly push the mains connector into the socket 1 USA Only 1 Firmly push the mains connector into the socket 2 2 Rotate the connector 90 clockwise to lock it in place Installation Quick StartGuide Rev A January 2019 page13 Notes ...

Page 14: ... overview Projector overview 6 7 1 3 2 4 5 Front View 1 Eye bolts x4 2 Connections panel 3 Stacking pins x4 4 Adjustable feet x4 5 Stacking cups x4 6 Control panel 7 Mains socket and switch Rev A January 2019 page14 Installation Quick StartGuide Notes ...

Page 15: ...urce 3 AUTO SYNC Re synchronises with the current input signal 4 ASPECT Changes the aspect ratio 5 CENTER LENS Centers the lens 6 PIC MUTE Switches the laser off on or blanks the DMD Indicator Off the projector is in standby On blue the projector is on normal projection On red the projector is on picture mute is activated 7 LIGHT INDICATOR Off light is switched off Flashing red cycles of single fl...

Page 16: ...lashes fan error On red system error 11 MENU Displays and exits the OSD 12 Arrow buttons ENTER Navigation buttons used to highlight menu entries in the OSD Press ENTER to open or execute the highlighted menu entry 13 EXIT Exits the current OSD page and enters the level above 14 LENS SHIFT arrow buttons Each of these buttons moves the lens in the specified direction 15 FOCUS plus and minus buttons ...

Page 17: ...ble and disable screen timeout messages and control whether to show the OSD during projection 4 MENU Access the OSD If the OSD is open press this button to go back to the previous menu 5 Navigation arrows and OK Navigate through the menus with the arrows confirm your choice with OK In lens adjustment modes the arrows are used to move zoom or focus the lens See 11 below In lens adjustment modes or ...

Page 18: ...e the lens l ZOOM IN OUT adjust zoom 12 USER PRESET A B C D Load user presets 13 ALT Press and hold this button to access alternative functions for all buttons with a green label This projector does not use the following options on the remote DVI VGA COMP 1 and COMP 2 3D is only available on the HDMI 3 and 4 inputs 14 DVI DisplayPort2 numeric input 3 There is no DVI input on this projector Use wit...

Page 19: ... ALT to switch between left and right eye 3D dominance 21 ADDR ALL with red indicator at the top Assign and unassign an IR remote address l To assign an IR remote address 1 Press and hold this button until the red indicator starts flashing 2 Release this button and while the red indicator is still flashing enter a two digit address using the numeric input buttons The indicator will flash three tim...

Page 20: ...ception 40 40 The projector has infrared sensors at the front and back The angle of acceptance is 40 Make sure that the remote control is within the angle of acceptance when trying to control the projector Rev A January 2019 page20 Installation Quick StartGuide Notes ...

Page 21: ...o hang or mount the projector 1 Install the screen ensuring that it is in the best position for viewing by your audience 2 Mount the projector ensuring that it is at a suitable distance from the screen for the image to fill the screen Set the adjustable feet so that the projector is level and perpendicular to the screen The drawing shows the positions of the feet for table mounting and the fixing ...

Page 22: ...projector Roll and pitch The projector can be operated in numerous positions 360 Pitch 360 Roll In portrait mode it is recommended to position the projector with inputs facing upward as shown in the diagram Rev A January 2019 page22 Installation Quick StartGuide Notes ...

Page 23: ...e used to attach a mounting rail The eye bolts on top of the projector can be used with suspension cables to fly the projector Pin and cup stacking 1 2 3 The top of the projector has pins and the bottom of the projector has cups The pins and cups can connect together and be locked into place with a locking pin 1 Remove the adjustable feet from the projector that will be stacked on the top 1 2 Moun...

Page 24: ...s 45 45 Refer to the following guidelines when connecting one end of a suspension cable directly to an eye bolt and the other to a suspension point l The suspension cables can be connected to the eye bolts at an angle of up to 45 around the eye ring l The suspension cables must not be connected to the eye bolts at any angle across the eye ring l The suspension cable must run vertically up from the...

Page 25: ...g both ends to suspension points l The suspension cable can exit the eye bolts at an angle of up to 45 around the eye ring l The suspension cable can exit the eye bolts at an angle of up to 45 across the eye ring l The suspension cable should not be threaded through 2 or more eye bolts Example of an incorrect configuration Example of a correct configuration Installation Quick StartGuide Rev A Janu...

Page 26: ...ens aperture making sure that the plug on the zoom drive mechanism lines up with the socket on the front of the projector then push the lens in firmly as far as it will go 4 Turn the lens release lever anti clockwise to the mid position 2 3 5 The lens can now be pushed in further Push the lens in firmly as far as it will go 6 Turn the lens release lever fully anti clockwise so that it is pointing ...

Page 27: ...tting can be provided by your reseller or System Integrator 1 Remove the six screws 1 2 Remove the lens glass 3 Place hood over the lens aligned with the screw holes 4 Screw in the six screws to secure the hood 2 3 5 Pace the six sponges over the locating pins on the hood 3 6 Place the glass and bracket over the hood 4 7 Screw in the six screws to secure the glass and bracket to the hood 4 Install...

Page 28: ...for a short time until the POWER indicator goes steady red to indicate that the projector has entered STANDBY mode 2 If you need to switch the projector off completely switch the breaker switch next to the power connector to off and then disconnect the power cable from the projector Selecting an input signal See Using the menus on page 40 for full details of how to use the controls and the menu sy...

Page 29: ... directly without opening a menu l OK enters lens control then switches between Zoom Focus Adjustment and Shift Adjustment l EXIT exits lens control and opens the Lens menu l MENU exits lens control and returns to the main image l The arrow buttons adjust zoom focus and shift as indicated on the screen Adjusting the image Orientation This can be set from the Setup menu Highlight Orientation and ch...

Page 30: ...Digital Projection Ltd Titan Laser WUXGA Rev A January 2019 This page is intentionally left blank ...

Page 31: ...Rev A January 2019 Titan LaserWUXGA High Brightness Digital Video Projector OPERATING GUIDE 119 712 ...

Page 32: ...MI 4 HDMI 1 and 2 are HDMI 2 0 inputs supporting HDCP 2 2 HDMI 3 and 4 are HDMI 1 4b inputs supporting Frame Sequential and Dual Pipe 3D with HDCP 1 4 Connect an HDMI cable to the connector 2 DisplayPort DisplayPort 1 2 input Connect a DisplayPort cable to the connector Supports sources up to 4K UHD resolution at 60 Hz 3 HDBaseT LAN Receives digital signal from HDBaseT compliant devices with LAN c...

Page 33: ...Using DisplayPort HDMI HDBaseT switchers with the projector When using a DisplayPort HDMI HDBaseT source switcher with the projector it is important to set the switcher so that it passes the projector EDID through to the source devices If this is not done the projector may not be able to lock to the source or display the source correctly as its video output timings may not be compatible with those...

Page 34: ...D with HDCP 1 4 Connect an HDMI cable to the connector 3 3D Sync IR Sync output signal This is affected by the settings in the 3D menu such as Dark Time and 3D Sync Offset Connect this to an IR emitter or ZScreen Frame sequential 1080p 3D up to 120Hz and WUXGA 3D at 100Hz See 3D formats on page 119 for a complete list of supported formats and frame rates 1 Connect to HDMI 3 or 4 2 Set 3D Format in...

Page 35: ...3D connections Digital Projection Ltd Titan Laser WUXGA 3D Sync 4 3 2 1 1 3D Input 2 3D Sync In 3 3D Sync IR 4 IR emmitter or Zscreen Connection Guide Rev A January 2019 page35 Notes ...

Page 36: ...onnected to an electrically operated screen automatically deploying the screen when the projector starts up and retracting the screen when the projector shuts down l Aspect ratio trigger can be used to control screen shuttering for different aspect ratios l RS232 trigger can be used to control the screen or screen shuttering on receipt of an RS232 command 2 HDBaseT LAN The projector s features can...

Page 37: ...gital Projection website For simultaneous HDBaseT and LAN connectivity a third party distribution product can be utilised to combine HDBaseT video stream with LAN connection for delivery to the projector The projector s features can be controlled via a LAN connection using Digital Projection s Projector Controller application or a terminal emulation program Un crossed LAN cable Un crossed LAN cabl...

Page 38: ...ection example The Protocol Guide is available separately All of the projector s features can be controlled via a serial connection using commands described in the Protocol Guide Straight through cable Computer to Projector Rev A January 2019 page38 Connection Guide Notes ...

Page 39: ...Rev A January 2019 Titan LaserWUXGA High Brightness Digital Video Projector OPERATING GUIDE 119 712 ...

Page 40: ...8 9 0 A L T A D D R O S D O F F O N D E F A U L T F R E E Z E R E S Y N C A B C D U S E R P R E S E T Remote control Projector control panel Access the various menus using either the projector control panel or the remote control On either device 1 Press the MENU button The on screen display OSD opens showing the list of available menus Opening a submenu Move up and down the list using the UP and D...

Page 41: ... open a menu the page consists of the following elements l Title bar at the top shows which menu you have accessed l Highlighted item l Available and unavailable items Unavailable items appear a pale gray color Whether an item is available may depend on other settings l The text or symbol to the right of an item shows whether the item l has a value that can be changed the current value is shown l ...

Page 42: ...b menu then press ENTER OK Executing commands Confirmation dialog Highlighted command If the item contains a command highlighting it reveals an OK button Press ENTER OK to execute the highlighted command You may be asked for confirmation Use the ENTER OK to confirm or EXIT to cancel Rev A January 2019 page42 OperatingGuide Notes ...

Page 43: ...WN arrow buttons to highlight a value then press ENTER OK again to select the highlighted value Using a slider to set a value Slider Some parameters open a slider To set such a parameter 1 Press the LEFT or RIGHT arrow button or ENTER OK The arrow buttons will open the slider and adjust the value at the same time ENTER OK will open the slider without altering the initial value 2 Use the LEFT and R...

Page 44: ...he numeric field you wish to edit 2 Press ENTER OK to enter edit mode A numeric field in edit mode is white text on blue background 3 In edit mode l Use the UP arrow button to increase the numeric value l Use the DOWN arrow button to decrease the numeric value 4 Use the LEFT and RIGHT arrow buttons to edit the next or previous numeric fields within the same row 5 Once ready press ENTER OK to exit ...

Page 45: ...he list then press ENTER OK to confirm your choice Press EXIT to return to the main menu l Test Pattern Choose from White Black Red Green Blue Checkerboard Crosshatch V Burst H Burst Color Bar Off Use the LEFT and RIGHT arrow buttons to switch between values l Lens Image Color Geometry Edge Blend 3D Laser Setup and Network Press ENTER OK to open these menus and access various settings Press the DO...

Page 46: ... 2 5 4 2 1 4 1 7 0 1 0 7 1 1 1 1 1 2 1 5 1 6 9 10 4 1 Select the lens that is installed on the projector l Lens Memory Opens a sub menu see next page Lens control Lens Control settings operate in Zoom Focus Adjustment and Shift Adjustment mode Press ENTER OK to switch between modes When in Zoom Focus Adjustment mode l Use the UP and DOWN arrow buttons to adjust Zoom l Use the LEFT and RIGHT arrow ...

Page 47: ...tment information For example if using different screen sizes and aspect ratios you can save zoom focus and positioning for each screen size and aspect ratio in a dedicated preset Use Clear Memory to delete a memory preset if you need to save a new combination of lens settings in its place Overwriting a saved memory preset is not possible OperatingGuide Rev A January 2019 page47 Notes ...

Page 48: ...y the Gamma setting can improve contrast while maintaining good details for blacks and whites If excess ambient light washes out the image and it is difficult to see details in dark areas lower the Gamma setting to compensate This improves contrast while maintaining good details for blacks Conversely if the image is washed out and unnatural with excessive detail in black areas increase the setting...

Page 49: ...igh Dynamic Range hybrid log gamma This is a broadcast version of HDR for live TV and events Brightness Contrast Saturation Hue Sharpness and Noise Reduction are not available with the HDMI 3 and HDMI4 inputs l Brightness Contrast Saturation Hue Sharpness Highlight the setting you wish to edit and then press ENTER OK or the LEFT or RIGHT arrow button to open the slider Use the LEFT and RIGHT arrow...

Page 50: ...space Color Space is not available with HDMI 3 or HDMI 4 In most cases the Auto setting determines the correct colorspace to use If it does not you can choose a specific colorspace Choose from Auto YPbPr YCbCr RGB PC and RGB Video Rev A January 2019 page50 OperatingGuide Notes ...

Page 51: ...ual Color Matching Color Temperature and Gains and Lifts ColorMax See Setup menu on page 78 for further information about setting up the User 1 and User 2 color gamuts 1 Set Color Mode to ColorMax 2 Navigate to the ColorMax setting 3 Choose from HDTV Peak User 1 User 2 3 Color Matching and 7 Color Matching User 1 and User 2 are user defined color gamuts set via the Setup ColorMax menu OperatingGui...

Page 52: ...following See Color matching parameters explained on the facing page for more details about the Hue Saturation and Gain settings l Switch Auto Test Pattern On and Off l Adjust Hue Saturation and Gain settings for each individual color to improve the color balance of the projected image l Adjust white balance RGB values l Reset all values Rev A January 2019 page52 OperatingGuide Notes ...

Page 53: ...lor values in the following ways 1 Hue Specifies the position of each color red yellow green cyan blue and magenta relative to its neighboring colors 2 Saturation Specifies the level of white in each color i e how pale each color is 3 Gain Controls the amount of light that goes into each color i e the lowest gain would produce black OperatingGuide Rev A January 2019 page53 Notes ...

Page 54: ... setting Choose a value from 3200K warmer to 9300K cooler or Native no correction Gains and lifts 1 Set Color Mode to Gains and Lifts 2 Open the Gains and Lifts submenu Lifts allow you to adjust black levels of individual colors while gains adjust the bright part of the scale Set the sliders as required Rev A January 2019 page54 OperatingGuide Notes ...

Page 55: ...al projection angle or irregular screen surface Aspect ratio Image scaling and aspect ratio are also influenced by Setup Screen Setting See Theaterscope setting on the next page for further information about the TheaterScope aspect ratio This feature defines the aspect ratio of the source Use the Setup Screen Setting to define the screen aspect ratio If you choose a preset aspect ratio from here i...

Page 56: ...top and bottom of the 16 9 screen to make up for the difference in aspect ratios Without an anamorphic lens and without the TheaterScope setting applied a 16 9 source containing a 2 35 1 image looks like this Black margin part of the source Black margin part of the source If we change the setting to TheaterScope the black lines will disappear but the image will stretch vertically to reach the top ...

Page 57: ...ection is cropped out to preserve the overall image size l Digital Zoom defines the level of zoom that needs to be applied If Digital Zoom is set to 0 then the other settings in the menu will be disabled l Digital Pan and Digital Scan specify the area that is being enlarged l Digital Pan adjusts the horizontal coordinates l Digital Scan adjusts the vertical coordinates The Reset command restores t...

Page 58: ...Mode 4 Corners Rotation Keystone Pincushion Barrel Off Source Arc Custom Warp Blanking Keystone Off Crop Zoom Use this setting to compensate for noisy or badly defined image edges Crop removes unwanted artifacts from the edges of your image by cropping the edges Zoom increases the size of the image to force the edges off screen Rev A January 2019 page58 OperatingGuide Notes ...

Page 59: ...dd sized screen l cut off timecode dots in the top line of a picture l cut off subtitles etc Select the edge you wish to blank and use the LEFT and RIGHT arrow buttons to determine the amount of correction Use the Reset command to restore blanked edges OperatingGuide Rev A January 2019 page59 Notes ...

Page 60: ...Keystone 0 0 0 Reset 0 3 Use this setting to compensate for any distortion caused by the projector being in a different horizontal or vertical plane to the screen After correcting for keystone the aspect ratio of the projected image may be incorrect This is dependant upon the throw ratio of the lens at its current zoom setting Adjust the lens throw ratio to compensate for the apsect ratio that res...

Page 61: ... The resulting image is distorted The projector is positioned at an angle The aspect ratio is corrected when the correct lens throw ratio is applied The image is corrected when Keystone is applied but the aspect ratio is incorrect OperatingGuide Rev A January 2019 page61 Notes ...

Page 62: ...ect apply a negative Horizontal Keystone value using the LEFT arrow button 3 Projector high The projector is positioned above the screen at a downward angle To correct apply a negative Vertical Keystone value using the DOWN arrow button 4 Projector low The projector is positioned below the screen at an upward angle To correct apply a positive Vertical Keystone value using the UP arrow button 5 Pro...

Page 63: ...irregular shaped screens that may distort the image To apply a similar but less flexible correction while preserving the original aspect ratio of the image use the Keystone menu For each corner apply horizontal and or vertical correction as necessary to restore the rectangular shape of the image OperatingGuide Rev A January 2019 page63 Notes ...

Page 64: ...ojection Ltd Titan Laser WUXGA Usingtheprojector Top right corner example In this illustration the top right corner requires both horizontal and vertical correction Rev A January 2019 page64 OperatingGuide Notes ...

Page 65: ...ojector Digital Projection Ltd Titan Laser WUXGA Rotation Use this feature for example to correct a mounting error causing the image not to be level with the screen OperatingGuide Rev A January 2019 page65 Notes ...

Page 66: ...at would be occupied by the image without correction 2 Rotated image The image is smaller than the surrounding DMD area It is scaled in order to remain within the DMD area 3 Angle of rotation Each step on the slider is 0 25 of rotation In this example the angle is 5 therefore Rotation value is 20 Rev A January 2019 page66 OperatingGuide Notes ...

Page 67: ...o compensate electronically for such distortions You can also use this menu to make simple panoramic screen corrections without using external processors When also correcting for keystone the aspect ratio of the projected image may be incorrect This is dependant upon the throw ratio of the lens at its current zoom setting Adjust the lens throw ratio to compensate for the apsect ratio that results ...

Page 68: ...age size as the projector needs to maintain the aspect ratio A negative Arc value will not affect the overall image size This feature is similar to Pincushion Barrel but allows you to apply curvature to each edge of the image independently so you can have any combination of corrections Rev A January 2019 page68 OperatingGuide Notes ...

Page 69: ...ined User warp maps User custom warp maps require the Projector Controller PC application to create the custom warp Custom warp maps provide non linear curvature correction for curved or spherical screens and other irregular shaped surfaces such as building mapping OperatingGuide Rev A January 2019 page69 Notes ...

Page 70: ...th other projectors in the array as a result the overlapping edges are evenly lit and easily blend in with the rest of the image l Edge Blend Enable and disable Edge Blend l Align Pattern Add markers to the image showing the edges of the blend area and making the overlaps more visible to help adjust the physical position of the projectors in the array l Blend Width Determine the width of the blend...

Page 71: ...or Digital Projection Ltd Titan Laser WUXGA Blend width Use the LEFT and RIGHT arrow buttons to set the width of the blended regions 1 2 3 4 1 Top 2 Bottom 3 Left 4 Right OperatingGuide Rev A January 2019 page71 Notes ...

Page 72: ...erlaps the pond of mirrors of its neighbor In the example below the blended image comes from two projectors 1 and 2 Both images have black level uplift applied as a result artifacts 3 and 4 have emerged at the edges where the black level uplift region of one projector overlaps the pond of mirrors of the other To remove the artifacts you need to slightly reduce the size of the black level uplift re...

Page 73: ...tions and frame rates Use this menu to enable disable and set up 3D input as follows l 3D Format Off Dual Pipe and Frame Sequential Frame Sequential is for sources where Left and Right eye images are delivered as alternate frames from a single input Dual Pipe is for sources where Left and Right eye are delivered on separate inputs l Eye Swap Normal and Reverse set to Reverse if the left and right ...

Page 74: ... two separate HDMI links which the projector will interleave for 3D display l Frame Sequential For sequential 3D an external sync is required to identify left and right frames If no sync is available from the sequential source the projector will generate an output sync but it may then be necessary to manually set the Eye Swap each time the player is started L R L R Sequential Dark Time and Sync Of...

Page 75: ...he best result is obtained Dark time Fully On Fully Off Left Right Dark Time Dark Time Dark Time Banding can be caused if the image is displayed before each eye of the 3D switching glasses or ZScreen is not fully open Dark Time allows you to minimize this effect Eye swap LEFT 1 LEFT 2 LEFT 3 RIGHT 1 RIGHT 2 RIGHT 3 Dominance Left LEFT 1 LEFT 2 LEFT 3 RIGHT 1 RIGHT 2 RIGHT 3 Dominance Right The out...

Page 76: ...ay adjustments The sync signal from the 3D server will be in phase with the frames generated by its graphics card However to compensate for switching delays in the glasses or ZScreen Sync Offset is used to adjust the sync output signal sent to the ZScreen or 3D glasses to minimise overlapping ghosting in the image when viewed through the 3D glasses Rev A January 2019 page76 OperatingGuide Notes ...

Page 77: ...ection MUBC is available when multiple projectors are synced together Over time the output power of the lasers in the projector will diminish The output power of the lasers in different projectors may diminish at different rates When multiple units are synced this can lead to different units operating at different laser power levels causing the projected images to display at differing brightnesses...

Page 78: ...rnet port only Normal enables power ON via both HDBase T LAN and Ethernet ports l Screen Setting Choose from 16 10 16 9 and 4 3 l ColorMax Setting Set up user defined color gamut values l Power On Off Management Access the submenu to set up automatic projector power on and power off l Clock Adjust Access the submenu to set current date and local time l Startup Logo Choose from Off Original and Use...

Page 79: ...on the remote until the On indicator starts flashing Release the ADDR button and while the indicator is still flashing enter a two digit address using the numeric input buttons The indicator will flash three times quickly to confirm the change l IR Code Reset Use this command to unassign an IR code from the projector This will revert the IR Code value to 00 To unassign an IR code from the remote c...

Page 80: ...output frame rate When you know that all input frame rates are the same value you can set an output frame rate to reduce the time it takes to switch between inputs Highlight the UP arrow at the top of the page and press ENTER OK to go back to the second Setup menu page ColorMax The Projector Controller software is available for download from the Digital Projection website free of charge This tool ...

Page 81: ...row buttons to navigate to the x or y coordinate 2 Use the UP and DOWN arrow buttons to increase and decrease the value respectively 3 Exit edit mode l press ENTER OK if you want to save the edited values l press EXIT if you do not wish to save the edited values 4 If necessary highlight another color and repeat the procedure OperatingGuide Rev A January 2019 page81 Notes ...

Page 82: ...OWER button is pressed on the control panel or the ON button is pressed on the remote control l Scheduled on off Access this submenu to create a weekly schedule for automatic on and off times 1 Set a schedule l Use the UP and DOWN arrow buttons to highlight a row then press ENTER OK to enable edit mode l Within a row navigate with the LEFT and RIGHT arrow buttons Set values with the UP and DOWN ar...

Page 83: ...C Mute to turn the laser off when the PIC Mute activated Select DMD Blanking to project a black image when PIC Mute is activated l Fade In Timer Fade out timer is available when PIC Mute is set to Laser Choose from Off 1s 2s 3s 4s and 5s Select Off to start projecting the image as soon as PIC Mute is deactivated Select a time to fade the image in when PIC Mute is deactivated l Fade Out Timer Fade ...

Page 84: ...rotation option to rotate the OSD menu when the projector is displaying in portrait Memory Presets from one input cannot be applied to another input Presets for inputs HDMI 3 and 4 do not contain all the settings normally stored for other inputs See memory scheme and memory items on page 125 for information about the parameters that can be saved in a memory preset The current image settings can be...

Page 85: ... Correction FREEZE and PIP SWAP Select the function that you want to assign to hotkey1 This function will be activated when you press hotkey 1 on the control panel l Hotkey2Function Choose from Information Test Pattern Lens Memory Load Ambient Brightness Correction FREEZE and PIP SWAP Select the function that you want to assign to hotkey2 This function will be activated when you press hotkey 2 on ...

Page 86: ...this submenu to view the status of each Art Net channel l AMX Switch on or off Network setup Network Setup DHCP IP Gateway DNS Subnet Mask MAC Apply Off 192 168 000 100 000 000 000 000 000 000 000 000 255 255 255 000 00 18 27 2d f2 06 l DHCP IP Subnet Mask Gateway DNS Set DHCP to On if the IP address is to be assigned by a DHCP server or Off if it is to be set here If DHCPis On it will not be poss...

Page 87: ...t Sub Net Universe and Start Address for the network l Apply Select to apply any changes to the art net setup Art net channel setting Art Net Channel Setting Channel 2 Channel 1 Channel 3 PIC Mute Power Power Level Channel 4 Channel 5 Input Channel Control l Chanel 1 5 Choose from None Power PIC Mute Power Level Input and Channel Control Select the projector functions that are associated with each...

Page 88: ...and off l Source Select an input source for the PIP image Any combinations are possible between main and PIP input source as long as one of the inputs is either DisplayPort or 3G SDI l Position Set the location of the PIP image on the screen Choose from Top Left Top Right Bottom Left Bottom Right and PBP Rev A January 2019 page88 OperatingGuide Notes ...

Page 89: ...03 125 This menu gives information about software and hardware configuration input source and laser operating times It also allows you to restore the factory default settings Signal format Signal Format Scanning Frequency Pixel Clock Timing Color Format H 134 8 KHz V 59 9 Hz 593 80 MHz 3840x2160 59 9Hz YCbCr 4 2 0 8 bit Active Source HDMI 1 HDR Format No Data Scanning Frequency Pixel Clock Timing ...

Page 90: ...ermal status Thermal Status LD 1 5 Temp LD 6 10 Temp Inlet DMD Temp Fan 5 8 Speed Fan 9 12 Speed Fan 1 4 Speed Fan 13 16 Speed 20 18 19 20 19 C 24 23 22 22 20 C 22 30 C 1493 1503 1493 1503 1498 1496 3010 NA 1406 1402 1396 1410 1691 3517 5886 2808 Fan 17 20 Speed Fan 21 24 Speed Water Pump Speed 2804 4453 4453 4463 4519 1406 1406 1400 3412 3388 3412 Fan 25 28 Speed Fan 29 Speed 1396 1408 1408 1402 ...

Page 91: ...00XXXXX0000 ME20 VE20 2 0 5 20181107 Titan Laser 33000 4K UHD LE10 29 20 3140 2 HDMI 1 NA Software Version 3 2 0 32 2 CT03 125 Factory Reset WARNING All user se ngs will be lost Press OK to confirm Press Exit to cancel Factory Reset WARNING All user se ngs will be lost Press OK to confirm Press Exit to cancel To restore the factory default settings 1 Navigate to Factory Reset and press ENTER OK 2 Wh...

Page 92: ...on Ltd Titan Laser WUXGA Served web pages Served web pages The served web pages allow you to control the projector remotely via LAN The default IP address is 192 168 0 100 Rev A January 2019 page92 OperatingGuide Notes ...

Page 93: ...Served web pages Digital Projection Ltd Titan Laser WUXGA OperatingGuide Rev A January 2019 page93 Notes ...

Page 94: ...Digital Projection Ltd Titan Laser WUXGA Served web pages Rev A January 2019 page94 OperatingGuide Notes ...

Page 95: ...Served web pages Digital Projection Ltd Titan Laser WUXGA OperatingGuide Rev A January 2019 page95 Notes ...

Page 96: ...Digital Projection Ltd Titan Laser WUXGA Served web pages Rev A January 2019 page96 OperatingGuide Notes ...

Page 97: ...Served web pages Digital Projection Ltd Titan Laser WUXGA OperatingGuide Rev A January 2019 page97 Notes ...

Page 98: ...Digital Projection Ltd Titan Laser WUXGA Served web pages Rev A January 2019 page98 OperatingGuide Notes ...

Page 99: ...Served web pages Digital Projection Ltd Titan Laser WUXGA OperatingGuide Rev A January 2019 page99 Notes ...

Page 100: ...Digital Projection Ltd Titan Laser WUXGA Served web pages Rev A January 2019 page100 OperatingGuide Notes ...

Page 101: ...Rev A January 2019 Titan LaserWUXGA High Brightness Digital Video Projector REFERENCE GUIDE 119 712 ...

Page 102: ... 04 R frame 1 12 1 Wide Fixed 105 608 3m 15m V 0 567 U 0 45 D frame H 0 188 L 0 188 R frame 1 16 1 49 1 Super Wide Zoom 109 236 3m 15m V 0 4 U 0 4 D frame H 0 188 L 0 188 R frame 1 39 1 87 1 Wide Zoom 105 610 4m 24m V 0 567 U 0 45 D frame H 0 188 L 0 188 R frame 1 87 2 56 1 Standard Zoom 105 611 4m 24m V 0 567 U 0 45 D frame H 0 188 L 0 188 R frame 2 56 4 16 1 Semi Long Zoom 105 612 9 1m 45m V 0 5...

Page 103: ... about using the right lens and hood 1 2 Identify the required lens by calculating the throw ratio A throw ratio is the ratio of the throw distance to the screen width 1 Use the formula above to obtain the required throw ratio 2 Allow a tolerance of 2 in the throw ratio calculation and match the throw ratio with a lens from the table below Throw ratios Focus Range 0 67 1 Super Wide fixed 1 1m 10m ...

Page 104: ...Wide fixed 1 1m 10m 1 12 1 Wide Fixed 3m 15m 1 16 1 49 1 Super Wide Zoom 3m 15m 1 39 1 87 1 Wide Zoom 4m 24m 1 87 2 56 1 Standard Zoom 4m 24m 2 56 4 16 1 Semi Long Zoom 9 1m 45m 4 16 6 96 1 Long Zoom1 12m 80m 6 92 10 36 1 Long Zoom2 12m 80m 1 Calculate the throw ratio using the formula Your screen is 4 5m wide and you wish to place the projector approximately 11m from the screen The throw ratio wi...

Page 105: ...ple Fig 1 illustrates a 4 3 image within a 16 9 display When a 16 9 projector is used for a 4 3 image the image does not fill the width of the DMD creating a pillarboxing effect blank spaces to the left and right Fig 2 shows the same image projected on a 4 3 screen using a standard lens chosen with the basic calculation The DMD accurately fills the width of the screen however the pillarboxing is n...

Page 106: ...ly be applied if greater than 1 If TRC is 1 or less disregard it and calculate the throw ratio using the basic formula See Fitting a lens hood on page 27 for more information about using the right lens and hood 1 For TRC 1 amend the basic throw ratio formula as follows Allow a tolerance of 2 in the throw ratio calculation 2 Once a throw ratio is established identify the matching lens from the tabl...

Page 107: ...3m 15m 1 39 1 87 1 Wide Zoom 4m 24m 1 87 2 56 1 Standard Zoom 4m 24m 2 56 4 16 1 Semi Long Zoom 9 1m 45m 4 16 6 96 1 Long Zoom1 12m 80m 6 92 10 36 1 Long Zoom2 12m 80m Your screen is 4 5m wide you wish to place the projector approximately 11m from the screen The source is 4 3 1 Calculate TRC as follows TRC 1 6 1 33 1 2 2 Calculate the throw ratio Throw ratio 11 4 5 x 1 33 1 84 3 Allow a tolerance ...

Page 108: ...he following examples show how a number of common formats may be displayed depending on your DMD resolution WUXGA images displayed full width full width 1920 pixels 2 35 1 Scope 817 pixels 16 10 full height 1200 pixels 16 9 1 78 1 1080 pixels WUXGA images displayed with a height of 1200 pixels full height 1200 pixels 4 3 1 33 1 1596 pixels full width 1920 pixels 16 10 1 6 1 1920 pixels Rev A Janua...

Page 109: ...e D When dealing with large screens and projection distances at different aspect ratios it is more convenient to measure screen width W and height H The example calculations below show how to convert diagonal sizes into width and height at various aspect ratios 2 35 1 Scope W D x 0 92 H D x 0 39 1 85 1 W D x 0 88 H D x 0 47 16 9 1 78 1 W D x 0 87 H D x 0 49 16 10 1 6 1 native aspect ratio for WUXG...

Page 110: ... the highest quality image Shifting the lens up rising front Centred Lens Shifting the lens down falling front The normal position for the projector is at the centre of the screen However you can set the projector above or below the centre or to one side and adjust the image using the Lens shift feature known as rising and falling front to maintain a geometrically correct image Rev A January 2019 ...

Page 111: ...ent outside the ranges specified on the following page may result in an unacceptable level of distortion particularly at the corners of the image due to the image passing through the periphery of the lens optics If the lens is to be shifted in two directions combined the maximum range without distortion will be somewhat less as can be seen in the illustrations ReferenceGuide Rev A January 2019 pag...

Page 112: ...ratio 16 9 leaves black bars at the top and bottom of the screen letterboxing effect 4 3 and 5 4 leave black bars at the sides of the screen pillarboxing l TheaterScope is a special setting used in combination with an anamorphic lens an optional accessory It removes letterboxing from a 2 35 1 source packed into a 16 9 frame l Source shows the image with its original aspect ratio if this does not m...

Page 113: ...tios explained Digital Projection Ltd Titan Laser WUXGA Source 16 9 Aspect Ratio 16 10 1 1 Aspect Ratio Source 16 9 Source 16 10 native Aspect Ratio Source 16 10 ReferenceGuide Rev A January 2019 page113 Notes ...

Page 114: ...p for the difference in aspect ratios Black margin part of the source Black margin part of the source Without an anamorphic lens and without the TheaterScope setting applied a 16 9 source containing a 2 35 1 image looks like this If we change the setting to TheaterScope the black lines will disappear but the image will stretch vertically to reach the top and bottom of the DMD An anamorphic lens wi...

Page 115: ... the distance from the outer end of the lens which will vary from lens to lens See Fitting a lens hood on page 27 for further information about using the right lens and hood LENS PART No FOCUS RANGE LENS EXTENSION 0 67 1 Super Wide fixed 105 607 1 1m 10m 141mm 1 12 1 Wide Fixed 105 608 3m 15m 205mm 1 16 1 49 1 Super Wide Zoom 109 236 3m 15m 162 5mm 1 39 1 87 1 Wide Zoom 105 610 4m 24m 130 5mm 1 87...

Page 116: ...48 848 x 480 60 X X 60 1024 x 768 60 X X 60 1024 x 768 75 X X 60 1024 x 768 85 X X 60 1280 x 720 48 X X 48 1280 x 768 60 X X 60 1280 x 800 60 X X 60 1280 x 960 60 X X 60 1280 x 1024 60 X X 60 1280 x 1024 75 X X 60 1280 x 1024 85 X X 60 1366 x 768 60 X X 60 1440 x 900 60 X X 60 1400 x 1050 60 X X 60 1600 x 1200 60 X X 60 1680 x 1050 60 X X 60 1920 x 1080 48 X X 48 1920 x 1200 RB 50 X X X 50 1920 x ...

Page 117: ...0 00 X X X X 50 576i 50 00 50 EDTV 480p 59 94 X X X X X X X 60 576p 50 00 X X X X X X X 50 HDTV 1035i 60 00 X X X X X 60 1080i 50 00 X X X X X 50 1080i 59 94 X X X X X 60 1080i 60 00 X X X X X 60 720p 50 00 X X X X X X X 60 720p 59 94 X X X X X X X 60 720p 60 00 X X X X X X X 60 1080p 23 98 X X X X X 48 1080p 24 00 X X X X X 48 1080p 25 00 X X X X X 60 1080p 29 97 X X X X X 60 1080p 30 00 X X X X ...

Page 118: ... RGB YUV 8 10 12 bit 2048x1080 4K UHD 3840x2160 24 X X X X 1 X 1 48 1 HDBaseT supports 4K 24 25 30Hz 4 2 2 only 4K UHD 3840x2160 25 X X X X 1 X 1 50 4K UHD 3840x2160 30 X X X X 1 X 1 60 4K UHD 3840x2160 50 X X 8 bits X 2 X 3 X 3 50 2 HDBaseT supports 4K 50 60Hz 4 2 0 only 3 HDMI 1 2 support up to 4 2 2 HDBaseT does not support 4K UHD 3840x2160 60 X X 8 bits X 2 X 3 X 3 60 Rev A January 2019 page11...

Page 119: ...20x1200 60 00 1125 00 74 04 120 00 Maintained aspect ratio at 16 10 SDI formats Timing SDI Link Mode Signal Standards Color Encode Sampling Structure Bit Depth NTSC SD SMPTE 259M C 270Mbps SD YCbCr 4 2 2 10 PAL SD SMPTE 259M C 270Mbps SD YCbCr 4 2 2 10 1035i60 HD SMPTE 292M 1 5Gbps HD YCbCr 4 2 2 10 1080i59 HD SMPTE 292M 1 5Gbps HD YCbCr 4 2 2 10 1080i60 HD SMPTE 292M 1 5Gbps HD YCbCr 4 2 2 10 108...

Page 120: ...pported signal inputmodes Timing SDI Link Mode Signal Standards Color Encode Sampling Structure Bit Depth 1080P59 3G Level B SMPTE 424M 3Gbps YCbCr 4 2 2 10 1080P60 3G Level B SMPTE 424M 3Gbps YCbCr 4 2 2 10 Rev A January 2019 page120 ReferenceGuide Notes ...

Page 121: ...ay type A connector 1 TMDS Data 2 2 TMDS Data 2 Shield 3 TMDS Data 2 4 TMDS Data 1 5 TMDS Data 1 Shield 6 TMDS Data 1 7 TMDS Data 0 8 TMDS Data 0 Shield 9 TMDS Data 0 10 TMDS Clock 11 TMDS Clock Shield 12 TMDS Clock 13 CEC 14 not connected 15 SCL DDC Clock 16 SCA DDC Data 17 DDC CEC Ground 18 5 V Power 19 Hot Plug Detect ReferenceGuide Rev A January 2019 page121 Notes ...

Page 122: ...Lane 1 n Lane 1 negative Pin 7 ML_Lane 2 p Lane 2 positive Pin 8 GND Ground Pin 9 ML_Lane 2 n Lane 2 negative Pin 10 ML_Lane 3 p Lane 3 positive Pin 11 GND Ground Pin 12 ML_Lane 3 n Lane 3 negative Pin 13 CONFIG1 Connected to Ground1 Pin 14 CONFIG2 Connected to Ground1 Pin 15 AUX CH p Auxiliary Channel positive Pin 16 GND Ground Pin 17 AUX CH n Auxiliary Channel negative Pin 18 Hot Plug Hot Plug D...

Page 123: ...Appendix C wiringdetails Digital Projection Ltd Titan Laser WUXGA 3G SDI in 3G SDI out 3G SDI connector 75 ohm BNC HDBaseT input HDBaseT LAN RJ45 socket ReferenceGuide Rev A January 2019 page123 Notes ...

Page 124: ... LAN HDBaseT LAN RJ45 socket Shared with HDBaseT RS232 RS232 pin view of female connector 9 way D type connector 1 unused 2 Transmitted Data TX 3 Received Data RX 4 unused 5 Signal Ground 6 unused 7 unused 8 unused 9 unused IR input Tip Sleeve Ring 3 5 mm mini jack Tip Signal Ring Not connected Sleeve Ground Rev A January 2019 page124 ReferenceGuide Notes ...

Page 125: ...l select the PQ 400 PQ 500 PQ 1000 HLG option Saturation N A Hue N A Sharpness N A Noise Reduction N A Freeze N A Not Memorized Ambient Brightness Correction N A Color Space N A Color Mode ColorMax When Color Mode is selected at ColorMax option Manual Color Matching When non HDR and the Color Mode is selected at Manual Color Matching option When HDR and the Color Mode is selected at Manual Color M...

Page 126: ...n Lens Throw Ratio H PinBarrel V PinBarrel 4Corner Blanking Arc Customer Warp Edge Blending Black Level 3D Format 3D Sync 3D DarkTime 3D SyncOffset 3D SyncReference Laser Mode Laser Power Fan Altitude Contrast Brightness MUBC Orientation High Altitude Screen Setting N A Auto Poweroff Auto Poweron Schedule Setting Startup Logo Blank Screen Trig 1 N A Trig 2 N A Auto Source N A Pic Mute Setting Ir E...

Page 127: ... Ir Code OSD Language OSD Menupos OSD Trans OSD Timer Standby Power Instant Startup Standby Period EDID Mode Hotkey Setting Keypad Blacklight Smear Reduction Output Frame Rate N A Lan DHCP Lan IP Lan Subnet Lan Gateway Lan DNS Lan MAC Lan AMX Artnet Setting PIP Mode N A PIP Input N A PIP Position N A ReferenceGuide Rev A January 2019 page127 Notes ...

Page 128: ...h left hand polarisation can pass through the left lens and light with righth and polarisation can pass through the right hand lens These glasses are used in conjunction with another device which polarizes the image such as a ZScreen A Adjust lines A pattern applied to the image where its edge is to be blended with another image Adjust lines are used to position the projectors in the array during ...

Page 129: ...ponent Video signals brightness is the same as luminance Brightness optical Describes how bright an image that is projected onto a screen appears to an observer C C Also known as C this is the component or pair of components of a Component Video signal which describes color difference information Chrominance Also known as C this is the component or pair of components of a Component Video signal wh...

Page 130: ...etween left and right eye DDC Display Data Channel A communications link between the source and projector DDC is used on the HDMI DVI and VGA inputs The link is used by the source to read the EDID stored in the projector Deinterlacing The process of converting interlaced video signals into progressive ones DHCP Dynamic Host Configuration Protocol A network protocol that is used to configure networ...

Page 131: ... sequence to create a moving picture A frame is made of horizontal lines of pixels For example a 1920x1080 frame consists of 1080 lines each containing 1920 pixels In analog video frames are scanned one at a time progressive scanning or split into fields for each field to be scanned separately interlaced video Frame rate The number of frames shown per second fps In TV and video a frame rate is the...

Page 132: ...le to NTSC I Interlacing A method of updating the image The screen is divided in two fields one containing every odd horizontal line the other one containing the even lines The fields are then alternately updated In analog TV interlacing was commonly used as a way of doubling the refresh rate without consuming extra bandwidth Interleaving The alternation between left and right eye images when disp...

Page 133: ...ies 625 lines transmitted at 50 interlaced fields per second Pillarboxing Black margins at the left and right of the image Pillarboxing appears when a narrower image is packed into a wider frame without changing the aspect ratio Pixel Short for Picture Element The most basic unit of an image Pixels are arranged in lines and columns Each pixel corresponds to a micromirror within the DMD resolutions...

Page 134: ...s for example 1920 x 1200 RGB Red Green and Blue An uncompressed Component Video standard S Saturation The amount of color in an image Scope An aspect ratio of 2 35 1 SDTV Standard Definition Television An interlaced television system with a lower resolution than HDTV For PAL and SECAM signals the resolution is 576i for NTSC it is 480i SECAM Sequential Color with Memory The television system used ...

Page 135: ...f the DMD aspect ratio to the image source aspect ratio TRC DMD aspect ratio Source aspect ratio TRC is only used in calculations if it is greater than 1 U UXGA A display resolution of 1600 x 1200 pixels with a 4 3 screen aspect ratio Stands for Ultra Extended Graphics Array V Vertical Scan Rate The rate at which the frames of the incoming signal are refreshed The rate is set by the vertical synch...

Page 136: ... signal color Not to be confused with Cr Cb Z ZScreen A special kind of light modulator which polarizes the projected image for 3D viewing It normally requires that images are projected onto a silver screen The ZScreen is placed between the projector lens and screen It changes the polarization of the projected light and switches between left and right handed circularly polarized light at the field...

Page 137: ...saw GA 30144 USA Tel 1 770 420 1350 Fax 1 770 420 1360 powerinfo digitalprojection com www digitalprojection com Digital Projection Limited Greenside Way Middleton Manchester M24 1XX UK Registered in England No 2207264 Registered Office As Above Tel 44 161 947 3300 Fax 44 161 684 7674 enquiries digitalprojection co uk service digitalprojection co uk www digitalprojection co uk Digital Projection I...

Reviews: