


105-453B January 2007
Page 4.21
Digital Projection
LIGHTNING 35HD-T, 40HD-T
User Manual
4. Using the Menus
Notes
Do not make changes to the
networking con
fi
guration
unless you understand what
you are doing, or have taken
advice from your Network
Manager.
If you make a mistake, it is
possible that you will lose
contact with the projector.
Always double-check your
settings before pressing the
APPLY button.
Always keep a written note of
the original settings, and any
changes you have made.
When making these settings,
leading zeroes
must
be used
for numbers less than 3 digits in
length. eg 192.168.010.001
When making a network
connection, eg via the address
box in a browser, leading
zeroes are not necessary.
Con
fi
g menu...
Network con
fi
guration...
Ethernet #1
Settings...
IP address
Netmask
Menu buttons...
Con
fi
gure wireless LAN
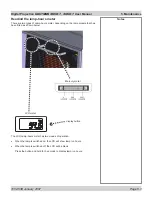
Making the IP address and Netmask settings
Press the
IP ADDRESS
fi
eld.
Use the on-screen keypad to enter the IP address, remembering to include
leading zeroes for numbers less than 3 digits in length. The numbers will appear
in the
fi
eld at the top of the keypad as you type.
If you make a mistake, press
DELETE
to undo your typing one character at a
time, or press
CANCEL
to start again completely.
Press
ENTER
to transfer the completed address from the keypad display to the
IP ADDRESS
fi
eld.
repeat for
NETMASK
.
When all settings are complete, double check, then press
APPLY
.
Example
To connect a number of projectors and computers in a self contained network,
using a hub:
For each projector and computer, set the
fi
rst three IP address number groups
the same, and the last number different (any number between 001 and 254).
The example below follows the convention for a private non-resolvable network
(cannot be seen on the internet).
172 . 016 . 010 . 001
. 002
. 003 etc
Set the Netmask
fi
eld for all projectors and computers to
255 . 255 . 255 . 000
•
•
•
•
•
•


