English
10
m. Lock-off button (Lock-on button for specified
regions)
inTEnDED uSE
These heavy-duty circular saws are designed for
professional wood cutting applications.
Do not
use water feed attachments with this saw.
Do not
use abrasive wheels or blades.
Do not
use under
wet conditions or in the presence of flammable
liquids or gases. Do not use diamond wheels.
These heavy-duty saws are professional power
tools.
Do not
let children come into contact with
the tool. Supervision is required when inexperienced
operators use this tool.
• This product is not intended for use by persons
(including children) suffering from diminished
physical, sensory or mental abilities; lack of
experience, knowledge or skills unless they are
supervised by a person responsible for their
safety. Children should never be left alone with
this product.
Electrical Safety
This appliance is double insulated
therefore no earth wire is required.Always
check that the power supply corresponds
to the voltage on the rating plate.
WARNING:
115 V units have to
be operated via a fail-safe isolating
transformer with an earth screen between
the primary and secondary winding.
If the supply cord is damaged, it must be replaced
by a specially prepared cord available through the
D
e
WALT
service organisation.
using an Extension Cable
If an extension cable is required, use an approved
3–core extension cable suitable for the power input
of this tool.The minimum conductor size is 1.5 mm
2
;
the maximum length is 30 m.
When using a cable reel, always unwind the cable
completely.
aSSEMBly anD aDjuSTMEnTS
WARNING: To reduce the risk of
injury, turn unit off and disconnect
machine from power source before
installing and removing accessories,
before adjusting or changing set-
ups or when making repairs.
An
accidental start-up can cause injury.
Changing Blades
CAUTION:
The inner flange has a 20
mm diameter on one side and a 19 mm
diameter on the other. The side with 19
mm diameter is marked by "19", and
the other side with 20mm diameter
marked by “20”. Use the correct side
for the hole diameter of the blade you
intend to use. Mounting the blade
on the wrong side can result in the
dangerous vibration.
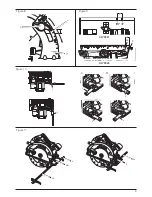
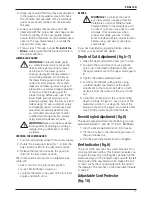
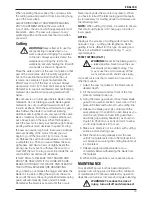
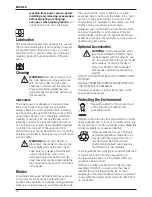
To inSTall ThE BlaDE (fiG. 1–4)
1. Using the lower guard lever (k), retract the lower
blade guard (i) and place blade on saw spindle
against the inner clamp washer (o), making
sure that the blade will rotate in the proper
direction (the direction of the rotation arrow
on the saw blade and the teeth must point in
the same direction as the direction of rotation
arrow on the saw). Do not assume that the
printing on the blade will always be facing you
when properly installed. When retracting the
lower blade guard to install the blade, check
the condition and operation of the lower blade
guard to assure that it is working properly. Make
sure it moves freely and does not touch the
blade or any other part, in all angles and depths
of cut.
2. Place outer clamp washer (n) on saw spindle
with the large flat surface against the blade and
the wording on the outer clamp washer facing
you.
3. Thread blade clamping screw (j) into saw
spindle by hand (screw has right-hand threads
and must be turned clockwise to tighten).
4. Depress the blade lock (c) while turning the saw
spindle with the blade wrench until the blade
lock engages and the blade stops rotating.
5. Tighten the blade clamping screw firmly with the
blade wrench.
notE:
Never engage the blade lock while saw
is running, or engage in an effort to stop the tool.
Never turn the saw on while the blade lock is
engaged. Serious damage to your saw will result.
To rEPlaCE ThE BlaDE (fiG. 2–4,)
1. To loosen the blade clamping screw (j), depress
the blade lock (c) and turn the saw spindle
with the blade wrench (s) until the blade lock
engages and the blade stops rotating. With the
blade lock engaged, turn the blade clamping
screw counterclockwise with the blade wrench
(screw has right-hand threads and must be
turned counterclockwise to loosen).
2. Remove the blade clamping screw (j) and outer
clamp washer (n). Remove old blade.

