English
12
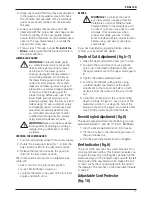
The adjustable cord protector (v) allows the cord to
be positioned vertical or parallel to the blade. It is
shipped in the vertical position.
To oBTain ThE ParallEl PoSiTion (fiG. 10a)
1. Press the cord protector (v) in as indicated by
the arrow.
2. Rotate the cord protector clockwise to the
parallel position.
To oBTain ThE vEriCal PoSiTion (fiG. 10B)
1. Press the cord protector (v) in as indicated by
the arrow.
2. Rotate the cord protector counterclockwise to
the vertical position.
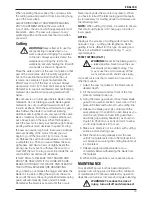
Mounting and adjusting the Parallel
fence (fig. 11)
The parallel fence (w) is used for cutting parallel to
the edge of the workpiece.
MounTinG
1. Insert parallel fence adjustment knob (x) into the
hole (aa) as shown in Figure 11, keeping the
knob loose to allow the parallel fence to pass.
2. Insert the parallel fence (w) into the base plate
(h) as shown in Figure 11.
3. Tighten the parallel fence adjustment knob (x).
aDjuSTinG
1. Slacken the fence adjustment knob (x) and set
the parallel fence (w) to the desired width.
The adjustment can be read on the parallel
fence scale.
2. Tighten the fence adjustment knob (x).
Prior to operation
• Make sure the guards have been mounted
correctly. The saw blade guard must be in
closed position.
• Make sure the saw blade rotates in the direction
of the arrow on the blade.
• Do not use excessively worn saw blades.
oPEraTion
instructions for use
WARNING:
Always observe the safety
instructions and applicable regulations.
WARNING: To reduce the risk of
injury, turn unit off and disconnect
machine from power source before
installing and removing accessories,
before adjusting or changing
set-ups or when making repairs.
An
accidental start-up can cause injury.
Proper hand Position (fig. 12)
WARNING:
To reduce the risk of
serious personal injury,
AlWAys
use
proper hand position as shown.
WARNING:
To reduce the risk of
serious personal injury,
AlWAys
hold
securely in anticipation of a sudden
reaction.
Proper hand position requires one hand on the
main handle (b), with the other hand on the auxiliary
handle (e).
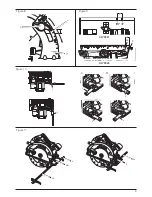
Switching on and off (fig. 1)
To run the tool, press the ON/OFF-switch (a). For
continuous operation, press the lock-on button (m)
and release the ON/Off-switch.
To stop the tool, release the ON/OFF-switch. To stop
the tool in continuous operation, press the ON/OFF-
switch once more. Always switch OFF the tool when
work is finished and before unplugging.
Switching on and off (safety switch)
(fig. 1)
If your saw is equipped with a safety switch to
prevent inadvertent operation, please follow the
below instruction.
To run the tool, press the lock-off button (m) and
subsequently press the ON/OFF-switch (a). Release
the lock-off button (m).
To stop the tool, release the ON/OFF-switch (a).
Always switch OFF the tool when work is finished
and before unplugging.
NOTICE:
Do not switch the tool ON or
OFF when the saw blade touches the
workpiece or other materials.
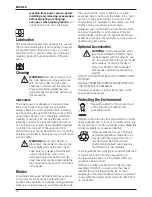
workpiece Support (fig. 13–16)
WARNING: To reduce the risk of
serious personal injury, support the
work properly and hold the saw
firmly to prevent loss of control.
Figures 14 and 16 show proper sawing position.
Figures 15 and 17 show an unsafe condition. Hands
should be kept away from cutting area, and power
cord is positioned clear of the cutting area so that it
will not get caught or hung up on the work.
To avoid kickback, ALWAYS support board or panel
NEAR the cut, (fig. 14 and 16). DON’T support
board or panel away from the cut (fig. 15 and 17).


