background image

Featur

es & Options

16

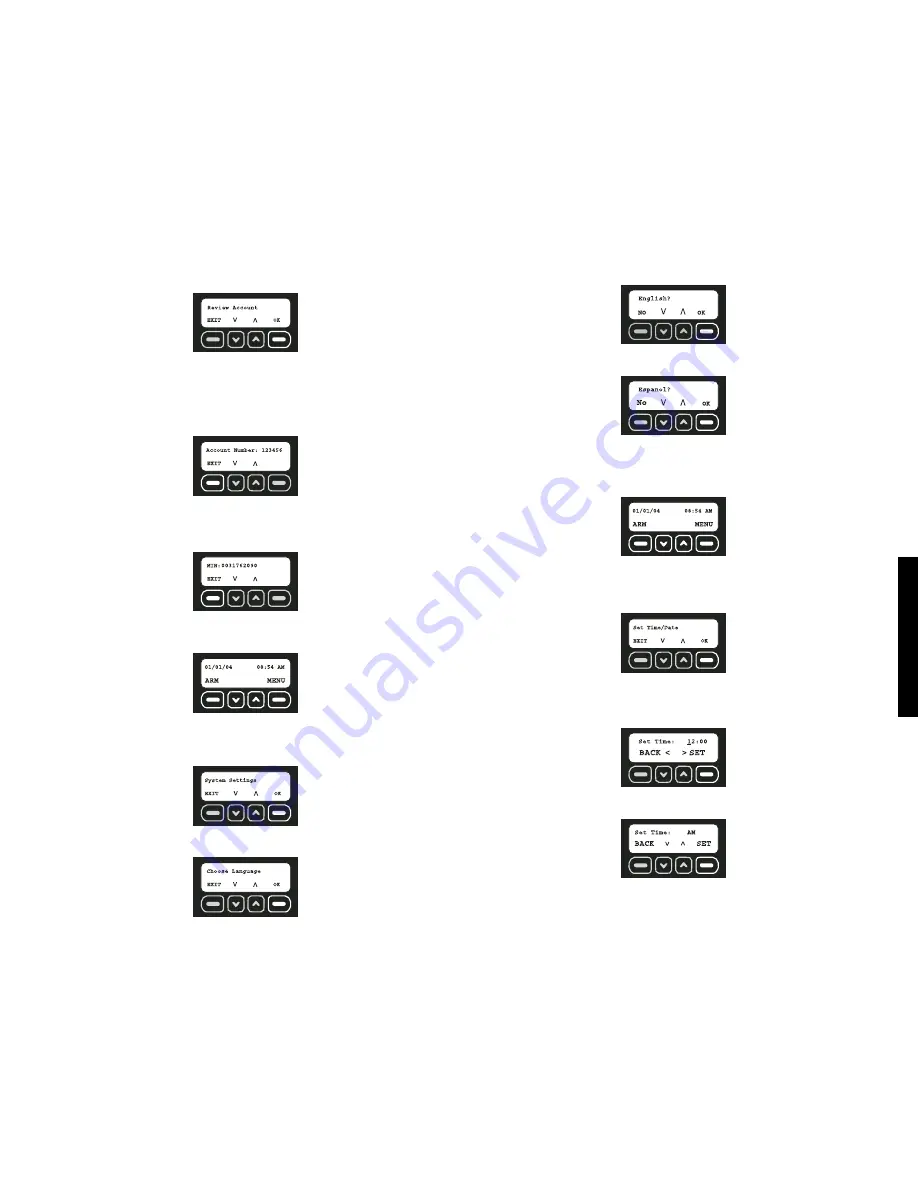
5. Use the up and down arrows to scroll through the menu until the Review Account

screen is displayed. Select OK.

Customer Service information
NOTE: To activate the monitoring of this system, contact customer service.

To View Account Number

Use the up and down arrows to scroll through the menu until the Account Number
screen is displayed. This screen will display the account number. This number is impor-
tant to provide to customer service. To exit this screen, select EXIT.

To View the Mobile Identification Number (MIN)

Use the up and down arrows to scroll through the menu until the MIN screen is dis-
played. This screen will display the Mobile Identification Number. This number is impor-
tant to provide to customer service. To exit this screen, select EXIT.

CHOOSE LANGUAGE 

Choose from three different languages (English, Spanish and French) for the LCD screen.

1. Start at the main screen.

2. Select MENU or press MAIN MENU on the keypad.
3. Using the keypad, enter the master code.
4. Use the up and down arrows to scroll through the menu until the System Settings menu

is displayed. Select OK.

5. Use the up and down arrows to scroll through the menu until the Choose Language

screen is displayed. Select OK.

6. To continue in English, select OK. 

7. To choose another language, use the arrow keys to find the correct language. When

the desired language is displayed, select OK.

Set Date/Time

The event log will list all events according to date and time. Be sure that the time and date
are accurate.

1. Start at the main screen.

2. Select MENU or press MAIN MENU on the keypad.
3. Using the keypad, enter the master code.
4. Use the up and down arrows to scroll through the menu until the Set Time/Date menu

is displayed. Select OK.

5. Using the numbers on the keypad, set the clock to the appropriate time, changing

hours first and then minutes. The character that is being changed will be underlined.
To move back a character, use the down arrow. To move forward a character, use the
up arrow. Select SET.

6. Choose AM or PM. Use the up and down arrows to toggle between AM and PM. Select

SET.

Summary of Contents for DS200

Page 1: ...VICIO Y PÓLIZA DE GARANTÍA ADVERTENCIA LÉASE ESTE INSTRUCTIVO ANTES DE USAR EL PRODUCTO Questions See us on the World Wide Web at www dewalt com Before returning this product call 1 800 4 DEWALT IF YOU SHOULD EXPERIENCE A PROBLEM WITH YOUR DEWALT PURCHASE CALL 1 800 4 DEWALT IN MOST CASES A DEWALT REPRESENTATIVE CAN RESOLVE YOUR PROBLEM OVER THE PHONE IF YOU HAVE A SUGGESTION OR COMMENT GIVE US A ...

Page 2: ......

Page 3: ...00 433 9258 LCD DISPLAY FUNCTION LEDs FUNCTION LEDs KEYPAD INTERFACE VIBRATION SENSOR MOTION SENSOR PHONE LINE BACK UP 8 HOUR BATTERY BACK UP AC ADAPTER WIRELESS SENSORS RECEIVER TRANSMITTER CELLULAR RADIO RECEIVER TRANSMITTER STROBE LIGHT RESET BUTTON BATTERY CHIME SIREN DS100 DS200 DISARM ARM CARABINER FIG 1 ...

Page 4: ...Using the Keypad 7 Using the Key Chain Remote 7 Arming Automatically 8 Disarming the System 8 Entry Delays 9 Using the Keypad 9 Using the Key Chain Remote 9 Faults 9 How to View Faults 9 Clearing a Fault 10 Description of Fault Codes 10 Features Options 10 System Settings 10 Wireless Device Maintenance 10 Change Master Code 12 User Code Maintenance 12 Set Console Devices 13 Set Delay Instant 14 Cl...

Page 5: ...t If the cord is missing or damaged replace only with the DEWALT power supply specified for this equipment to avoid product damage CAUTION POTENTIAL EQUIPMENT MALFUNCTION OR FAILURE This equipment is supplied with a wall mount power supply designed specifically to operate on 120V 60Hz Replace only with the DEWALT power supply specified for this unit CAUTION POTENTIAL EQUIPMENT MALFUNCTION OR FAILU...

Page 6: ...t and Key Chain Remote has been tested and complies with Part 15 of the FCC Rules Operation is subject to the following two conditions 1 This device may not cause harmful interference and 2 the device must accept any interference received including interference that may cause undesired operation If this equipment does cause harmful interference to radio or television reception which can be determi...

Page 7: ...ns Repairs to certified equipment should be coordinated by a representative designated by the supplier Any repairs or alterations made by the user to this equipment or equip ment malfunctions may give the telecommunications company cause to request the user to disconnect the equipment Users should ensure for their own protection that the electrical ground connections of the power utility telephone...

Page 8: ...l 300MHz systems send information on one narrow band channel Any in band interference can result in missed signals DS100 Jobsite Security Portable Alarm System Base Unit The DS100 Jobsite Security Portable Alarm System is a portable self contained alarm system that can be easily moved from site to site This system includes a built in motion sensor vibration sensor siren strobe battery back up LCD ...

Page 9: ...ers materials gates or other remote assets for protection Also provides a location for a standard padlock not included providing added security Container Sensor A unique sensor that enables monitoring of remote metal containers by measuring vibration Recommended for use on steel containers large tool boxes and tool storage boxes Prevention of False Alarms The majority of alarms that occur are fals...

Page 10: ... Unit contains a vibration sensor Mount the Base Unit in a location that is not subject to vibration during the armed state If the system is armed and both the motion sensor and vibration sensor are activated an alarm is sent instantly Heat The motion detector inside the Base Unit is sensitive to heat To prevent false alarms avoid placing in direct or reflected sunlight or near objects that can be...

Page 11: ...ing the initial setup The event log will list all events accord ing to date and time 1 Using the numbers on the keypad set the clock to the appropriate time changing hours first then minutes The character that is being changed will be underlined To E F C move back a character use the down arrow To move forward a character use the up arrow Select SET 2 Choose AM or PM The up and down arrows are use...

Page 12: ...E RESET BUTTON ON THE KEY CHAIN REMOTE a Using a flat screwdriver open the housing Insert the screwdriver about 25 6mm at the tab on the top of the unit Pry downward on the handle of the screwdriver until the latch holding the cover to the housing base releases b Install the battery using the polarity and markings on the battery and equipment Do not use excessive force If the battery does not fit ...

Page 13: ...t by selecting YES 3 During the test function the system will cycle through the list of registered devices Each device is displayed for one second 4 Walk through the site and trigger each sensor using the list below As that sensor is tripped the entry should disappear Indoor Motion Wait 90 seconds since last motion was detected then walk through the areas where protection is expected When motion i...

Page 14: ...ess sensors and the Base Unit motion sensor are programmed with built in delays This will give the user 60 seconds to exit after arming and 30 seconds to enter before disarming without causing an alarm Each sensor aside from the Base Unit motion sensor can be changed to Instant so that when the system is armed an instan taneous alarm occurs when the sensor is tripped IMPORTANT The vibration sensor...

Page 15: ...OTE If Arming with Faults is displayed and a warning chime is heard there is a serious issue that could leave the site unsecured You may arm over a fault force arm however it is highly recommended that the issue be corrected prior to arming For further information on fault codes see Faults 3 There are three indications that the system is armed First there will be a quick loud siren noise Second th...

Page 16: ...id causing vibration in the Base Unit when typing the master code The vibration sensor will be on as soon as the internal motion detector recognizes motion When a vibration occurs the unit will send an alarm This is to provide protection of damage or destruction of the Base Unit If the vibration sensor is accidentally tripped the system will immediately contact the monitoring system When the syste...

Page 17: ...k for intrusion Device been tripped re secure device NoCheckIn No Check In Device check in Check for interference Device messages have not move device been received DESCRIPTION OF FAULT CODES NOTE The battery will take up to 24 hours to charge completely To avoid draining the battery do not use an outlet that is controlled by a wall switch The battery is designed to be a back up source of power fo...

Page 18: ...ES IN USE To edit the description of the device select EDIT To add another device select EXIT 6 To edit the description use the keypad to type a description up to 8 characters The character that is being changed will be underlined To move back a character use the down arrow To move forward a character use the up arrow IMPORTANT Write the device description and corresponding device number on the Se...

Page 19: ...l ask for a new master code Using the numbers on the keypad enter a new four digit master code Then select OK 8 Re enter the new master code to confirm Again using the numbers on the keypad enter the new four digit master code The character that is being changed will be under lined To move back a character use the down arrow To move forward a character use the up arrow Then select OK 9 If the code...

Page 20: ...e the user code enter a new four digit access code To move back a character use the down arrow To move forward a character use the up arrow Select SAVE 4 Next edit the name for the user Use the keypad to type a name up to 8 characters The character that is being changed will be underlined To move back a character use the down arrow To move forward a character use the up arrow To select letters ref...

Page 21: ...s to scroll through the menu until the System Settings screen is displayed Select OK 5 Use the up and down arrows to scroll through the menu until the Set Delay Instant screen is displayed Select OK 6 Using the up and down arrows scroll through the list of programmed devices The screen will indicate whether the device is currently set on delay or instant 7 When the device to be changed is reached ...

Page 22: ... disarms the system after the auto arm time and still requires protection the user will need to re arm the system using the Key Chain Remote or key pad The following day the auto arm will continue to auto arm at the pre set time AUTO ARM TIME SET The system can be set to arm at a particular time each day To set or change the time of automatic arming follow these steps 1 Start at the main screen 2 ...

Page 23: ...on the keypad 3 Using the keypad enter the master code 4 Use the up and down arrows to scroll through the menu until the System Settings menu is displayed Select OK 5 Use the up and down arrows to scroll through the menu until the Choose Language screen is displayed Select OK 6 To continue in English select OK 7 To choose another language use the arrow keys to find the correct language When the de...

Page 24: ...2 REAR DR UNSECURED 01 01 04 12 34 AM See the Appendix for a complete Description of Events Test The Base Unit conducts periodic checks with the monitoring service When the signal is received by the monitoring service the user may be notified Although the system will provide notification of a low battery or a device out of range run tests on a regular basis to verify the proper operation of the sy...

Page 25: ...e evenings NOTE The connection to the telephone line should be tested regularly The phone line pro vides back up communication in the event that the cellular signal can not complete a call 1 When the phone line screen is displayed select TEST 2 The system will display a message when it is testing the phone line 3 Once the test is complete the screen will display a message to verify if the test pas...

Page 26: ...he menu until the next console device to be tested is reached WIRELESS DEVICES Key Chain Remotes and sensors should be tested regularly 1 Select TEST 2 The system will cycle through the list of registered devices Each device is displayed for one second 3 Walk through the site and trigger each sensor using the list below As that sensor is tripped the entry should disappear NOTE To test only one sen...

Page 27: ...R LED will flash once every 5 seconds To resume activity plug the Base Unit into the wall outlet NOTE After power is restored the Base Unit makes a call to verify communication with the monitioring service When the alarm signal is received by the monitoring service the user is notified Battery Maintenance Do not attempt to access the battery in the Base Unit Follow all instructions regarding the i...

Page 28: ...Primary power supply No unit power source is present missing steady flashes and no battery Low battery series of two power flashes or Standby state one flash every 5 seconds ARMED System is armed On an exit or entry delay System is disarmed CELL Cellular signal Cellular signal Little or no is strong is weak cellular signal CALL Call is complete Call is in progress No activity will remain solid for...

Page 29: ...Appendix 22 Coverage Map ...

Page 30: ...thorized service center Sitelock Event Burglary Unit is armed and an Contact the police and alarm open Sensor 000 unauthorized intruder has provide the appropriate been detected by the information to notify them Base Unit motion or of an intrusion vibration sensor Sitelock Event Burglary Unit is armed and an Contact the police and alarm open Sensor XXX unauthorized intruder has provide the appropr...

Page 31: ...de the system USER x txt DISARMED or User x or Key Chain NA DEV x txt DISARMED keychain or Remote x has disarmed DISARMED code the system USER x txt FORCED ARM or User x or Key Chain Check for faults resolve DEV x txt FORCED ARM keychain Remote x has armed issue clear fault and or FORCED ARM code the system over a fault then re arm Base AUTOARM System has been NA automatically armed Base FORCED AU...

Page 32: ...se Unit If the device still does not register then take the device to an authorized DEWALT service center A device fails to register when you press the The device may not be compatible reset button First be sure that it is a DEWALT accessory Next check to be sure there is a working battery in the device If it is still not working take it to a DEWALT authorized service center The CELL LED is blinki...

Page 33: ...w the preset limits and no AC power is provided As soon as the power supply cord is connected to an active wall outlet hibernation ends Key Chain Remote Device used to arm and disarm the system Master Code A four digit code used to arm disarm and make programming changes MIN Number Mobile Identification Number this number is the mobile phone number of the equipment This number should be provided t...

Page 34: ...ALT AFFICHAGE ACL FONCTIONS DEL FONCTIONS DEL INTERFACE CLAVIER DÉTECTEUR DE VIBRATIONS DÉTECTEUR DE MOUVEMENTS LIGNE TÉLÉPHONIQUE DE SECOURS PILE DE SECOURS D UNE DURÉE DE 8 HEURES ADAPTATEUR CA RÉCEPTEUR TRANSMETTEUR DE DÉTECTEURS SANS FIL RÉCEPTEUR TRANSMETTEUR DE RADIO CELLULAIRE STROBOSCOPE BOUTON DE RÉINITIALISATION PILE SIRÈNE DS100 DS200 DÉSARMER ARMER SONNERIE MOUSQUETON FIG 1 ...

Page 35: ...mande porte clés 38 Armement automatique 40 Désarmement du système 40 Configuration des délais 40 Utilisation du clavier 40 Utilisation de la télécommande porte clés 41 Erreurs 41 Comment afficher les erreurs 41 Effacer une erreur 41 Description des codes d erreurs 42 Caractéristiques et options 42 Options du système 42 Entretien des dispositifs sans fil 42 Changer le code maître 44 Mise à jour du...

Page 36: ...les dans un lieu frais sombre et sec Conserver les piles hors de la portée des enfants Une pile représente une unité autonome Ne pas chercher à l ouvrir Ne jamais mettre une pile au feu S en défaire conformément aux régulations locales Recycler les piles Ne pas chercher à les recharger MISE EN GARDE RISQUES DE MAUVAIS FONCTIONNEMENT OU DE DÉFAILLANCE N utiliser que des blocs d alimentation spécifi...

Page 37: ...nd correctement à une intrusion il reste possible que l utilisateur manque de temps pour protéger biens et propriété Pour offrir le meilleur service possible le service clientèle doit être averti de tout changement affectant le site et de toute addition ou suppression de dispositif Même avec un service de surveillance il reste possible que les autorités ne répondent pas de façon appropriée Les dis...

Page 38: ...l indique le nombre maximum de terminaux qu il est permis de connecter à une interface téléphonique Les raccordements d une interface peuvent consister en une combinaison quelconque de dispositifs respectant l Indice d Équivalence Le nombre total de dispositifs ne doit pas excéder cinq 5 0 Avant d installer cet équipement l utilisateur doit s assurer que la connexion aux services de la compagnie t...

Page 39: ...ie des messages redondants sur une bande passante d au moins 10 MHz pour une protection accrue contre toute interférence et l assurance d une communication fiable Cette communication entre la base et les détecteurs offre une couverture allant jusqu à 6100 m 2000 permettant une portée et fiabilité supérieures Pratiquement tous les systèmes à 300MHz envoient des informations sur une seule bande étro...

Page 40: ...pôts à température conditionnée et espaces intérieurs de surveillance Câble verrou de sécurité de chantier Un détecteur unique qui permet d assurer la sécurité des biens en entourant d un câble tout équipement mobile conteneurs matériaux portails et autres biens distants pour la sécurité Il est aussi équipé d un emplacement pour cadenas non compris pour un ajout de sécurité Détecteur de caisson Un...

Page 41: ... à une hauteur facilement accessible à toute personne devant utiliser le clavier Bord Si la base est disposée sur un bureau une étagère ou tout autre objet fixe le fait de placer l appareil près du bord maximisera la portée du détecteur de mouvements Direction Diriger la base de façon à ce que tout intrus traverse la zone de détection plutôt que de s avancer ou s éloigner du détecteur de mouvement...

Page 42: ...ié à des lignes multiples comme pour les systèmes téléphoniques où différents numéros de téléphone sonnent sur un téléphone unique Ce système ne fonctionnera pas sur un téléphone payant Programmation de la configuration initiale Une fois la base alimentée en courant une séquence de configuration permettra de personnaliser le système SEPT ÉTAPES FACILES 1 Choix de la langue 5 Test de portée 2 Régla...

Page 43: ...ode maître bis RET OK Code maître RET OK 3 Si les codes maître cadrent l écran indiquera que le code maître a été sauvegardé Choisir SUIV ÉTAPE QUATRE ASSIGNATION DES DISPOSITIFS Jusqu à 48 détecteurs et 6 télécommandes porte clés peuvent être assignés Chaque fois qu un détecteur sera ajouté il communiquera avec la base pour aviser l utilisateur de toute intrusion D autres détecteurs et télécomman...

Page 44: ...ter au diagramme alpha numérique ci dessous CLAVIER Appuyer 1 2 3 4 5 1 1 1 1 1 1 2 2 A B C 2 3 3 D E F 3 4 4 G H I 4 5 5 J K L 5 6 6 M N O 6 7 7 P Q R S 8 8 T U V 8 9 9 W X Y Z 0 0 espace espace DIAGRAMME ALPHA NUMÉRIQUE Disp 1 enregistré OK EDIT BOUTON DE RÉINITIALISATION IMPORTANT Inscrire la description du dispositif et le numéro correspondant du dispositif sur la Liste d emplacements des déte...

Page 45: ...tiliser la flèche vers le bas Pour avancer d un caractère utiliser la flèche vers le haut Util 1 QUIT ENREG Ajout util OMET OK Fin test SUIV 3 Une fois le code utilisateur entré choisir ENREG 4 Entrer ensuite un nom d utilisateur À l aide du clavier taper le texte jusqu à 8 caractères Le caractère qui sera changé sera souligné Pour reculer d un caractère utiliser la flèche vers le bas Pour avancer...

Page 46: ...le problème avant de réarmer Pour plus d information sur les codes d erreurs se reporter à la section Erreurs Armement DÉSARM 01 01 04 08 54 AM ARM MENU 4 Deux choses indiquent que le système est armé Premièrement le voyant ARMÉ sur le coin supérieur droit du clavier sera allumé Deuxièmement l écran Armé sera affiché UTILISATION DE LA TÉLÉCOMMANDE PORTE CLÉS La télécommande porte clés peut être ut...

Page 47: ...lèche vers le haut 10 Choisir CONFIG 11 Choisir AM ou PM Les flèches vers le haut ou le bas sont utilisées pour passer de AM à PM 12 Choisir CONFIG IMPORTANT Si pour une raison quelconque le système est désarmé après l heure d auto armement et que le site requiert protection le système devra être réarmé à l aide de la télécommande porte clés ou du clavier Le lendemain l auto armement reprendra à l...

Page 48: ...édiatement choisir AFFICH 2 Le code d erreur sera affiché Utiliser les flèches vers le haut ou le bas pour faire défiler les erreurs Résoudre le problème en suivant les actions à prendre dans le tableau Description des codes d erreurs pour que l écran d erreur disparaisse Pour éliminer une erreur due à une altération choisir EFFAC IMPORTANT Se reporter à la section Description des codes d erreurs ...

Page 49: ...rouillé reste allumé appeler le service clientèle si le problème persiste Récepteur Err La transmission Appeler le service récepteur disp bi directionnelle du clientèle pour dispositif a été perdue vérifier le système SurvRés Contrôle réseau Communications du Vérification interne de la base processeur RF se réinitialisera par de la base lui même appeler le service clientèle si le problème persiste...

Page 50: ...us d enregistrement au service de surveillance L emplacement et la description de chaque dispositif sont critiques pour le système de surveillance 7 Choisir ENREG IMPORTANT Chaque fois qu un dispositif est modifié s assurer de bien contacter le service clientèle DEWALT pour rapporter toute modification Disp 01 CÂBLE ANNUL ENREG Disp 04 Enregistré QUIT EDIT Réinit disp RET Disp 01 CÂBLE QUIT OK Dis...

Page 51: ...u code maître QUIT OK Changer code maître QUIT OK Options sys QUIT OK Si les codes maître ne cadrent pas 1 Choisir OK 2 L écran Changer code maître s affichera Étape 5 Changer de code maître Le code maître original est le code par défaut est le reste tant qu il n est pas modifié et vérifié MISE À JOUR DU CODE UTILISATEUR Une fois la configuration initiale terminée des codes et noms d utilisateur p...

Page 52: ...nt de l utilisateur sur la Liste d emplacements des détecteurs Conserver cette liste à titre de référence Util 3 1235 QUIT ENREG Util 3 1235 QUIT EDIT Edit util OUIT OK Nom SMITH QUIT ENREG Nom UTIL O2 QUIT ENREG 5 Choisir ENREG 6 Continuer de modifier des utilisateurs ou choisir QUIT Pour supprimer un utilisateur 1 Utiliser les flèches vers le haut ou le bas pour faire défiler le menu jusqu à ce ...

Page 53: ...LISATION DES OPTIONS REMARQUE Cette option permettra à la base d être complètement reprogrammée Ce système a été conçu pour être mobile Si le site change et que les utilisateurs et les descriptions et emplacements des détecteurs doivent être modifiés le système peut effacer la configuration présente Tous les détecteurs enregistrés et utilisateurs seront supprimés du système Le code maître NE sera ...

Page 54: ...le menu jusqu à ce que l écran Options sys soit affiché Choisir OK Options sys QUIT OK Auto arm ON QUIT CHANGE Auto arm OFF QUIT CHANGE Auto arm act désact QUIT OK Options sys QUIT OK 5 Utiliser les flèches vers le haut ou le bas pour faire défiler le menu jusqu à ce que l écran Heure auto arm soit affiché Pour régler l heure choisir OK 6 À l aide des chiffres du clavier choisir l heure à laquelle...

Page 55: ...ons sys QUIT OK 01 01 04 08 54 AM ARM MENU NIM 0031762090 QUIT Num de compte 123456 QUIT 7 Pour choisir une autre langue utiliser les flèches pour trouver la langue voulue Lorsque la langue voulue est affichée choisir OK Réglage heure date Le rapport d activités affichera les évènements suivant la date et l heure S assurer que le système est à la bonne heure et date 1 Commencer sur l écran princip...

Page 56: ... est reçu par le service de surveillance l utilisateur peut être à son tour notifié Bien que le système annonce qu une pile est faible ou qu un dispositif est hors de portée il est recommandé de faire des tests réguliers pour vérifier l intégrité du système Exécution d un test Dispositifs de console Radio cellulaire Dispositifs sans fil Ligne téléphonique Sirènes externes EXÉCUTION D UN TEST Teste...

Page 57: ... ligne téléphonique sert de ligne de secours dans l éventualité ou le signal cellulaire ne pourrait effectuer un appel Test OK RET Test cellule ANNUL Radio cell QUIT TEST 1 Lorsque l écran Lgn téléphon est affiché choisir TEST 2 Le système affichera un message pendant le test de la ligne téléphonique 3 Une fois le test terminé l écran affichera un message pour indiquer si le test a réussi ou non S...

Page 58: ...tée RET Sirène QUIT TEST D Choisir RET E Utiliser les flèches vers le haut ou le bas pour faire défiler le menu jusqu au prochain dispositif de console à tester DISPOSITIFS SANS FIL Les télécommandes porte clés et les détecteurs doivent être testés régulièrement 1 Choisir TEST 2 Le système passera en revue chacun des dispositifs enregistrés sur la liste Chaque dispositif est affiché pendant une se...

Page 59: ...squ à ce que l écran Veille soit affiché Choisir OK 5 Cet écran rappellera que l appareil doit être débranché avant d être mis en veille Débrancher le bloc d alimentation puis choisir OK 6 S assurer que le système doit bien être mis en veille Choisir OUI 7 À l aide du clavier entrer le code maître 8 Si le code maître est correct l appareil se mettra en état de veille Pendant 2 secondes l écran Mis...

Page 60: ...vice clientèle DEWALT ou se reporter au contrat du service de surveillance pour une liste complémentaire de numéro de téléphone Garantie complète d un an Le Système d alarme mobile de sécurité des chantiers DEWALT est garanti un an à compter de la date d achat Nous réparerons à nos frais tout défaut pour vice de matière ou fabrication Pour plus d informations relatives aux réparations sous garanti...

Page 61: ...54 Appendice Carte de la zone de couverture cellulaire analogique ...

Page 62: ...ile du dispositif Changer la pile faible réinitialiser Signfaib Disp signal La transmission Éliminer toute faible du signal du interférence déplacer dispositif est faible le dispositif Suspect Disp suspect Le dispositif a été Vérifier toute déclenché intrusion réarmer le dispositif AucunValid Aucun disp Aucun message envoyé Éliminer toute validé par le dispositif interférence déplacer n a été reçu...

Page 63: ...e chez un centre de service autorisé DEWALT Évènement Sitelock Alarme L appareil est armé et un Contacter la police et leur anti vol activée détecteur intrus a été détecté par le fournir les renseignements n 000 détecteur de mouvements pertinents pour les informer ou de vibrations de la base de l intrusion Évènement Sitelock Alarme L appareil est armé et un Contacter la police et leur anti vol act...

Page 64: ... ALERTE SUPP L alerte du détecteur de vibrations de la base a été supprimée NÉANT DESCRIPTION DES CODES D ÉVÈNEMENT Code d évènement Description Action Radio cell ARRÊT La radio cellulaire a été arrêtée Se reporter au Guide de dépannage appeler le service clientèle Radio cell ACTIVÉ La radio cellulaire a été activée NÉANT UTIL x txt ARMÉ ou DISP x txt ARMÉ Porte clé ou code ARMÉ Utilisateur x ou t...

Page 65: ...NON VALIDÉ Erreur au niveau du contrôle de réseau processeur RF L erreur se corrigera d elle même NC BASE NON VALIDÉ SUPP Erreur au niveau du contrôle de réseau corrigée NÉANT DÉSARM FORCE Désarmement forcé à cause d une pile faible NÉANT Base TEST PERIOD Appel périodique placé auprès du service de surveillance NÉANT Base ALERTE SUPP Cycle d alerte de 8 minutes terminé NÉANT DESCRIPTION DES CODES ...

Page 66: ... base S il ne peut toujours pas être en registré apporter le dispositif chez un centre de service autorisé DEWALT Le dispositif n a pas été enregistré bien que Le dispositif est peut être incompatible le bouton de Réinitialisation ait été poussé S assurer tout d abord que c est bien un accessoire DEWALT Vérifier ensuite que le dispositif est pourvu d une bonne pile S il ne fonctionne toujours pas ...

Page 67: ...ateur ne pourra faire aucune modification de programmation Code maître Un code à quatre chiffres pour armer désarmer ou modifier la programmation du système Délai d entrée Le temps alloué pour entrer dans une zone protégée lorsque le système est armé Délai de sortie Le temps alloué pour sortir d une zone protégée une fois le système armé Désarmer Pour désactiver le service de sécurité Détecteur Un...

Page 68: ... PANTALLA DE CRISTAL LÍQUIDO LED DE FUNCIONES LED DE FUNCIONES INTERFAZ DEL TECLADO SENSOR DE VIBRACIÓN SENSOR DE MOVIMIENTO LÍNEA TELEFÓNICA DE RESPALDO BATERÍA DE RESPALDO DE 8 HORAS ADAPTADOR DE CA RECEPTOR TRANSMISOR DE SENSORES INALÁMBRICOS RECEPTOR TRANSMISOR DE RADIO CELULAR LUZ ESTROBOSCÓPICA BOTÓN DE REPOSICIONAMIENTO PILA SIRENA DS100 DS200 DESARMAR ARMAR CAMPANILLA GANCHO FIG 1 ...

Page 69: ... entrada 75 Uso del teclado 75 Uso del control remoto de llavero 75 Fallas 75 Cómo ver fallas 75 Cómo despejar una falla 75 Descripción de códigos de fallas 75 Características y opciones 76 Configuraciones del sistema 76 Mantenimiento de dispositivos inalámbricos 76 Cómo cambiar el código maestro 78 Mantenimiento de los códigos de usuario 78 Cómo fijar los dispositivos en la consola 79 Cómo fijar ...

Page 70: ...e pilas gastadas según los reglamentos locales Recicle sus pilas No intente recargarlas PRECAUCIÓN POSIBLE AVERÍA O FALLA DEL EQUIPO Use sólo los accesorios de alimentación DEWALT designados para este equipo Si no tiene el cable o tiene uno dañado cámbielo sólo por el cable de alimentación DEWALT especificado para este equipo para evitar dañar el producto PRECAUCIÓN POSIBLE AVERÍA O FALLA DEL EQUI...

Page 71: ...i el sistema responde a una intrusión de la manera esperada puede que los usuarios no tengan suficiente tiempo para proteger sus bienes y propiedad Para poder ofrecerle el mejor servicio de soporte el departamento de servicio al cliente deberá ser notificado de cualquier cambio realizado al emplazamiento y de adiciones o eliminaciones de dispositivos Aún con el servicio de monitoreo puede que las ...

Page 72: ...tal como se prescribe en los documentos correspondientes de requisitos técnicos para equipos terminales El departamento no garantiza que el funcionamiento del equipo vaya a satisfacer al usuario El NÚMERO DE EQUIVALENCIA ENTRE LLAMADORES REN para este equipo terminal se encuentra en la etiqueta de la unidad base El REN asignado a cada equipo terminal ofrece un índice del número máximo permitido de...

Page 73: ...unizar contra interferencia y ayudar a garantizar una comunicación fiable Esta comunicación entre la unidad base y los sensores ofrece una cobertura de hasta 2000 pies 6 100 m lo cual posibilita un alcance y una confiabilidad superiores Casi todos los sistemas de 300 MHz envían información por un sólo canal de banda estrecha Cualquier interferencia dentro de esa banda puede ocasionar la pérdida de...

Page 74: ...nsor es utilizado para monitorear la apertura de objetos como puertas o ventanas o espacios de hasta 10 mm 3 8 pulg Se recomienda su uso en áreas cerradas oficinas bodegas climatizadas y espacios interiores de monitoreo Cerrojo tipo cable Jobsite Security Un sensor único que permite la protección de bienes al pasar un cable por equipos móviles contenedores materiales rejas u otros bienes a distanc...

Page 75: ...altura fuera de este nivel disminuirá la sensibilidad del detector de movimiento en la unidad base Asegúrese que la unidad sea puesta a una altura tal que cualquier persona con acceso al sistema pueda operar el teclado con facilidad Borde Si usa la unidad base sobre un escritorio una repisa o cualquier otro objeto fijo el colocar la unidad cerca del borde maximizará el alcance del detector de movi...

Page 76: ...ciones telefónicas sin incluir 1 Conecte el enchufe del teléfono E a la toma telefónica F en la parte de atrás de la unidad base C 2 Inserte el otro extremo del cable del teléfono en la toma telefónica modular singular de la pared IMPORTANTE No use una toma telefónica que se comunique con varias líneas tales como sistemas telefónicos en los que diferentes números de teléfono llaman a un sólo teléf...

Page 77: ...s no corresponden entre sí la pantalla dirá Cód equivocado Cód equivocado OK Cód maestro guardado SIG Volver a ingr cód maestro ATRÁS OK Ingr cód maestro ATRÁS OK Fecha 01 04 04 ATRÁS CONFIG Si los códigos maestros no corresponden 1 Seleccione OK 2 Vuelva a ingresar el código maestro Seleccione OK 3 Si los códigos ingresados corresponden entre sí la pantalla indicará que se ha guardado el código m...

Page 78: ...TANA Cerrojo tipo cable Jobsite Security CABLE Sensor para contenedores CONTENEDOR Control remoto de llavero LLAVERO 5 Para editar la descripción del dispositivo con el teclado ingrese una descripción de hasta 8 caracteres El caracter subrayado es el que está siendo cambiado Para desplazarse entre los caracteres utilice la flecha de abajo para moverse hacia atrás y la flecha de arriba para moverse...

Page 79: ...as funciones de programación Los demás usuarios sólo tendrán acceso al armado y desarmado del sistema Prueba completa SIG Dispos 01 CONTEN CANCEL Pba de recorrido SALTAR SÍ Una vez registrados los dispositivos la unidad base mostrará la pantalla para agregar usuario 1 Para agregar usuarios nuevos seleccione OK 2 Empiece por el usuario 1 e ingrese un código de acceso de cuatro dígitos Para desplaza...

Page 80: ... MENÚ OPERACIONES BÁSICAS Durante el armado la unidad base emitirá un tono por 10 segundos seguidos por 40 segundos de silencio La unidad base emitirá estos tonos con mayor rapidez durante los últimos 10 segundos de armado Si necesita desarmar el sistema antes de completar el armado por ejemplo si necesita volver a entrar al recinto presione el botón desarmar a la derecha del control remoto de lla...

Page 81: ...ALIR OK Config del sist SALIR OK 01 01 04 08 54 AM ARMAR MENÚ Armado Ingr cód 7 Cuando se activa el armado automático aparece la pantalla Autoarmado ENCEND Seleccione SALIR 8 Para fijar la hora seleccione OK 9 Utilice los números del teclado para ingresar una hora para que el sistema se active automáticamente cambiando primero las horas y luego los minutos El caracter subrayado es el que está sien...

Page 82: ...ÓMO VER FALLAS Si hay una falla presente el sistema mostrará la pantalla Falla 1 Para despejar seleccione SILENC Esto sencillamente permitirá que el sistema se arme a pesar de la falla Se recomienda corregir la falla lo antes posible Para mostrar la falla y resolverla de inmediato seleccione MOSTRAR 2 El código de la falla aparecerá en pantalla Para desplazarse por la lista de fallas utilice las f...

Page 83: ... unidad base a un lugar donde la luz CELL es continua llamar servicio al cliente si el problema persiste Receptor Dispos de falla del rcptor Se ha perdido la transmisión bidireccional del dispositivo Llame al servicio al cliente para probar el sistema Control de red Control de red base Comunicaciones del procesador de base RF Control interno se despejará llamar servicio al cliente si el problema p...

Page 84: ...o La ubicación y las descripciones para cada dispositivo son críticas para el monitoreo del sistema 7 Seleccione GUARDA IMPORTANTE Acuérdese de contactar al departamento de servicio al cliente DEWALT para hacer ajustes si efectúa algún cambio en los dispositivos Dispos 01 CABLE CANCEL GUARDA Dispos 04 Registrado SALIR EDITAR Reposic dispos ATRÁS Dispos 01 Cable SALIR OK Dipos 1 SALIR OK Para edita...

Page 85: ... códigos no corresponden entre sí aparecerá la pantalla Cód no iguales Cód no iguales OK Cód maestro nvo guardado OK Ingr cód maestro nvo SALIR OK Cambiar cód maestro SALIR OK Config del sist SALIR OK Si los códigos maestros no corresponden 1 Seleccione OK 2 Aparecerá la pantalla Cambiar cód maestro Paso 5 Cómo cambiar el código maestro El código maestro original es el código preconfigurado hasta ...

Page 86: ...etras refiérase al Cuadro alfanumérico del Apéndice NOTA Escriba el nombre y número de usuario correspondiente en la Lista de ubicación de sensores Guarde esta hoja como referencia Usuario 3 1235 SALIR GUARDA Usuario 3 1235 SALIR EDITAR Editar usuario SALIR OK Nombre SMITH SALIR GUARDA Nombre USUARIO2 SALIR GUARDA 5 Seleccione GUARDA 6 Siga editando usuarios o elija SALIR Para borrar un usuario 1 ...

Page 87: ...ena APAGAR ATRÁS CAMBIA Luz ENCEND ATRÁS CAMBIA 7 Cuando se alcance el dispositivo a cambiar seleccione CAMBIA El botón CAMBIA cambia la opción de retraso a instantáneo 8 Una vez que todos los dispositivos se hayan cambiado seleccione SALIR para volver a la pantalla principal CÓMO DESPEJAR LAS CONFIGURACIONES NOTA Esta función permitirá que la unidad base sea completamente reprogramada Este sistem...

Page 88: ...a Para fijar o cambiar la hora de armado automático siga estos pasos 1 Empiece por la pantalla principal 2 Seleccione MENÚ o presione MENÚ PRINCIPAL en el teclado 3 Con el teclado ingrese el código maestro Autoarmado ENCEND SALIR CAMBIA Autoarmado APAGAR SALIR CAMBIA ENC APAG autoarmado SALIR OK Config del sist SALIR OK 4 Use las flechas de arriba y abajo para desplazarse por el menú hasta que apa...

Page 89: ... arriba y abajo para desplazarse por el menú hasta que aparezca la pantalla Config del sist Seleccione OK Config del sist SALIR OK 01 01 04 08 54 AM ARMAR MENÚ MIN 0031762090 SALIR Número de cuenta 123456 SALIR Revisar cta SALIR OK 5 Use las flechas de arriba y abajo para desplazarse por el menú hasta que aparezca la pantalla de Escoger idioma Seleccione OK 6 Para continuar en inglés seleccione OK...

Page 90: ...cione ATRÁS La información se desplazará por la pantalla DESCRIPCIÓN DE EVENTOS Al evento le siguen la hora y fecha en que ocurrió Por ejemplo si la puerta trasera fue abierta se mostrará el siguiente evento DISPOS 2 PTA TRASERA ABIERTA 01 01 04 12 34 AM Vea el Apéndice para una Descripción de eventos completa TIMEOUT DE MOD MAESTRA ATRÁS Rev eventos SALIR OK Fecha 01 04 04 ATRÁS CONFIG Prueba La ...

Page 91: ...LIR PRUEBA Radio cel SALIR PRUEBA LÍNEA TELEFÓNICA PRECAUCIÓN Cuando pruebe el sistema esté preparado para 1 Permanecer en la línea y explicar brevemente al operador la razón de la llamada si lo contacta el servicio de monitoreo 2 Realizar estas actividades en las horas de menor actividad como temprano en la mañana o tarde por la noche NOTA La conexión a la línea telefónica debería probarse regula...

Page 92: ...ento SALIR PRUEBA Probando sirena ATRÁS Sirena SALIR PRUEBA Luz destellante ATRÁS B El sistema generará un mensaje que le indicará que debe sacudir la unidad base Mueva la unidad base para activar el sensor C Una vez probado el sensor de vibración aparecerá un mensaje indicando que la prueba se ha completado Si lo siguiente no aparece en pantalla vea la Guía de resolución de problemas para mayor i...

Page 93: ... de DEWALT Cuando llame tenga cerca a usted la unidad base Probando sirena ATRÁS Sirena X DESCRIPCIÓN SALIR PRUEBA Sirenas ext SALIR PRUEBA Prueba completa SALIR Apagado del sistema Este sistema fue diseñado para ser portátil Si el emplazamiento se cambia de lugar se recomienda poner la unidad en standby para transportarla o almacenarla Esto conservará la duración de la batería y protegerá la unid...

Page 94: ...lcance de niños IMPORTANTE Cuando instale la pila presione el botón de REPOSICIONAMIENTO para volver a registrar el sensor y restaurar sus configuraciones Contacto Si tiene cualquier pregunta o comentario acerca de este producto llámenos sin cobro al 1 800 4 DEWALT 1 800 433 9258 o visite www dewalt com Si necesita respuesta a preguntas específicamente relacionadas al servicio de monitoreo llame a...

Page 95: ...88 Mapa de cobertura Apéndice ...

Page 96: ...cione Senal débil Dispos con senal débil La señal de transmisión del dispositivo está débil Verifique que no haya interferencia mueva el dispositivo a otro lado No seguro Dispos no seguro El dispositivo ha sido activado Verifique que no haya intrusión vuelva a asegurar el dispositivo NoVerifica Dispos no verifica No se han recibido los mensajes de verificación del dispositivo Verifique que no haya...

Page 97: ...icación de que el o 000 El sensor 080 o 000 indica sistema funciona que esto es una prueba manual correctamente Evento Sitelock Pila del El voltaje de la unidad base Si no está usando corriente sistema gastada es demasiado bajo alterna enchufe la unidad Si se sensor 000 Después de 1 hora la está usando corriente alterna unidad se desarmará y la pila está fallando y necesita pasará a la modalidad s...

Page 98: ...a unidad base MOV EN BASE ALARMA DESPEJADA Se ha despejado la alarma del sensor de movimiento de la unidad base NA Vibrac de unid Base ALARMA El sensor de vibración de la unidad base ha sido activado Verifique que no haya intrusión en la unidad base Vibrac de unid Base ALARMA DESPEJADA Se ha despejado la alarma del sensor de vibración de la unidad base NA Radio cel APAGADA Se ha apagado la radio c...

Page 99: ...txt ALARMA Dispos x no seguro sólo cuando está armado Revise dispos x DISPOS x txt ALARM DESPEJADA Dispos x seguro sólo cuando está armado NA RADIOCEL No verifica Falla en radio celular NA RADIOcel No VERIFICA DESPEJ Radio cellular despejada NA CR Base No VERIFICA Falla en el control de la red de base procesador RF La falla se despejará sola CR BAse No VERIFICA DESPEJ Control de la red despejado N...

Page 100: ...ispositivo al lado de la unidad base y pruébelo Si el dispositivo aún no registra llévelo a un centro de servicio autorizado por DEWALT Un dispositivo no queda registrado cuando presiona el botón de reposición Puede que el dispositivo no sea compatible Primero verifique que sea un accesorio DEWALT Luego verifique que el dispositivo tenga una pila que funcione Si aún así no funciona llévelo a un ce...

Page 101: ...éctrica a una toma de corriente activa se acabará la hibernación Luz estroboscópica Un dispositivo que emite una luz para notificar al usuario y al intruso de la alarma No seguro Un dispositivo que ha sido activado Esto puede ser debido a una puerta abierta la detección de un movimiento o un cerrojo de cable abierto Esto significa que el emplazamiento ya no está protegido Esto puede indicar que ha...

Page 102: ......

Page 103: ......

Page 104: ...ademark of the DEWALT Industrial Tool Co 701 East Joppa Road Baltimore MD 21286 The following are trademarks for one or more DEWALT power tools the yellow and black color scheme the D shaped air intake grill the array of pyramids on the handgrip the kit box configuration and the array of lozenge shaped humps on the surface of the tool ...

Reviews: