background image

English

5

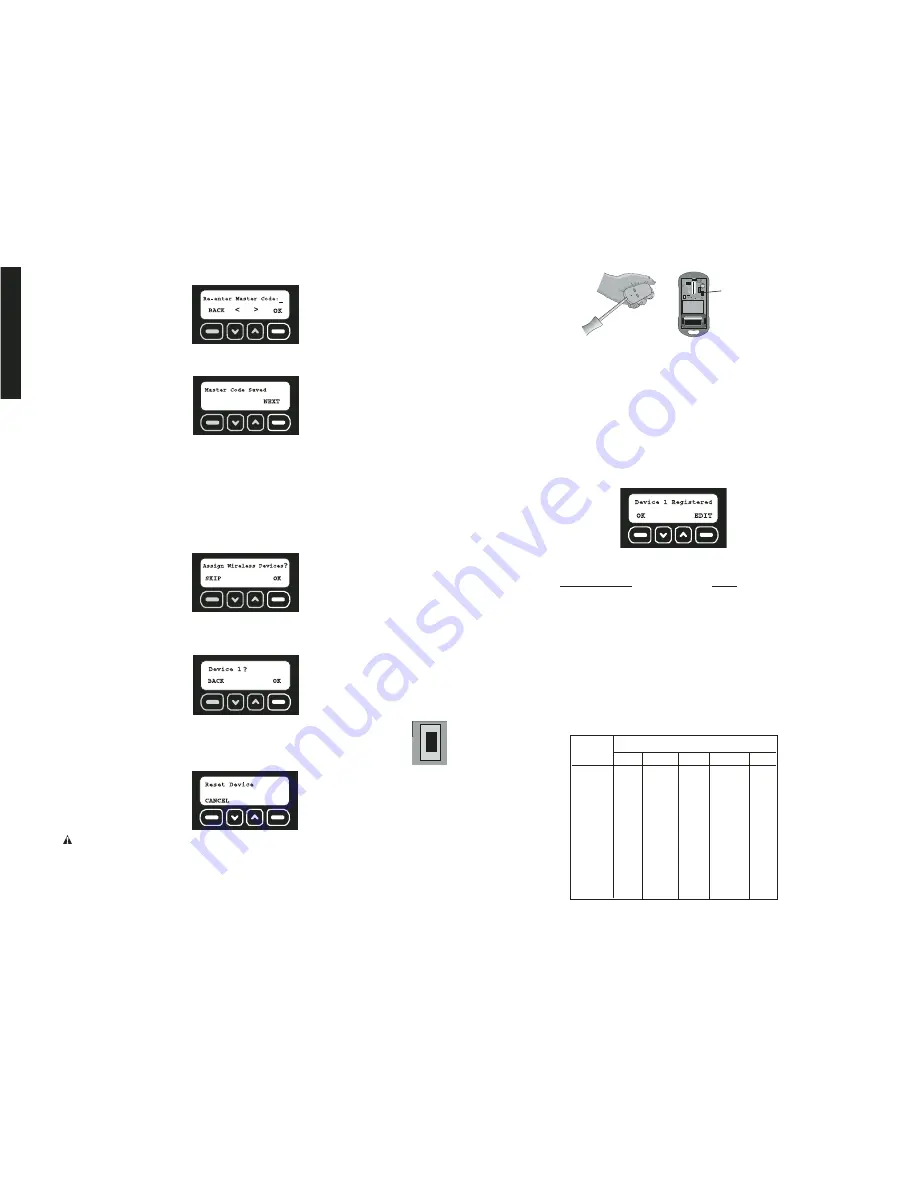
2. Re-enter the master code. Select OK.

3. If the codes match, the screen will indicate that the master code has been saved.

Select NEXT.

STEP FOUR: ASSIGN DEVICES 

Up to 48 sensors and 6 Key Chain Remotes can be assigned. As each sensor is added, it
will communicate with the Base Unit to notify the user of an intrusion. Additional sensors
and remotes can be programmed at any time after the initial setup. Refer to 

Wireless

Device Maintenance

.

NOTE: 

Each device (Key Chain Remote or sensors) must have batteries to operate. Refer

to the instruction manual for each device to determine the type of battery required. 

1. The Assign Wireless Devices screen will appear after setting the master code. To add

sensors and Key Chain Remotes, select OK. 

2. The device number of the next available device will be displayed. Add the Key Chain

Remote included with the Base Unit as the first device. Select OK. The device will not
register until OK is selected and then the device reset button is pressed and released.

NOTE:

Each device has a reset button that must be pressed and

released. To locate the reset button, refer to the instructions for each
particular device.  

3. Reset the device. 

CAUTION: 

Do not touch the electronic components inside the devices as they are

static sensitive.

TO ACCESS THE RESET BUTTON ON THE KEY CHAIN REMOTE

a. Using a flat screwdriver, open the housing. Insert the screwdriver about .25" (6mm)

at the tab on the top of the unit. Pry downward on the handle of the screwdriver until
the latch holding the cover to the housing base releases. 

RESET

BUTTON

b. Install the battery using the polarity (+ and -) markings on the battery and equipment.

Do not use excessive force. If the battery does not fit, check to make sure that it
matches the polarity markings.

c. When prompted by the Base Unit to RESET DEVICE, press the reset

button located inside the Key Chain Remote to register the device. After registering
the Key Chain Remote, replace the cover.

4. Only 48 sensors and 6 Key Chain Remotes can be assigned, if there are no slots avail-

able, the screen will display ALL DEVICES IN USE. When the device has been regis-
tered, the screen will indicate which type of device has been registered. This descrip-
tion is the default description set at the factory. To provide further detail, such as the
location of the device, the description can be changed by selecting EDIT. To keep the
default description, select OK and move to step 7.

NOTE:

If the device does not register when you press the reset button, see the

Troubleshooting Guide

for more detailed information.

List of Devices

Code

Indoor Motion Sensor – PIR

I.MOTION

Door / Window Contact Sensor

DOOR/WIN

JobSite Security Cable Lock

CABLE

Container Sensor

CONTAIN

Outdoor Motion Sensor – PIR

O.MOTION

Key Chain Remote 

KEYCHAIN

5. To edit the device description using the keypad, type a description of up to 8 characters.

The character that is being changed will be underlined. To move back a character, use
the down arrow. To move forward a character, use the up arrow.
To change from numbers to letters, reference the Alpha/Numeric chart below:

KEY

# of presses

PAD

1

2

3

4

5

1

1

1

1

1

1

2

2

A

B

C

2

3

3

D

E

F

3

4

4

G

H

I

4

5

5

J

K

L

5

6

6

M

N

O

6

7

7

P

Q

R

S

8

8

T

U

V

8

9

9

W

X

Y

Z

0

0

space

.

space

.

ALPHA/NUMERIC CHART

RESET

BUTTON

Summary of Contents for DS100

Page 1: ...VICIO Y PÓLIZA DE GARANTÍA ADVERTENCIA LÉASE ESTE INSTRUCTIVO ANTES DE USAR EL PRODUCTO Questions See us on the World Wide Web at www dewalt com Before returning this product call 1 800 4 DEWALT IF YOU SHOULD EXPERIENCE A PROBLEM WITH YOUR DEWALT PURCHASE CALL 1 800 4 DEWALT IN MOST CASES A DEWALT REPRESENTATIVE CAN RESOLVE YOUR PROBLEM OVER THE PHONE IF YOU HAVE A SUGGESTION OR COMMENT GIVE US A ...

Page 2: ......

Page 3: ... 800 433 9258 LCD DISPLAY FUNCTION LEDs FUNCTION LEDs KEYPAD INTERFACE VIBRATION SENSOR MOTION SENSOR PHONE LINE BACK UP 8 HOUR BATTERY BACK UP AC ADAPTER WIRELESS SENSORS RECEIVER TRANSMITTER CELLULAR RADIO RECEIVER TRANSMITTER STROBE LIGHT RESET BUTTON BATTERY SIREN DS100 DS200 UNLOCK LOCK CARABINER FIG 1 ...

Page 4: ...Using the Keypad 7 Using the Key Chain Remote 7 Arming Automatically 8 Disarming the System 8 Entry Delays 9 Using the Keypad 9 Using the Key Chain Remote 9 Faults 9 How to View Faults 9 Clearing a Fault 9 Description of Fault Codes 10 Features Options 10 System Settings 10 Wireless Device Maintenance 10 Change Master Code 11 User Code Maintenance 12 Set Console Devices 13 Set Delay Instant 13 Cle...

Page 5: ...ENT MALFUNCTION OR FAILURE This equipment is supplied with a wall mount power supply designed specifically to operate on 120V 60Hz Replace only with the DEWALT power supply specified for this unit CAUTION POTENTIAL EQUIPMENT MALFUNCTION OR FAILURE Do not use near water Damage to the equipment may occur Equipment shall not be exposed to dripping or splashing and no objects filled with liquids such ...

Page 6: ...s cause harmful interference to radio or television reception which can be determined by placing the equipment in standby mode try to correct the interference by one or more of the following measures 1 Reorient the antenna of the radio TV experiencing the interference 2 Relocate the Base Unit with respect to the radio TV 3 Move the antenna leads away from any wire that runs to the Base Unit 4 Plug...

Page 7: ...mmunications company cause to request the user to disconnect the equipment Users should ensure for their own protection that the electrical ground connections of the power utility telephone lines and internal metallic water pipe system if present are connected together This precaution may be particularly important in rural areas CAUTION Users should not attempt to make such connections themselves ...

Page 8: ...reliable communication This communication between the Base Unit and sensors provides coverage of up to 2000 enabling superior range and reliability Virtually all 300MHz systems send information on one narrow band channel Any in band interfer ence can result in missed signals DS100 JobSite Security Portable Alarm System Base Unit The DS100 JobSite Security Portable Alarm System is a portable self c...

Page 9: ... for a standard padlock not included providing added security Container Sensor A unique sensor that enables monitoring of remote metal containers by measuring vibration Recommended for use on steel containers large tool boxes and tool storage boxes Outdoor Motion Sensor PIR This sensor is used for monitoring an outdoor area and is recommended to monitor enclosed outside areas or non temperature co...

Page 10: ...ide the Base Unit is sensitive to heat To prevent false alarms avoid placing in direct or reflected sunlight or near objects that can be heated quick ly by sunlight Do not place the Base Unit facing the windows Do not place the unit near heating or cooling sources like heater ducts air conditioners or space heaters SENSOR RANGE 3 to 6 9m to 1 8m INITIAL SETUP The DEWALT Mounting Bracket DS001 is r...

Page 11: ...eypad set the date The character that is being changed will be underlined To move back a character use the down arrow To move forward a character use the up arrow Select SET STEP THREE SET MASTER CODE A master code MUST be selected This code can be changed however it is the ONLY code that can be used to make programming changes and clear a fault The Enter Master Code screen will appear after the d...

Page 12: ... base releases RESET BUTTON b Install the battery using the polarity and markings on the battery and equipment Do not use excessive force If the battery does not fit check to make sure that it matches the polarity markings c When prompted by the Base Unit to RESET DEVICE press the reset button located inside the Key Chain Remote to register the device After registering the Key Chain Remote replace...

Page 13: ... the test list Determine the limits of the coverage by repeating this test until the motion is not detected Door Window Open and close the door or window to test Cable Lock Open and close the lock to test Container Sensor Wait 60 seconds since the last container vibration then create vibration on the container to test Adjust sensitivity as necessary Outdoor Motion Wait 90 seconds since last motion...

Page 14: ...e purpose of this setting is to send a notification if an intruder attempts to disable or destroy the device See Set Delay Instant under Features and Options for more information NOTE To avoid a false alarm sensors that are likely to be tripped as the user enters and exits the site to arm disarm the unit should remain set on delay mode USING THE KEYPAD IMPORTANT Arming the system introduces the ri...

Page 15: ... cannot be initiated by the master user or other users of the system Once a time is set the system will activate at the same time each day CAUTION LOUD NOISE Enabling the auto arm feature will cause a brief loud noise while arming that may startle any persons near the Base Unit To enable the automatic arming feature be sure that the system is disarmed 1 Start at the main screen 2 Select MENU or pr...

Page 16: ...ayed The ARMED light on the unit will be off Faults Faults indicate when there has been a serious issue that needs to be addressed This could be a number of things including an unsecured device low battery tamper and weak signal How to View Faults Clearing a Fault Description of Fault Codes HOW TO VIEW FAULTS If a fault is present the system will chime and display the Fault screen 1 To silence the...

Page 17: ...t move device been received Tamper Tamper Device has been Close device or opened or damaged replace if damaged BaseBadBatt Bad Battery Base Unit battery has Needs to be repaired Base dropped below the at DEWALT authorized voltage limit service center CellRadio Cell Radio Cellular radio Move Base Unit to Fault signal is lost a location where CELL light is solid Receiver Receiver Fault 2 way transmi...

Page 18: ...2 Use the up and down arrows to scroll through the list until the device to be edited is reached Select EDIT 3 To edit the description use the keypad to type a description up to 8 characters The character that is being changed will be underlined To move back a character use the down arrow To move forward a character use the up arrow IMPORTANT Write the device description and corresponding device n...

Page 19: ...n 2 Select MENU or press MAIN MENU on the keypad 3 Using the keypad enter the master code 4 Use the up and down arrows to scroll through the menu until the System Settings screen is displayed Select OK 5 Use the up and down arrows to scroll through the menu until the User Code Maintenance screen is displayed Select OK To Add a User NOTE Up to 6 users including the master user can be programmed 1 U...

Page 20: ...and strobe can be turned off and will not operate if an alarm occurs 1 Start at the main screen 2 Select MENU or press MAIN MENU on the keypad 3 Using the keypad enter the master code 4 Use the up and down arrows to scroll through the menu until the System Settings screen is displayed Select OK 5 Use the up and down arrows to scroll through the menu until the Set Console Devices On Off screen is d...

Reviews: