DETAIL K2 HCC502A Owner'S Manual Download Page 4

E4  

HCC502A man

ENGLISH

imPORTanT Safe OPeRaTinG PRacTiceS

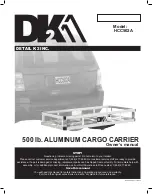
aluminum caRGO caRRieR uSe anD caRe


„

Do not modify the aluminum cargo carrier in any way. 


Unauthorized modification may impair the function and/or safety and could 

affect the life of the equipment. There are specific applications for which the 

aluminum cargo carrier was designed.


„

always check for damaged or worn out parts before using the 

aluminum cargo carrier.  

Broken parts will affect the aluminum cargo 

carrier operation. Replace or repair damaged or worn parts immediately.


„

Do not exceed the aluminum cargo carrier load capacity.


„

Distribute the load evenly.  

Uneven loads may cause the aluminum cargo 

carrier to tip, resulting in personal injury to the operator or others. To minimize 

the effects of dynamic loading, make sure the load is centered on the carrier.


„

use the aluminum cargo carrier on flat and level surfaces 


capable of supporting the aluminum cargo carrier and its maximum load. 

Pulling or pushing a load on a slanted or uneven surface can result in loss of 

control.


„

Prior to transporting a load,  

make sure the load is properly secured to 

the carrier.


„

Store idle aluminum cargo carrier.  

When the aluminum cargo carrier is 

not in use, store it in a secure place out of the reach of children. Inspect it for 

good working condition prior to storage and before re-use.

WaRninG:  

NEVER impede or block vehicle exhaust. Always keep clear 

exhaust pipe and exhaust path.

1.  This Carrier has a maximum weight capacity of 500 pounds. Do not exceed the 

500 pound capacity.

2.  Always secure the Carrier as close to your vehicle as possible, minimizing the 

distance of the Carrier and its load from your vehicle.

3. 

Beware of dynamic loading! Dropping or bouncing a load may briefly create 

excess load, causing personal injury and/or product failure.

4.  Inspect before use, including all bolts and nuts in the Carrier. Do not use if 

damaged.

5. 

Turn off the vehicle’s ignition and set the parking brake before loading an object 

onto the Carrier or unloading.

6.  Make sure to read and understand all instructions and warnings set forth by the 

manufacturer of the vehicle that the carrier will be used with.

7.  Keep the Carrier clean and dry at all times.
8.  This product is not a toy. Keep it out of reach of children.
9.  Never ride a motorized object (powered scooters, lawn tractors, ATV’s, etc.) 

onto or off the Carrier. Only load/unload with the motorized object empty of 

cargo and people.

10. Follow D.O.T. (Department of Transportation) guidelines for installation and use.
11. 

Make sure to secure the load or on the Carrier with ropes, and/or tie-downs (not 

included) before transporting.

12. Only use the Carrier with a properly installed Class III or Class IV 2 inch hitch 

receiver capable of supporting the Carrier and its load.

13. The warnings, precautions, and instructions discussed in this manual cannot 

cover all possible conditions and situations that may occur. It must be 

understood by the operator that common sense and caution are factors which 

cannot be built into this product, but must be supplied by the operator

Summary of Contents for HCC502A

Page 1: ...or missing replacement parts can be shipped from our facility For immediate help with assembly or for additional product information call our North American toll free number 1 888 277 6960 C Save this...

Page 2: ...ket Carbon steel hardware Thermoplastic end caps Vehicle Hitch Receiver Size 2 in 5 cm Vehicle hitch requires a Class III or Class IV tow rating Table of Contents Specifications E2 Technical Specifica...

Page 3: ...rcuits water pipes and other mechanical hazards in your work area particularly those hazards below the work surface hidden from the operator s view that may be unintentionally contacted and may cause...

Page 4: ...h 1 This Carrier has a maximum weight capacity of 500 pounds Do not exceed the 500 pound capacity 2 Always secure the Carrier as close to your vehicle as possible minimizing the distance of the Carrie...

Page 5: ...Frame 8 using Bolt 9 and Nut 10 see Assembly diagram Repeat for each Small Connect Plate 2 3 Attach the Middle Connect Plate 3 so that the top and bottom of the Middle Connect Plate 3 is attached to t...

Page 6: ...Reflectors 7 Make certain to use the appropriate red flags not included when moving a load Check with your local traffic enforcement agency to make certain that you are correctly following all local l...

Page 7: ...2 4 Reflector plate 2 5 Nut M5 4 6 Spring washer 5 4 7 Reflector 2 8 Carrier frame 1 9 Screw M5 x 12 40 10 Nylon nut M5 40 11 Hitch pin 1 12 Connect frame 1 13 Safety pin 2 14 Screw M6 x 45 6 15 Big w...

Page 8: ...E8 HCC502A man ENGLISH Assembly Diagram...

Page 9: ...hange peuvent tre ex p di s de nos tablissements Pour une aide imm diate au niveau de l assemblage ou pour des informations suppl men taires sur le produit veuillez appeler notre num ro sans frais en...

Page 10: ...plastique Taille du r cepteur d attelage du v hicule 2 po 5 cm L attelage du v hicule doit tre de classe III ou de classe IV Table des mati res Sp cifications F10 Sp cifications techniques F10 Pratiqu...

Page 11: ...s votre zone de travail en particulier les dangers cach s la vue de l op rateur qui peuvent tre involontairement contact s et causer des dommages corporels ou mat riels Soyez attentif votre environnem...

Page 12: ...Rangez le porte bagages en aluminium Lorsque le porte bagages en aluminium n est pas utilis rangez le dans un endroit s r hors de port e des enfants Inspectez le pour un bon tat de fonctionnement ava...

Page 13: ...porte bagages l aide du boulon 9 et de l crou 10 voir le sch ma de montage Le c t r fl chissant doit faire face l arri re du porte bagages 2 Utilisez la Petite Plaque de Connexion 2 pour joindre le C...

Page 14: ...transporteur d environ 30 lb Attelage de classe 3 poids de la languette maximum de 500 lb Remarque Toujours utiliser des r flecteurs 7 Assurez vous d utiliser les drapeaux rouges appropri s non inclus...

Page 15: ...ue Reflection 2 5 crou M5 4 6 Rondelle ressort 4 7 R flecteur 2 8 Cadre de transport 1 9 Boulon M5 x 12 40 10 Contre crou M5 40 11 Boulon M10 x 45 1 12 crou M10 1 13 Support anti basculement 2 14 Goup...

Page 16: ...F16 HCC502A man Fran ais Diagramme...

Reviews: