Conveyance and installation
GAW-185ES2
- 62 -
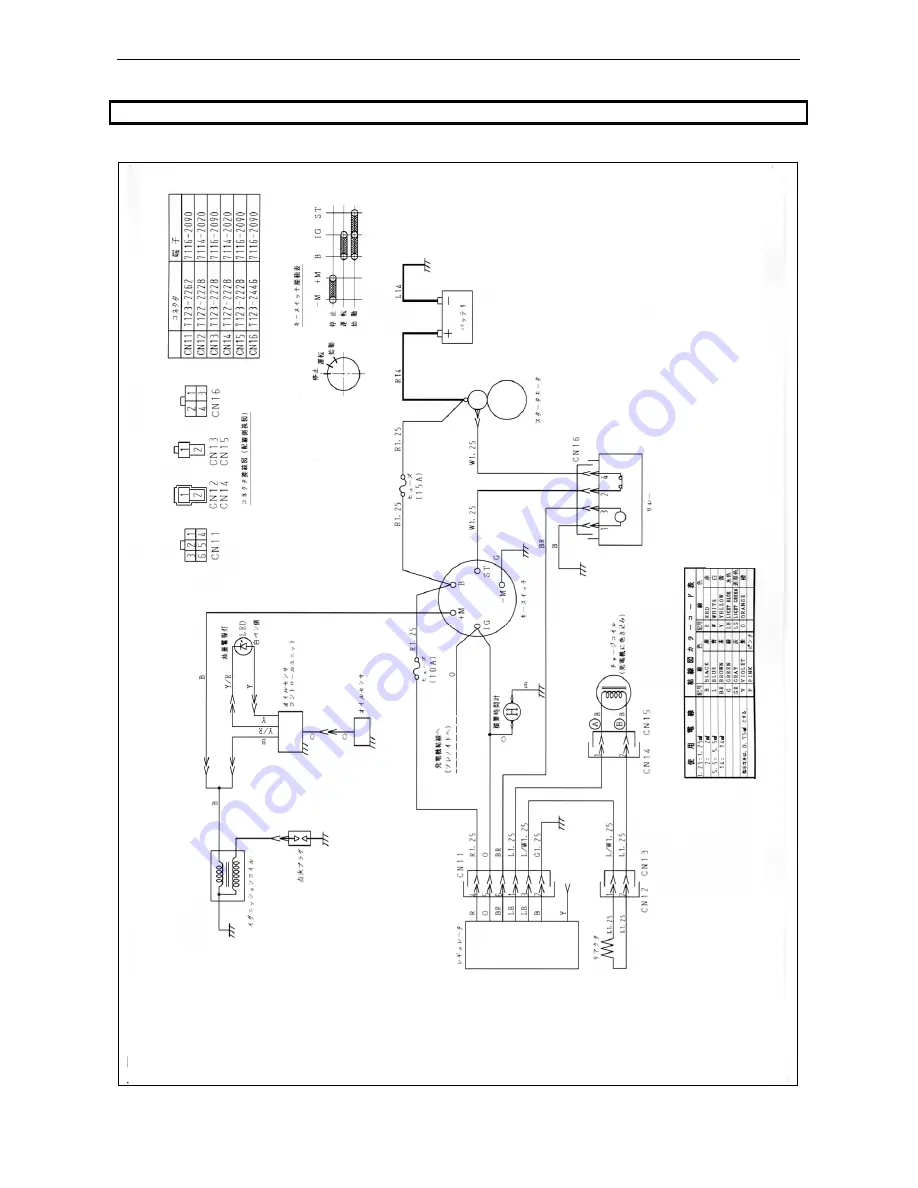
8-4 Engine wiring diagram
Page 1: ...ES2 For ensuring safety make sure to read this manual prior to use of the machine For ensuring safety be sure to observe precautions given under headings DANGER and CAUTION For ensuring safety keep th...
Page 2: ...injury or even loss of life Make sure to carefully read this manual and fully understand its contents before use of the machine If you lend the machine to somebody else or allow such a person to use...
Page 3: ...the machine please do not hesitate to contact us When you contact us for an inquiry please give us the type and serial number of the machine The serial number is stamped on the main nameplate Window...
Page 4: ...ng Stick welding work 24 4 8 Voltage reduction 25 4 9 Regarding AC power supply 25 4 10 Simultaneous use of welding power supply and AC power supply 27 5 Periodic inspection and maintenance For keepin...
Page 5: ...minor extent as well as damage to properties may occur if the machine is erroneously handled Caution Attention is required for permitting the machine to work efficiently and for an extended period of...
Page 6: ...meplate If a warning nameplate is lost or damaged please order to DENYO by nameplate number that is described below in immediately Please paste again to the specified location NOTE Welding exhaust gas...
Page 7: ...or death may arise due to oxygen deficiency or toxic gas if the above precautions are neglected DANGER Personal injury There are components rotating at high speed in the machine Make sure to stop the...
Page 8: ...re neglected CAUTION Removal 1 Falling during hoisting Use the lifting lug located at the center of the roof panel for hoisting the machine Furthermore do not walk in to the space underneath the machi...
Page 9: ...on and explosion may arise otherwise CAUTION Wheel stoppers Use the machine in a level position on a solid ground If the machine is used on a slope under unavoidable circumstances the tolerance in the...
Page 10: ...el Gauge Air inlet Fuel filler port Exhaust port Lifting lug Air outlet Door handle Wheel 1 2 Names of internal components Engine Fuse Fuel Strainer Generator Reactor Carburetor Oil filler port Oil ga...
Page 11: ...nitor Model GAW 150ES2D only 2 Welding current regulator 3 Arc force regulator 4 Voltage reduction device switch 5 AC Power output switch 6 Starter switch 7 Choke knob 8 Slow down switch 9 Welding out...
Page 12: ...that case please identify the abnormal portion from Symbol And check and maintenance 2 ODO meter ODO This will display the accumulated operating time of the machine Hour meter will start the integrat...
Page 13: ...control unit Note Before using the welder check the frequency of load side and display of the machine it should be same 5 Internal Battery for ODO meter display Digital display monitor has a built in...
Page 14: ...ope under unavoidable circumstances the tolerance in the gradient is 5 on each of longitudinal and lateral directions Make sure to lock wheels using wheel stoppers except the occasion of removal The m...
Page 15: ...f welding work for preventing scattering of arc light and spatter b Avoid a place of high temperature and high humidity c Avoid a place of ambient temperature over 40 C d Avoid a dusty place and place...
Page 16: ...it Caution The oil level should not be higher than the H level upper limit Damage to engine cylinder interior may occur otherwise Regarding engine oil Engine oil exerts major influence over the engine...
Page 17: ...ic inspection and maintenance GAW 185ES2 31 Caution Do not mix engine oil of different kinds It is because properties of the engine oil may become inferior if engine oil of different kinds is mixed to...
Page 18: ...l is low fill the fuel tank with clean and fresh NON LEAD gasoline Do not over fill the fuel tank The fuel tank cap must be closed tightly after filling If the fuel is contaminated close the fuel cock...
Page 19: ...oil leakage Carry out repair or replacement if any abnormality is found 6 Check of wiring Check wiring for loose connection and wear Carry out repair or replacement if any abnormality is found Cautio...
Page 20: ...mponents will be damaged even if such an error occurred only for a short length of time Caution Connect battery cables in the state where the starter switch key is removed Applying small amount of gre...
Page 21: ...er motor for about 10 seconds it is essential to allow a pause time of at least 10 seconds in the state where the starter switch is returned to the STOP position before turning the starter motor again...
Page 22: ...Periodic inspection and maintenance GAW 185ES2 36 Push Push...
Page 23: ...to start despite repeating the starting procedure there is obviously some problem with the machine Therefore a thorough check is required e g Fuel has run out forgetting to turn the fuel cock to the o...
Page 24: ...about 5 minutes in this state 2 Stop the engine by turning the starter switch to the STOP position 3 If the engine fails to stop even when starter switch is turned to the STOP position use one out of...
Page 25: ...onnect the welding cable Disconnect cables and plugs from AC power outlets 4 Keep refueling the fuel tank If left in a state in which the fuel in the fuel tank is low water droplets adhering fuel is e...
Page 26: ...own Welding out put shut down Lamp indication Release of protecting Oil level drop Oil feed Control unit input over voltage Release automatically by engine revolution slow AC output over current AC po...
Page 27: ...u touch any live part 1 Do not touch any live part 2 Do not use a cable of insufficient capacity a damaged cable or a cable with exposed conductors 3 Be sure to tighten and insulate each cable joint 4...
Page 28: ...dden combustible materials 5 Be sure to tighten and insulate cable joints 6 Connect the cable on the base metal side to as close as possible to the welding point 7 Do not weld a gas pipe containing ga...
Page 29: ...work is performed near such a place 5 For welding of coated steel products be sure to provide sufficient ventilation or use respiratory protective equipment Noxious fumes and gases may be produced wh...
Page 30: ...r other equipment 2 Firmly close and fix all the doors and covers of the welding power supply unit 3 Minimize the length of the welding cable 4 Lay the base metal side cable holder and torch side cabl...
Page 31: ...elding cable to output terminals located in the lower part of the control panel Make sure to mount a terminal to the tip connection Caution 1 The welder will be damaged if the cable is damaged or if t...
Page 32: ...Periodic inspection and maintenance GAW 185ES2 46 Reversed polarity Welding electrode holder Ground base metal Deposit welding arc welding of thin sheets arc welding of stainless steel air gouging...
Page 33: ...rent value that is appropriate for the work contents Applicable electrode Current range 30 185 A Welding electrode 2 0 4 0 3 Arc force regurator This machine is equipped with an Arc force regurator th...
Page 34: ...pended for a while in the state where the welder keeps running the engine revolution changes to a low level automatically 2500 min 1 after elapse of a fixed length of time about 9 10 seconds 2 When th...
Page 35: ...the following table Relation between used current and Duty cycle Duty Cycle 100 85 70 60 50 55 40 Used current A 120A 130A 140A 150A 160A 170A 170A 4 7 Regarding Stick welding work CAUTION Eye defici...
Page 36: ...crews Caution If any cable end lead is connected to a terminal in a circular form after stripping heat generation may arise due to faulty contact Also burn to the insulator and short circuit caused by...
Page 37: ...n the Electrical Equipment Technical Specification 4 10 Simultaneous use of welding power supply and AC power supply Do not allow over loading when AC and DC are used simultaneously AC power supplies...
Page 38: ...n of running Burn injury will occur to your hands if the above precautions are neglected CAUTION Casualty caused by battery 1 Casualty caused by battery electrolyte Be careful so as not to allow entry...
Page 39: ...1 Remove the engine oil drain plug and fully discharge the engine oil Smooth discharge is permitted if the work is performed while the engine is still warm 2 Feed fresh engine oil through the oil fil...
Page 40: ...aintenance of once every 100 hours 1 Change of engine oil 2 Cleaning of Fuel strainer Remove the cup of the fuel strainer cleaning inside the cup and strainer When remove the cup to be check for damag...
Page 41: ...brought to a specified servicing workshop 5 7 Inspection and maintenance of once every 500 hours 1 Check of battery voltage and charge 2 Tightening engine head as brought to a specified servicing wor...
Page 42: ...r Check the fuel cock and open fuel cock Fuel is coming to carburetor Check the spark plug Check the ignition coil The battery power is weak the turning force is weak and the momentum to overcome the...
Page 43: ...unit Disconnected connector Push the AC output switch to the ON position Replace control unit Replace the generator Check the connection Revolution control Slow down switch ON The engine fails to run...
Page 44: ...Shut position whiles the driving and use up the fuel in the machine And stop an engine naturally 5 Pulled out the fuel in the fuel tank Loose the drain of the carburetor to pull out the all fuel insid...
Page 45: ...Conveyance and installation GAW 185ES2 59 8 Servicing data 8 1 External dimensions and appearance drawing...
Page 46: ...0 60 Rated revolution min 1 3600 Power factor 1 0 Engine Name Fuji heavy Industrial EX35DS Type 4 stroke cycle Air cooled OHC gasoline engine Number of cylinders Bore Stroke mm 1 89 65 Total displacem...
Page 47: ...Conveyance and installation GAW 185ES2 61 8 3 Generator wiring diagram...
Page 48: ...Conveyance and installation GAW 185ES2 62 8 4 Engine wiring diagram...
Page 49: ...Conveyance and installation GAW 185ES2 63 8 5 Attachment Starter key Plug wrench Instruction manual Engine instruction manual...