VIVOTEK
50 - User's Manual
■
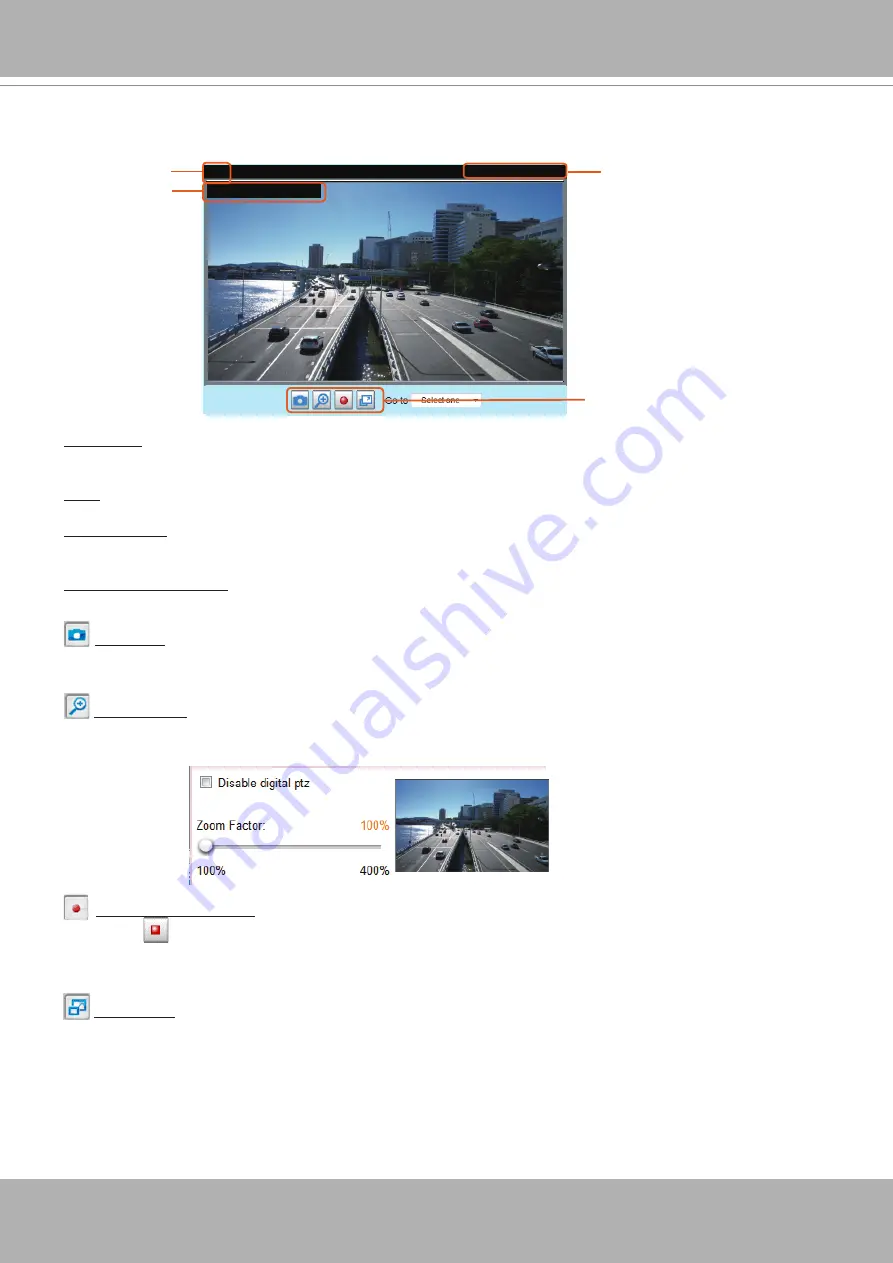
The following window is displayed when the video mode is set to MJPEG:
Video Title
: The video title can be configured.
For more information, please refer to Media > Image on
Time: Display the current time. For more information, please refer to Media > Image on page 75.
Title and Time: Video title and time can be stamped on the streaming video. For more information, please
refer to Media > Image on page75.
Video Control Buttons
: Depending on the Network Camera model and Network Camera configuration,
some buttons may not be available.
Snapshot: Click this button to capture and save still images. The captured images will be displayed
in a pop-up window. Right-click the image and choose
Save Picture As
to save it in JPEG (*.jpg) or BMP
(*.bmp) format.
Digital Zoom
: Click and uncheck “Disable digital zoom” to enable the zoom operation. The navigation
screen indicates the part of the image being magnified. To control the zoom level, drag the slider bar. To
move to a different area you want to magnify, drag the navigation screen.
Start MP4 Recording: Click this button to record video clips in MP4 file format to your computer.
Press the
Stop MP4 Recording button to end recording. When you exit the web browser, video
recording stops accordingly. To specify the storage destination and file name,
Options on page 52 for details.
Full Screen
: Click this button to switch to full screen mode. Press the “Esc” key to switch back to normal
mode.
Video 17:08:56 2021/03/25
Title and Time
2021/03/25 17:08:56
Time
Video (HTTP-V)
Video Title
Video Control Buttons
Summary of Contents for Vivotek FD9189-H-V2
Page 9: ...VIVOTEK User s Manual 9 Lens IR LEDs Reset button MicroSD card slot LEDst ...
Page 13: ...VIVOTEK User s Manual 13 7 Connect the Ethernet cable to the RJ45 socket ...
Page 26: ...VIVOTEK 26 User s Manual 10 Secure the camera to wall or ceiling using the included screws ...
Page 104: ...VIVOTEK 104 User s Manual ...


