


Using the ISA Configuration Utility
3-9
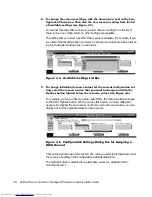
NOTE: If you change one or more resource values using the Options button and
later change the setting in the Configuration Choice box, the changes that you
made to the resource values are overwritten by the default values for the new
configuration choice.
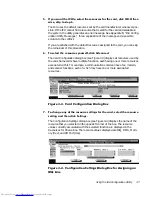
&OLFN2.LQWKH&RQILJXUDWLRQ6HWWLQJVGLDORJER[ZKHQ\RXKDYHILQ
LVKHGVHOHFWLQJUHVRXUFHVIRUWKHIXQFWLRQ
NOTE: After modifying the system configuration, you must turn off the system to
install, remove, or change jumper settings on the non-Plug and Play ISA expansion
cards to match the settings you selected in the ICU.
$GGLQJDQ8QOLVWHG&DUG
Unlisted cards are non-Plug and Play ISA expansion cards that do not have configura-
tion files stored in the ICU database.
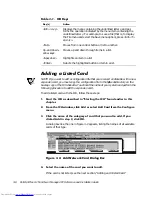
NOTE: If you want to add a configuration file that you received on diskette with a new
expansion card, see “Adding a Listed Card” found earlier in this chapter.
To add an unlisted card with the ICU, follow these steps:
6WDUWWKH,&8DVGHVFULEHGLQ´6WDUWLQJWKH,&8µIRXQGHDUOLHULQWKLV
FKDSWHU
)URPWKH,&8ZLQGRZFOLFN$GGRUVHOHFW$GG&DUGIURPWKH&RQILJXUH
PHQX
&OLFNWKHQDPHRIWKHFDWHJRU\RIFDUGWKDW\RXZDQWWRDGG,I\RX
FOLFNHG$GGLQVWHS FOLFN2.
A dialog box appears listing the names of all available cards of that type.
6HOHFW8QOLVWHG&DUGIURPWKHERWWRPRIWKHOLVWRIFDUGVGLVSOD\HGLQ
WKHGLDORJER[WKDWDSSHDUV7KHQFOLFN2.
&OLFN1RZKHQWKH,&8DVNVLI\RXKDYHDFRQILJXUDWLRQILOHIRUWKHFDUG
The Configure Unlisted Card dialog box appears with blank fields.
(QWHUWKHQDPHRIWKHFDUGWKDW\RXZDQWWRDGGLQWKH&DUG1DPHILHOG
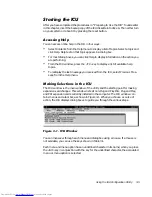
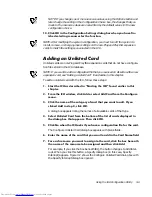
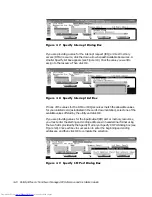
)RUHDFKUHVRXUFH\RXZDQWWRDVVLJQWRWKHFDUGFOLFNWKHER[EHQHDWK
WKHQDPHRIWKHUHVRXUFHWREHDVVLJQHGDQGWKHQFOLFN$GG
For example, if you click the box beneath IRQ, the button changes to Add Inter-
rupt. When you click this button, a Specify dialog box (in this case, Specify
Interrupt) appears. Figure 3-7 shows the Configure Unlisted Card dialog box with
the Specify Interrupt dialog box opened.
Summary of Contents for OptiPlex G1
Page 1: ... ZZZ GHOO FRP HOO 2SWL3OH 0LQL 7RZHU 0DQDJHG 3 6 VWHPV 5 5 1 1 167 7 21 8 ...
Page 8: ...x ...
Page 20: ...xxii ...
Page 34: ...1 14 Dell OptiPlex G1 Mini Tower Managed PC Reference and Installation Guide ...
Page 56: ...2 22 Dell OptiPlex G1 Mini Tower Managed PC Reference and Installation Guide ...
Page 89: ...Working Inside Your Computer 5 9 LJXUH 6 VWHP RDUG XPSHUV jumpered unjumpered ...
Page 128: ...7 16 Dell OptiPlex G1 Mini Tower Managed PC Reference and Installation Guide ...
Page 134: ...A 6 Dell OptiPlex G1 Mini Tower Managed PC Reference and Installation Guide ...
Page 156: ...D 4 Dell OptiPlex G1 Mini Tower Managed PC Reference and Installation Guide ...