background image

New connectors and cable

The topics below cover some of the most commonly asked questions regarding USB 3.0/USB 3.1 Gen 1.

Speed

Currently, there are 3 speed modes defined by the latest USB 3.0/USB 3.1 Gen 1 specification. They are Super-Speed, Hi-Speed and Full-
Speed. The new SuperSpeed mode has a transfer rate of 4.8Gbps. While the specification retains Hi-Speed, and Full-Speed USB mode, 
commonly known as USB 2.0 and 1.1 respectively, the slower modes still operate at 480Mbps and 12Mbps respectively and are kept to 
maintain backward compatibility.

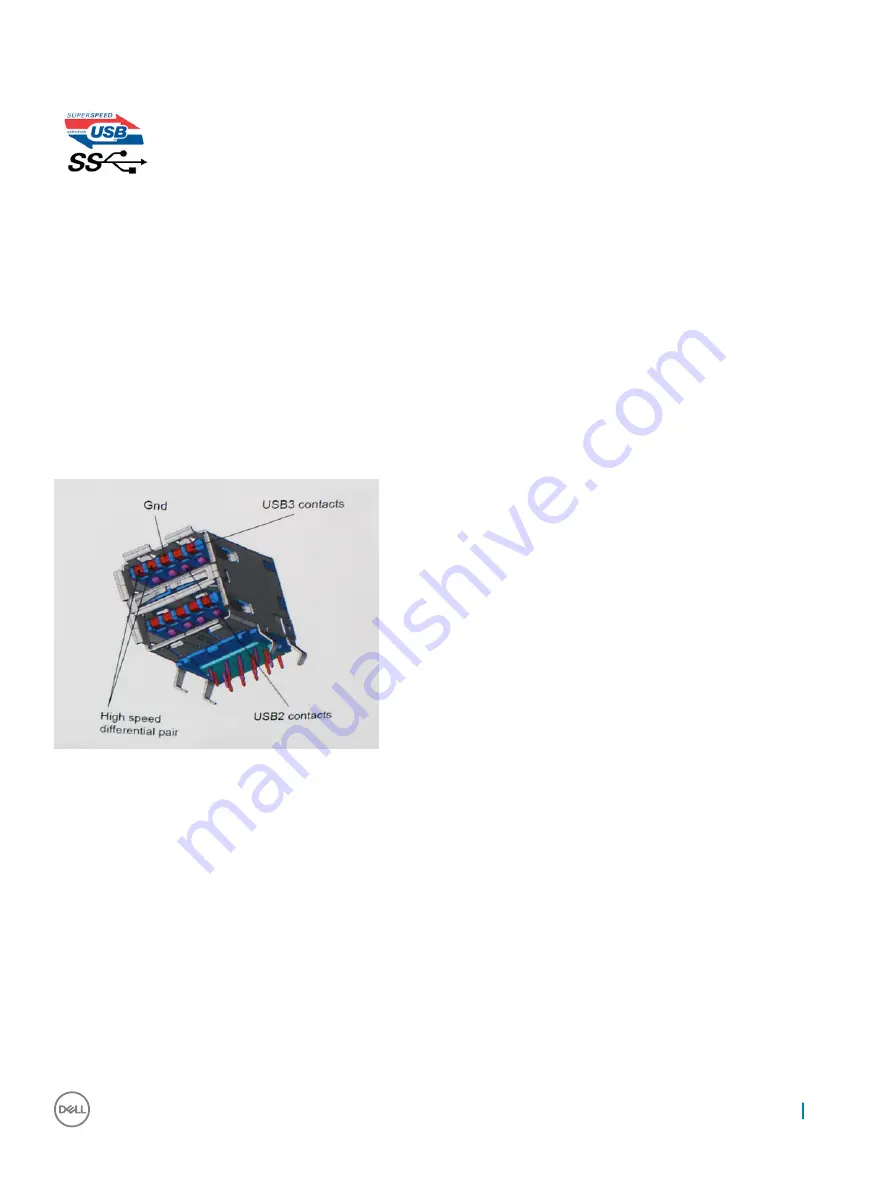
USB 3.0/USB 3.1 Gen 1 achieves the much higher performance by the technical changes below:

An additional physical bus that is added in parallel with the existing USB 2.0 bus (refer to the picture below).

USB 2.0 previously had four wires (power, ground, and a pair for differential data); USB 3.0/USB 3.1 Gen 1 adds four more for two pairs 

of differential signals (receive and transmit) for a combined total of eight connections in the connectors and cabling.

USB 3.0/USB 3.1 Gen 1 utilizes the bidirectional data interface, rather than USB 2.0's half-duplex arrangement. This gives a 10-fold 

increase in theoretical bandwidth.

With today's ever increasing demands placed on data transfers with high-definition video content, terabyte storage devices, high megapixel 
count digital cameras etc., USB 2.0 may not be fast enough. Furthermore, no USB 2.0 connection could ever come close to the 480Mbps 
theoretical maximum throughput, making data transfer at around 320Mbps (40MB/s) — the actual real-world maximum. Similarly, USB 
3.0/USB 3.1 Gen 1 connections will never achieve 4.8Gbps. We will likely see a real-world maximum rate of 400MB/s with overheads. At this 
speed, USB 3.0/USB 3.1 Gen 1 is a 10x improvement over USB 2.0.

Applications

USB 3.0/USB 3.1 Gen 1 opens up the laneways and provides more headroom for devices to deliver a better overall experience. Where USB 
video was barely tolerable previously (both from a maximum resolution, latency, and video compression perspective), it's easy to imagine 
that with 5-10 times the bandwidth available, USB video solutions should work that much better. Single-link DVI requires almost 2Gbps 
throughput. Where 480Mbps was limiting, 5Gbps is more than promising. With its promised 4.8Gbps speed, the standard will find its way 
into some products that previously weren't USB territory, like external RAID storage systems.

Listed below are some of the available SuperSpeed USB 3.0/USB 3.1 Gen 1 products:

Technology and components

45

Summary of Contents for Latitude 12 7212

Page 1: ...Latitude 12 Rugged Extreme Tablet 7212 Owner s Manual Regulatory Model T03H Regulatory Type T03H002 ...

Page 2: ... to hardware or loss of data and tells you how to avoid the problem WARNING A WARNING indicates a potential for property damage personal injury or death Copyright 2017 Dell Inc or its subsidiaries All rights reserved Dell EMC and other trademarks are trademarks of Dell Inc or its subsidiaries Other trademarks may be trademarks of their respective owners 2017 08 Rev A00 ...

Page 3: ...play assembly 17 Stylus 18 Removing stylus 18 Installing stylus 18 WLAN card 19 Removing WLAN card 19 Installing WLAN card 20 WWAN card 20 Removing WWAN card 20 Installing WWAN card 21 CMOS battery 21 Removing CMOS battery 21 Installing CMOS battery 22 Power button assembly 23 Removing power button assembly 23 Installing power button assembly 24 Micro serial port and power connector port 25 Removi...

Page 4: ...6 4 Software 47 Supported operating systems 47 Downloading drivers 47 Intel audio drivers 48 Intel chipset drivers 48 Intel HD Graphics drivers 48 Network drivers 49 System devices drivers 49 Storage drivers 50 5 System specifications 51 Product overview 51 Key Features 51 System specifications 52 Processor specifications 52 Memory specifications 52 Storage specifications 52 Audio specifications 5...

Page 5: ...upport options 67 Wireless options 68 Maintenance 68 System Log 68 Support Assist System Resolution 69 7 Troubleshooting 70 Dell Enhanced Pre Boot System Assessment ePSA diagnostic 3 0 70 Diagnostic LED 70 General Troubleshooting 71 8 Ecosystem Accessories 73 Active Stylus 73 Getting the stylus ready for use 73 System base view 74 System right view 74 Dock front view 75 Keyboard Dock 75 Turn the B...

Page 6: ... tasks CAUTION Handle components and cards with care Do not touch the components or contacts on a card Hold a card by its edges or by its metal mounting bracket Hold a component such as a processor by its edges not by its pins CAUTION When you disconnect a cable pull on its connector or on its pull tab not on the cable itself Some cables have connectors with locking tabs if you are disconnecting t...

Page 7: ... If your computer and attached devices did not automatically turn off when you shut down your operating system press and hold the power button for about 6 seconds to turn them off After working inside your computer After you complete any replacement procedure ensure that you connect external devices cards and cables before turning on your computer CAUTION To avoid damage to the computer use only t...

Page 8: ...Rugged Extreme Tablet screw size list Component M2 2 M2 3 M2 4 M2 5 M2 5 3 M2 5 5 M2 5 8 Smart card 6 Bottom Base 6 81 Front Camera 2 Rear Camera 3 Bottom Base 8 16 4 Protective Rubber Bumper all four corners 8 Front Camera 2 Rear Camera 3 WLAN 1 WWAN 1 M 2 SSD 1 Right I O Board Assembly 1 Left I O Board Assembly 3 System Board Assembly System Board and Fan 13 Power Button Assembly 1 1 DC In Cable...

Page 9: ... computer with your tablet WARNING Before removing or replacing the battery turn off the computer disconnect the AC adapter from the electrical outlet and the tablet and remove any other external cables from the tablet 1 Follow the procedure in Before Working Inside Your Computer 2 Locate the battery and slide the battery latch to unlock the battery release latch 1 3 Push the button in a downward ...

Page 10: ...The battery is released from the battery bay 4 Lift the edge of the battery that pops up 10 Removing and installing components ...

Page 11: ...de the battery into the slot until it clicks into place 3 Make sure the battery latch is back to the locked state NOTE There are two battery Perform steps 1 to 3 to install battery 1 and battery 2 on the tablet 4 Follow the procedure in After working inside your computer Subscriber Identification Module SIM card Removing uSIM 1 Follow the procedure in Before working inside your computer 2 Remove t...

Page 12: ...insert the uSIM a Lift the latch and remove the SIM slot cap b Insert the SIM in the slot until it is locked NOTE Ensure the gold chip is facing down in the slot c Press the SIM slot cap to initial state 3 Follow the procedure in After working inside your computer Display assembly Removing display assembly 1 Follow the procedure in Before working inside your computer 2 Remove the a Battery 12 Remo...

Page 13: ...lastic scribe a Place the display side of system on a smooth flat surface b Remove the 19 screws that secures the display panel to the tablet 4 Flip the system so that the display assembly is at top view Removing and installing components 13 ...

Page 14: ...be inserted 6 Pry the edges starting from Windows button clockwise 1 2 NOTE Gently pry the edges evenly to unlock the plastic lock that secures the display assembly with the tablet chassis 7 Lift the display assembly 1 by angle 15 and slide it from the chassis 2 14 Removing and installing components ...

Page 15: ... edge of the display panel inside the bottom edge of the rear chassis b Flip open the display panel to 90 angle and lay it angled on the tablet chassis 10 To disconnect the display cable a Remove the adhesive tape that secures the LVDS cable on the system board 1 b Lift the latch with a plastic scribe on the system board c Disconnect the connector of LVDS cable from the slot by a plastic scribe 2 ...

Page 16: ...the latch by a plastic scribe and release the Touch cable connected to the system board 5 NOTE Disconnect only the display cable from the system board NEVER disconnect the display cable from the display panel 11 Remove the display assembly from the tablet 16 Removing and installing components ...

Page 17: ...ter reassembling 6 Paste the adhesive tapes to secure the connected slots NOTE Ensure to secure the adhesive tapes to protect the display assembly from electrostatic discharge damage 7 Align the display assembly on the tablet chassis and press the edges to snap in NOTE Ensure that the Window button on the display assembly aligns with the docking pogo pins on the system board chassis Press the edge...

Page 18: ...the stretchable thread 4 Pull the stylus from the groove on the tablet NOTE Pull the stylus until the tip of the pen is visible at the mouth of the groove The stylus is ready to assist you in using the rugged tablet For more details see Getting the stylus ready for use Installing stylus 1 Align the stylus with the groove on the tablet 2 Push and smoothly slide it inside to secure the stylus NOTE A...

Page 19: ...es the WLAN bracket to the system board 1 d Lift the metal bracket 2 from the WLAN card e Disconnect the two antenna cables 3 with a plastic scribe NOTE Insert the edge of the plastic scribe between the tiny gap of cable copper head and WLAN card button pin f Slide and lift the WLAN card from the slot on the system board 4 NOTE Ensure to lift the WLAN card by NOT more than 35 angle CAUTION Never t...

Page 20: ...d 1 Follow the procedure in Before working inside your computer 2 Remove the a Battery b Display assembly 3 To remove the WWAN card a Place the back side of system on a flat surface b Locate the WWAN card c Remove the screw that secures the WWAN bracket to the system board 1 d Lift the metal bracket 2 from the system board e Disconnect main and auxiliary cables 3 with a plastic scribe from the con...

Page 21: ...he WWAN card 3 To secure the WWAN card place the metal bracket and tighten the M2 0 x 3 0 screw 4 Install the a Display assembly b Battery 5 Follow the procedure in After working inside your computer CMOS battery Removing CMOS battery 1 Follow the procedure in Before working inside your computer 2 Remove the a Battery b Display assembly 3 To remove the CMOS battery a Place the back side of system ...

Page 22: ...CMOS battery upwards as it is positioned beneath the power assembly button cable Gently release the battery from the adhesive tape NOTE Replace the CMOS battery when checksum error is displayed in booting Installing CMOS battery 1 Align the CMOS battery on the rubber pad next to the power assembly button 2 Press the CMOS battery on the adhesive tape NOTE CMOS battery for the tablet is insulated in...

Page 23: ...the power button assembly a Place the back side of system on a flat surface b Locate the power button assembly c Lift the latch by an angle 35 to unlock and gently release the power button assembly cable 1 d Remove the screw 1 that secures the power button assembly to the system board 2 NOTE DO NOT try to remove the power assembly without removing the screw e Push with plastic scribe and pull the ...

Page 24: ...Installing power button assembly 1 Assemble the power assembly button with the power button bracket NOTE Ensure that the power button cable is routed between the square gap in the power button bracket 2 Push the power button assembly in the slot on the tablet chassis NOTE Ensure NOT to insert the power button from the exterior right view 3 Secure the power button assembly with the adhesive tape 4 ...

Page 25: ...ecures the cable with system chassis 4 NOTE Ensure to release the bracket after the display cable is connected f Remove the metal bracket screws 5 that secure the micro serial port to the system chassis 5 CAUTION Micro serial port metal bracket is secured with four screws Initial ariel view displays three screws that secure the metal bracket Micro serial port is assembled combo with power connecto...

Page 26: ...26 Removing and installing components ...

Page 27: ... bracket ensures to secure the micro serial port cable from damage 5 Insert the micro serial port cable into the connector 6 Release the latch to secure the micro serial port cable to the system board 7 Align the power connector cable and replace the screw 1 to secure the power connector port on the system board NOTE Ensure to replace the screw which enables the power connector port to charge the ...

Page 28: ...era lens shutter 2 e Remove the screws 2 that secure the camera on the system chassis 1 f Insert the plastic scribe in the gap by an angle not more than 35 and push upward to lift the camera lens case 2 NOTE To remove the camera lens case ensure to lift the camera lens until it is released 28 Removing and installing components ...

Page 29: ...g Flip the camera circuit board with a plastic scribe 1 h Release the latch that secures the camera cable on the system board 2 Removing and installing components 29 ...

Page 30: ...align front camera circuit board with screw hole 4 Align the camera lens case and push downwards NOTE Ensure that the plastic latch of camera lens case is positioned towards back of front camera chassis 5 Replace the screw to secure the front camera circuit board on the system board 6 Slide the lens shutter in the lens channel and push towards left 7 Install the a Display assembly b Battery 8 Foll...

Page 31: ...the latch by an angle not more than 35 to unlock and gently release the power microphone cable 1 NOTE DO NOT pull the microphone bus cable without unreleased latch d Remove the screw 1 that secures the integrated microphone assembly to the system board 2 NOTE DO NOT try to remove the microphone without removing the screw e Release the microphone assembly and lift the microphone form the tablet cha...

Page 32: ...the IC on the microphone circuit board is positioned upward 2 Align the microphone in the slot on the tablet chassis NOTE Ensure that microphone input outlet is positioned upward 3 Replace the one screw to secure the microphone to the tablet chassis 4 Slide the microphone bus cable in the port on tablet system board 5 Release the latch on the system board by a plastic scribe 6 Install the a Displa...

Page 33: ... sink on the system board 1 d Lift the heat sink from the outlet connected on the heat sink fan and the system board 2 NOTE SSD card is below heat sink To upgrade or replace SSD card ensure to remove the heat sink CAUTION When in use the surface of the heat sink is hot Ensure to lift the heat sink cautiously CAUTION DO NOT bend or damage the copper heat sink tunnel Any damage results in malfunctio...

Page 34: ...dure in Before working inside your computer 2 Remove the a Battery b Display assembly c Heat sink 3 To remove the SDD a Place the back side of system on a flat surface b Locate the SSD NOTE SSD is positioned below heatsink Ensure to remove heat sink NOTE HDD is not shipped with the tablet c Remove the screws 1 that secures the SSD on the system board 1 d Slide and lift the SSD card from the connec...

Page 35: ... in the connector on the system board Do ensure to insert the SSD module by an angle not more than 30 to 35 2 Replace the screw 1 to secure the SSD module to the tablet chassis 3 Install the a Heat sink b Display assembly c Battery 4 Follow the procedure in After working inside your computer System fan Removing system fan 1 Follow the procedure in Before working inside your computer 2 Remove the R...

Page 36: ...r d Remove the screws 3 that secure the system fan on the system board 3 NOTE Ensure to remove the heatsink before removing the system fan Attention To remove the system fan and heatsink combo remove the screws 4 in arc U and the screws 2 diagonally opposite that secures the heatsink on the system board Installing system fan 1 Align the system fan in the slot on the system chassis 2 Route the spea...

Page 37: ...ter 2 Remove the a Battery b Display assembly c Heat sink d System fan e WLAN f WWAN 3 Perform the following before removing the system board a Place the back side of system on a flat surface b Lift the latch and disconnect the microphone cable from the system board 1 c Remove the radio antennae cable from the routing clip 2 3 4 with a plastic scribe on the system board Removing and installing com...

Page 38: ...ble 5 e Remove the CMOS battery cable from the connector on the system board 6 f Lift the latch and remove the back camera cable 1 g Disconnect the power button cable with a plastic scribe on the system board 2 38 Removing and installing components ...

Page 39: ...atch and slide to remove the finger print reader cable 4 j Press the latch and remove the USB port cable from the connector 5 k Disconnect the left I O assembly latch and remove the cable 1 l Disconnect the right I O assembly latch and remove the cable 2 Removing and installing components 39 ...

Page 40: ... the antennae latch 6 p Lift and remove the antennae cable from the connector 7 q Release the bracket that secures the micro serial port cable with system chassis 8 r Remove the adhesive tape protecting the docking board cable connector 1 s Lift the latch and slide to remove the docking board cable on the system board 2 40 Removing and installing components ...

Page 41: ...ble 7 x Disconnect the speaker cable with a plastic scribe 8 CAUTION Speaker cable is accessible after you remove the pogo pin docking connector cable Ensure to remove pogo pin docking cable before removing speaker cable 4 To remove the system board a Remove the screw 1 that connects the security card reader connector on the system board 1 b Flip the connector upward 2 c Disconnect the security ca...

Page 42: ...e Lift the metal bracket from the system chassis 5 f Remove the screw 6 that secures the system board to the tablet chassis 1 42 Removing and installing components ...

Page 43: ...s 2 Replace the screws 6 to secure the system board to the tablet chassis 3 Connect the back camera cable front camera cable fingerprint reader cable battery connector cables on the system board CAUTION Connect the cables to respective slot that were disconnected while removing the system board See removing system board 4 Install the a WWAN b WLAN c System fan d Heat sink e Display assembly f Batt...

Page 44: ...ard drive or optical devices Bluetooth and many more peripheral devices in the market Let s take a quick look on the USB evolution referencing to the table below Table 2 USB evolution Type Data Transfer Rate Category Introduction Year USB 3 0 USB 3 1 Gen 1 5 Gbps Super Speed 2010 USB 2 0 480 Mbps High Speed 2000 USB 3 0 USB 3 1 Gen 1 SuperSpeed USB For years the USB 2 0 has been firmly entrenched ...

Page 45: ...oretical bandwidth With today s ever increasing demands placed on data transfers with high definition video content terabyte storage devices high megapixel count digital cameras etc USB 2 0 may not be fast enough Furthermore no USB 2 0 connection could ever come close to the 480Mbps theoretical maximum throughput making data transfer at around 320Mbps 40MB s the actual real world maximum Similarly...

Page 46: ...3 0 USB 3 1 Gen 1 cables and only come into contact when connected to a proper SuperSpeed USB connection Windows 8 10 will be bringing native support for USB 3 1 Gen 1 controllers This is in contrast to previous versions of Windows which continue to require separate drivers for USB 3 0 USB 3 1 Gen 1 controllers Microsoft announced that Windows 7 would have USB 3 1 Gen 1 support perhaps not on its ...

Page 47: ...ghts from Windows10 Pro License supported only for Intel 6th generation processors OS Media Support Dell com support to download eligible Windows OS USB media available for upsell Downloading drivers 1 Turn on the laptop 2 Go to Dell com support 3 Click Product Support enter the Service Tag of your laptop and then click Submit NOTE If you do not have the Service Tag use the auto detect feature or ...

Page 48: ...ation Intel chipset drivers Verify if the Intel chipset drivers are already installed in the laptop Table 5 Intel chipset drivers Before installation After installation Intel HD Graphics drivers Verify if the Intel HD Graphics drivers are already installed in the laptop Table 6 Intel HD Graphics drivers Before installation After installation 48 Software ...

Page 49: ...stalled in the laptop Table 7 Network drivers Before installation After installation System devices drivers Verify if the System devices drivers are already installed in the laptop Table 8 System devices drivers Before installation After installation Software 49 ...

Page 50: ...Storage drivers Verify if the Storage drivers are already installed in the laptop Table 9 Storage drivers Before installation After installation 50 Software ...

Page 51: ... Adapter specifications Physical dimension specifications Environmental specifications Product overview The Latitude 7212 Rugged Extreme Tablet is Dell s ruggedized tablet in the rugged portfolio Its design is engineered for industrial and outdoor environments where customers need mobile computing power that is durable and able to perform in extreme conditions that expose the system to temperature...

Page 52: ...al core processor L3 cache i3 3 MB L3 cache i5 4 MB L3 cache i7 4 MB Memory specifications Feature Specification Memory type LPDDR3 Speed 1866 MHz Minimum memory 8 GB Maximum memory 16 GB Storage specifications Feature Specification SDD M 2 NVMe 256 GB to 1 TB SSD M 2 SATA 128 GB to 1 TB Audio specifications Feature Specification Types High definition audio Controller Integrated ALC3253 Stereo con...

Page 53: ...rts one VGA DisplayPort HDMI through the Docking station Communication specifications Feature Specification Network adapter USB 3 1 Gen1 and USB Type C Wireless Intel Dual Band Wireless AC 8265 with Bluetooth 4 2 vPro Mobile broadband Qualcomm QCA61x4A 802 11ac Dual Band 2x2 Wireless Adapter Bluetooth 4 1 WWAN NFC LTE Micro SIM slot Port and connector specifications Feature Specification Audio Uni...

Page 54: ...t 158 5 mm 6 24 in Width 268 0 mm 10 59 in Active area X Y 256 12 mm x 144 mm Maximum resolution 1920 x 1080 pixels Refresh rate 60 Hz Operating angle 0 closed to 180 Minimum viewing angles horizontal 89 TYP Minimum viewing angles vertical 89 TYP Pixel pitch 0 1335 mm Touch specifications Feature Specification Sample report Rate 100 Hz per finger pen Response Latency 15ms for all touch points Touc...

Page 55: ...g 40 C to 70 C 40 F to 158 F Physical dimension specifications Feature Specification Height Typical 203 00 mm 7 99 inches Maximum 209 00 mm 8 23 inches Width Typical 312 20 mm 12 29 inches Maximum 318 20 mm 12 53 inches Thickness Typical 24 40 mm 0 96 inches Maximum 28 90 mm 1 14 inches Weight Maximum 1 27 kg 2 82 lbs NOTE The weight of the tablet will vary depending on the configuration ordered a...

Page 56: ...rating 10 to 90 non condensing Relative humidity maximum storage 5 to 95 non condensing Altitude maximum operating 16 m to 12192 m 50 ft to 40000 ft Altitude maximum nonoperating 15 20 m to 12192 m 50 ft to 40 000 ft Airborne contaminant level G1 as defined by ISA 71 04 1985 56 System specifications ...

Page 57: ...appears you can Access System Setup by pressing F2 key Bring up the one time boot menu by pressing F12 key The one time boot menu displays the devices that you can boot from including the diagnostic option The boot menu options are Removable Drive if available STXXXX Drive NOTE XXX denotes the SATA drive number Optical Drive if available Diagnostics NOTE Choosing Diagnostics will display the ePSA ...

Page 58: ...er Option Description System Information System Information Displays BIOS Version Service Tag Asset Tag Ownership Tag Ownership Date Manufacture Date and the Express Service Code Memory Information Displays Memory Installed Memory Available Memory Speed Memory Channels Mode Memory Technology DIMM A Size DIMM B Size Processor Information Displays Processor Type Core Count Processor ID Current Clock...

Page 59: ... system startup This technology is part of the SMART Self Monitoring Analysis and Reporting Technology specification Enable SMART Reporting USB Configuration You can configure the integrated USB controller If Boot Support is enabled the system is allowed to boot any type of USB Mass Storage Devices hard drive or memory key If the USB port is enabled the device attached to this port is enabled and ...

Page 60: ...ues to support the various illumination levels The options are 5 seconds 10 seconds This option is selected by default 15 seconds 30 seconds 1 minute 5 minute 15 minute Never Keyboard Backlight Timeout on Battery The Keyboard Backlight with Battery option does not affect the main keyboard illumination feature Keyboard Illumination continues to support the various illumination levels The options ar...

Page 61: ...word NOTE You must set the admin password before you set the system or hard drive password Deleting the admin password automatically deletes the system password and the hard drive password NOTE Password changes take effect immediately By default the drive will not have a password set System Password Allows you to set change or delete the system password NOTE Password changes take effect immediatel...

Page 62: ...This option is selected by default Attestation Enable This option is selected by default PPI Bypass for Disable Commands Key Storage Enable This option is selected by default SHA 256 This option is selected by default CAUTION For the TPM upgrade downgrade process it is recommended to complete the process in an AC power with AC adapter plugged into the computer The upgrade downgrade process without...

Page 63: ... The Enable Custom Mode option is disabled by default Custom Mode Key Management Allows you to manage the security key databases only if the system is in Custom Mode The options are PK This option is selected by default KEK db dbx NOTE If you disable the Enable Custom Mode all the changes made will be erased and the keys will restore to default settings Save to File will save the key to a user sel...

Page 64: ...n is enabled Intel TurboBoost Allows you to enable or disable the Intel TurboBoost mode of the processor Enable Intel TurboBoost Default setting The option is enabled HyperThread Control Allows you to enable or disable the HyperThreading in the processor Disabled Enabled Default setting Enabled Power Management Option Description Lid Switch You can enable or disable the lid switch so the screen do...

Page 65: ...g algorithm and other techniques during the non work hours to improve the battery health The option is Enable Advance Battery Charge Mode This option is disabled by default Battery 1 Charge Configuration You can select the charging mode for the battery The options are Adaptive This option is enabled by default Standard Fully charges your battery at a standard rate ExpressCharge The battery charges...

Page 66: ...e Adapter Warnings This option is selected by default Keypad Embedded Allows you to choose one of two methods to enable the keypad that is embedded in the internal keyboard Fn Key Only This option is enabled by default By Numlock NOTE When setup is running this option has no effect Setup works in Fn Key Only mode Fn Lock Options Allows you to let hot key combinations Fn Esc toggle the primary beha...

Page 67: ...you to replace the external NIC MAC address in a supported dock or dongle with the selected MAC address from the system The options are System Unique MAC Address This option is enabled by default Integrated NIC1 MAC Address Disabled Manageability Option Description USB Provision Allows you to enable or disable provisioning the Intel AMT from a USB storage device Enable USB Provision This option is...

Page 68: ...already set This option is not set by default BIOS Downgrade Allows you to control flashing of the system firmware to previous revisions The option are Allows BIOS Downgrade This option is enabled by default Data Wipe Allows you to securely erase data from all internal storage devices The process adheres to Serial ATA Security Erase and eMMC JEDEC Sanitize specifications The option are Wipe on Nex...

Page 69: ...ecovery Threshold Allows you to control the automatic boot flow for Support Assist System Resolution Console and for OS Recovery Tool The options are OFF 1 2 This option is enabled by default 3 SupportAssist OS Recovery Allows you to enable or disable the boot flow for SupportAssist OS Recovery tool in the event of certain system errors The options is SupportAssist OS Recovery This option is enabl...

Page 70: ...attern then repeats NOTE The diagnostic pattern will consist of a two digit number being represented by a first group of LED blinks 1 through 9 in amber followed by a 1 5 second pause with the LED off and then a second group of LED blinks 1 through 9 in white This is then followed by a three second pause with the LED off before repeating over again Each LED blink takes 0 5 seconds The system will ...

Page 71: ...problems here are some basic steps that you can perform 1 If the LCD is not displaying video or the video is garbled run the ePSA diagnostics 2 If the LCD is not displaying any video connect an external monitor to eliminate a no POST problem A good image on the external monitor eliminates a video card problem or a POST problem 3 Connect an external monitor when possible for all LCD related problem...

Page 72: ...or nonfunctional replace the system board Display assembly No additional drivers or updates are needed for VGA functionality When troubleshooting an external monitor keep these tips in mind Check both ends of the cable for a snug connection into the laptop and into the external monitor Adjust the contrast and brightness controls on the external monitor Make sure that the tablet is not set to inter...

Page 73: ...iew Keyboard Dock Dock rear view I O module Rugged tablet vehicle dock Active Stylus This section provides information about the features available on the active stylus 1 Pen lead provides the finger touch functionality 2 Pen button used to perform a left click and right click 3 Middle barrel provides access to the battery compartment 4 Pen clip Pen rear cap allows you to secure the stylus in your...

Page 74: ...itive side facing the tip of the pen 3 Reassemble the barrel securely System base view This section contains information on the desk dock System right view 1 Microphone 2 Quad Cool vent output 3 Security cable slot 74 Ecosystem Accessories ...

Page 75: ...ing effectiveness of electrical enclosures against intrusion The digit 65 indicates that the rugged keyboard is enhanced with protection against dust and low pressure water jets To understand more on IP ratings please refer to the Essential Knowledge page Backlit Keyboard The keyboard dock comes equipped with a customizable backlit keyboard The backlight can be set to any of the following colors W...

Page 76: ...ation turns on the backlight to its lowest setting 3 Additional cycling of the key combinations will vary the brightness settings to 25 50 75 and 100 4 Cycle through the key combination to either adjust the brightness or completely turn off the backlight Keyboard Function Fn Key Lock The keyboard has Function key Fn lock capability When activated the secondary functions on the top row of keys beco...

Page 77: ...s of the keys Use of the Fn key will trigger numbered function keys F1 F2 F3 and so on c Other secondary functions on keys below the top row are not affected and will still require use of the Fn key d The Fn lock can be turned off by pressing the Fn Esc keys again This will return the function keys to the default state Dock rear view 1 2x Spare Battery Charging Slots 2 Lock slot positioned on left...

Page 78: ...nstalling I O module 1 Align the I O Module at the back of the tablet 2 Tighten up all four thumb screws Rugged tablet vehicle dock This section contains information about the Rugged Vehicle Dock The Rugged Tablet Vehicle Dock is a unique docking solution specially designed for the Latitude 7212 Rugged Extreme Tablet The dock mounts the tablet in optimal position for vehicle use It is crash tested...

Page 79: ...Ecosystem Accessories 79 ...

Reviews: