background image

Steps

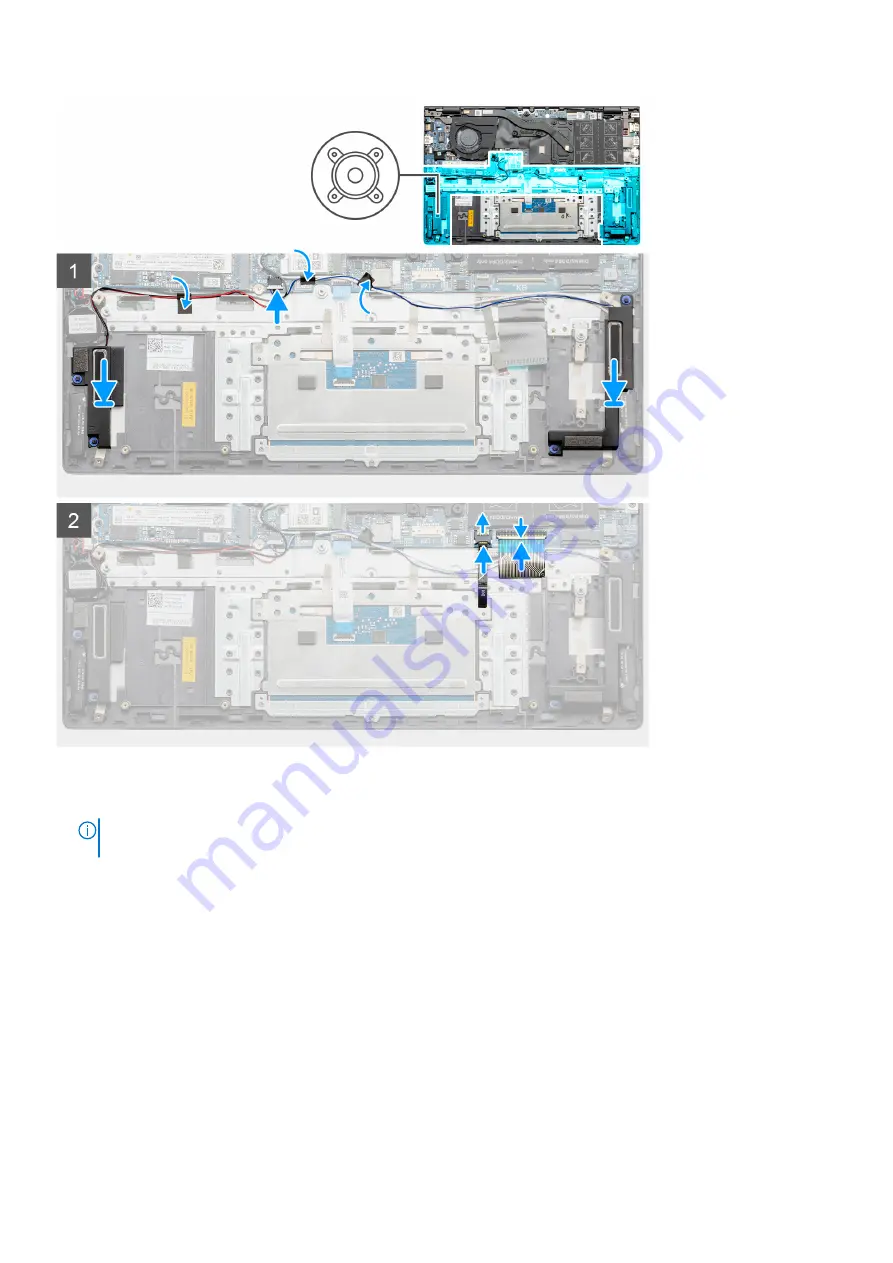
1. Using the alignment posts and rubber grommets, place the speakers in the slots on the palm-rest and keyboard assembly.

NOTE:

 If the rubber grommets are pushed out of the speakers when removing the speakers, push them back in place

before replacing the speakers.

2. Route the speaker cable through the routing guides on the palm-rest and keyboard assembly.
3. Connect the speaker cable to the system board.
4. Connect the keyboard-backlight cable and the keyboard cable to the system board.

Next steps

1. Install the 

battery

.

2. Install the 

base cover

.

3. Follow the procedure in 

After working inside your computer

.

54

Removing and installing components

Summary of Contents for Inspiron 14 5402

Page 1: ...Inspiron 14 5402 Service Manual Regulatory Model P130G Regulatory Type P130G002 January 2021 Rev A01 ...

Page 2: ...tial damage to hardware or loss of data and tells you how to avoid the problem WARNING A WARNING indicates a potential for property damage personal injury or death 2020 2021 Dell Inc or its subsidiaries All rights reserved Dell EMC and other trademarks are trademarks of Dell Inc or its subsidiaries Other trademarks may be trademarks of their respective owners ...

Page 3: ...e 22 Solid state drive M 2 slot one 24 Removing the M 2 2230 solid state drive from M 2 slot one 24 Installing the M 2 2230 solid state drive in M 2 slot one 24 Removing the M 2 2280 solid state drive from M 2 slot one 25 Installing the M 2 2280 solid state drive in M 2 slot one 26 Installing the solid state drive bracket 27 Solid state drive M 2 slot two 28 Removing the M 2 2230 solid state drive...

Page 4: ...or discrete GPU 57 Power button with optional fingerprint reader 58 Removing the power button with optional fingerprint reader 58 Installing the power button with optional fingerprint reader 59 System board 60 Removing the system board 60 Installing the system board 62 Palm rest and keyboard assembly 64 Removing the palm rest and keyboard assembly 64 Installing the palm rest and keyboard assembly ...

Page 5: ...83 System board built in self test M BIST 84 Display panel power rail built in self test L BIST 84 Display panel built in self test LCD BIST 85 Outcome 85 Recovering the operating system 86 System diagnostic lights 86 Enabling Intel Optane memory 87 Disabling Intel Optane memory 87 Drain residual flea power perform hard reset 88 WiFi power cycle 88 Chapter 6 Getting help and contacting Dell 89 Con...

Page 6: ...r computer WARNING Before working inside your computer read the safety information that is shipped with your computer For more safety best practices see the Regulatory Compliance home page at www dell com regulatory_compliance WARNING Disconnect your computer from all power sources before opening the computer cover or panels After you finish working inside the computer replace all covers panels an...

Page 7: ...s to melt and in the meantime may cause degradation of memory integrity intermittent memory errors etc The more difficult type of damage to recognize and troubleshoot is the intermittent also called latent or walking wounded failure Perform the following steps to prevent ESD damage Use a wired ESD wrist strap that is properly grounded The use of wireless anti static straps is no longer allowed the...

Page 8: ...n static safe packaging Metal static shielded bags are preferred However you should always return the damaged part using the same ESD bag and packaging that the new part arrived in The ESD bag should be folded over and taped shut and all the same foam packing material should be used in the original box that the new part arrived in ESD sensitive devices should be removed from packaging only at an E...

Page 9: ...re that no stray screws remain inside your computer 2 Connect any external devices peripherals or cables you removed before working on your computer 3 Replace any media cards discs or any other parts that you removed before working on your computer 4 Connect your computer and all attached devices to their electrical outlets 5 Turn on your computer Working inside your computer 9 ...

Page 10: ... NOTE Some computers have magnetic surfaces Ensure that the screws are not left attached to such surfaces when replacing a component NOTE Screw color may vary with the configuration ordered Table 1 Screw list Component Secured to Screw type Quantity Screw image Base cover Palm rest and keyboard assembly M2 x 4 5 NOTE Screw color may vary depending on the configuration ordered Base cover Palm rest ...

Page 11: ...Power button with fingerprint reader optional Palm rest and keyboard assembly M2 x 2 5 2 Power adapter port bracket Palm rest and keyboard assembly M2 x 3 1 USB 3 2 Gen 2 Type C port bracket System board M2 x 3 2 Hinge brackets Palm rest and keyboard assembly M2 5 x 5 4 I O board Palm rest and keyboard assembly M2 x 3 1 System board Palm rest and keyboard assembly M2 x 3 1 System board Palm rest a...

Page 12: ...0 solid state drive in M 2 slot two 8 Speakers 9 System board 10 Touchpad 11 Palm rest and keyboard assembly 12 Display assembly 13 Power button with fingerprint reader 14 Coin cell battery 15 I O board 16 Fan 17 Wireless card 18 M 2 2280 Solid state drive in M 2 slot one 12 Removing and installing components ...

Page 13: ...isites 1 Follow the procedure in Before working inside your computer About this task The following images indicate the location of the base cover and provide a visual representation of the removal procedure Removing and installing components 13 ...

Page 14: ...14 Removing and installing components ...

Page 15: ...y cable from the system board NOTE Disconnect the battery cable only when you are continuing to remove other components from your computer 5 Press and hold the power button for five seconds to ground the computer and drain the flea power Installing the base cover Prerequisites If you are replacing a component remove the existing component before performing the installation procedure About this tas...

Page 16: ...16 Removing and installing components ...

Page 17: ...ews M2x4 that secure the base cover to the palm rest and keyboard assembly Next steps 1 Follow the procedure in After working inside your computer Battery Lithium ion battery precautions CAUTION Exercise caution when handling Lithium ion batteries Discharge the battery completely before removing it Disconnect the AC power adapter from the system and operate the computer solely on battery power the...

Page 18: ...n be dangerous In such an instance contact Dell technical support for assistance See www dell com contactdell Always purchase genuine batteries from www dell com or authorized Dell partners and resellers Removing the 3 cell battery Prerequisites 1 Follow the procedure in Before working inside your computer 2 Remove the base cover About this task The following images indicate the location of the ba...

Page 19: ... the screw holes on the battery with the screw holes on the palm rest and keyboard assembly 3 Replace the four screws M2x3 that secure the battery to the palm rest and keyboard assembly 4 Connect the battery cable to the system board and adhere the tape that secures the battery cable to the system board Next steps 1 Install the base cover 2 Follow the procedure in After working inside your compute...

Page 20: ...tery to the palm rest and keyboard assembly 3 Lift the battery along with its cable off the palm rest and keyboard assembly Installing the 4 cell battery Prerequisites If you are replacing a component remove the existing component before performing the installation procedure About this task The following image indicates the location of the battery and provides a visual representation of the instal...

Page 21: ...tem board and adhere the tape that secures the battery cable to the system board Next steps 1 Install the base cover 2 Follow the procedure in After working inside your computer Memory module Removing the memory module Prerequisites 1 Follow the procedure in Before working inside your computer 2 Remove the base cover About this task The following images indicate the location of the memory module a...

Page 22: ...3 Remove the memory module from the memory module slot Installing the memory module Prerequisites If you are replacing a component remove the existing component before performing the installation procedure About this task The following image indicates the location of the memory module and provides a visual representation of the installation procedure 22 Removing and installing components ...

Page 23: ...ot 3 Slide the memory module firmly into the slot at an angle 4 Press the memory module down until it clicks into place NOTE If you do not hear the click remove the memory module and reinstall it Next steps 1 Install the base cover 2 Follow the procedure in After working inside your computer Removing and installing components 23 ...

Page 24: ...80 or one Intel Optane Memory H10 with Solid State Storage The following image indicates the location of the M 2 2230 solid state drive that is installed in M 2 slot one and provides a visual representation of the removal procedure Steps 1 Remove the screw M2x3 that secures the solid state drive to the palm rest and keyboard assembly 2 Slide and lift the solid state drive off the M 2 slot one on t...

Page 25: ...at is installed in M 2 slot one and provides a visual representation of the installation procedure Steps 1 Align the notches on the solid state drive with the M 2 slot one on the system board 2 Slide the solid state drive into the M 2 slot one on the system board 3 Replace the screw M2x3 that secures the solid state drive to the palm rest and keyboard assembly Next steps 1 Install the base cover 2...

Page 26: ...OTE This procedure applies only to computers shipped with an M 2 2280 solid state drive installed in M 2 slot one NOTE Depending on the configuration ordered your computer may support an M 2 2230 solid state drive or an M 2 2280 solid state drive in M 2 slot one NOTE M 2 slot two supports one PCIe Gen3 x4 NVMe or SATA solid state drive M 2 2230 or M 2 2280 or one Intel Optane Memory H10 with Solid...

Page 27: ...ate drive bracket Prerequisites 1 Follow the procedure in Before working inside your computer 2 Remove the base cover 3 Remove the solid state drive from M 2 slot one About this task NOTE If there is only one solid state drive in the configuration you ordered you can install another solid state drive in the other M 2 slot However you may need a solid state drive bracket sold separately please cont...

Page 28: ...is only available if you have ordered an Intel Optane storage NOTE If you have ordered a 4 cell 53 Wh battery configuration your computer may have an M 2 2230 solid state drive or an M 2 2280 solid state drive Intel Optane storage installed in M 2 slot two NOTE This procedure applies only to computers shipped with an M 2 2230 solid state drive installed in M 2 slot two 1 Follow the procedure in Be...

Page 29: ... drive in M 2 slot two Prerequisites If you are replacing a component remove the existing component before performing the installation procedure About this task NOTE If you have ordered a 3 cell 40 Wh battery configuration your computer can only support one solid state drive in M 2 slot one M 2 slot two is only available if you have ordered an Intel Optane storage NOTE If you have ordered a 4 cell...

Page 30: ...vides a visual representation of the installation procedure Steps 1 Align the notches on the solid state drive with M 2 slot two on the system board 2 Slide the solid state drive into M 2 slot two on the system board 3 Replace the screw M2x3 that secures the solid state drive to the palm rest and keyboard assembly 4 Place the solid state drive bracket on the solid state drive 5 Align the screw hol...

Page 31: ... Intel Optane storage NOTE If you have ordered a 4 cell 53 Wh battery configuration your computer may support an M 2 2230 solid state drive an M 2 2280 solid state drive or an Intel Optane storage in M 2 slot two NOTE This procedure applies only to computers shipped with an M 2 2280 solid state drive Intel Optane storage installed in M 2 slot two The following image indicates the location of the M...

Page 32: ...n procedure About this task NOTE If you have ordered a 3 cell 40 Wh battery configuration your computer will not support a solid state drive Intel Optane storage in M 2 slot two NOTE If you have ordered a 4 cell 53 Wh battery configuration your computer may support an M 2 2230 solid state drive or an M 2 2280 solid state drive Intel Optane storage in M 2 slot two NOTE Before installing your M 2 22...

Page 33: ...ve bracket on the solid state drive 5 Align the screw holes on the solid state drive bracket with the screw holes on the system board and the palm rest and keyboard assembly 6 Replace the screw M2x3 that secures the solid state drive bracket to the palm rest and keyboard assembly Next steps 1 Install the base cover 2 Follow the procedure in After working inside your computer Installing the solid s...

Page 34: ...racket to the palm rest and keyboard assembly 2 Remove the solid state drive bracket from the support bracket slot 3 Depending on the type of solid state drive M 2 2230 M 2 2280 align and insert the solid state drive bracket into the bracket slot 4 Replace the screw M1 6x2 that secures the solid state drive bracket to the palm rest and keyboard assembly 5 Install the solid state drive WLAN card Re...

Page 35: ...N card 4 Slide and remove the WLAN card from the WLAN card slot Installing the WLAN card Prerequisites If you are replacing a component remove the existing component before performing the installation procedure About this task The following image indicates the location of the WLAN card and provides a visual representation of the installation procedure Removing and installing components 35 ...

Page 36: ... Auxiliary Black AUX black triangle 2 Align the notch on the WLAN card with the tab on the WLAN card slot and insert the WLAN card at an angle into the WLAN card slot 3 Place the WLAN card bracket on the WLAN card 4 Align the screw hole on the WLAN card bracket and the screw hole on the system board 5 Replace the screw M2x3 that secures the WLAN card to the system board Next steps 1 Install the ba...

Page 37: ...de a visual representation of the removal procedure Steps 1 Peel and lift the mylar covering the fan cable 2 Peel the tape and disconnect the I O board cable from the system board 3 Disconnect the fan cable from the system board 4 Remove the two screws M2x2 that secure the fan to the palm rest and keyboard assembly 5 Lift the fan off the palm rest and keyboard assembly Removing and installing comp...

Page 38: ...ps 1 Align and place the fan on the palm rest and keyboard assembly 2 Replace the two screws M2x2 that secure the fan to the palm rest and keyboard assembly 3 Route the I O board cable through the routing guides on the fan 4 Connect the fan cable to the system board 5 Connect the I O board cable to the system board and close the latch 6 Adhere the tape that secures the I O board cable to the syste...

Page 39: ...our computer 2 Remove the base cover About this task The following images indicate the location of the base cover and provide a visual representation of the removal procedure Steps 1 Disconnect the coin cell battery cable from the I O board 2 Remove the coin cell battery cable from the routing guides on the palm rest and keyboard assembly 3 Peel the coin cell battery from the palm rest and keyboar...

Page 40: ... the palm rest and keyboard assembly 3 Connect the coin cell battery cable to the I O board Next steps 1 Install the base cover 2 Follow the procedure in After working inside your computer Power adapter port Removing the power adapter port Prerequisites 1 Follow the procedure in Before working inside your computer 2 Remove the base cover About this task The following images indicate the location o...

Page 41: ...nd keyboard assembly 4 Lift the power adapter port off the palm rest and keyboard assembly Installing the power adapter port Prerequisites If you are replacing a component remove the existing component before performing the installation procedure About this task The following image indicates the location of the power adapter port and provides a visual representation of the installation procedure R...

Page 42: ...ign the screw holes on the display hinges with the screw holes on the system board 6 Replace the two screws M2 5x5 that secure the right display hinge to the system board Next steps 1 Install the base cover 2 Follow the procedure in After working inside your computer Display assembly Removing the display assembly Prerequisites 1 Follow the procedure in Before working inside your computer 2 Remove ...

Page 43: ...Removing and installing components 43 ...

Page 44: ...assembly 5 Lift the left and right display hinges 6 Slide the palm rest and keyboard assembly off the display assembly 7 After performing the above steps you are left with the display assembly Installing the display assembly Prerequisites If you are replacing a component remove the existing component before performing the installation procedure About this task The following image indicates the loc...

Page 45: ...Removing and installing components 45 ...

Page 46: ...cover 2 Follow the procedure in After working inside your computer I O board Removing the I O board Prerequisites NOTE Removing the I O board requires the coin cell battery to be disconnected the action of which resets the BIOS setup program s settings to default It is recommended that you note the BIOS setup program s settings before removing the coin cell battery 1 Follow the procedure in Before...

Page 47: ...sk The following image indicates the location of the I O board and provides a visual representation of the installation procedure Steps 1 Place the I O board on the palm rest and keyboard assembly 2 Replace the screw M2x3 that secures the I O board to the palm rest and keyboard assembly 3 Connect the power button cable or the fingerprint reader cable if applicable to the I O board and close the la...

Page 48: ...e the location of the touchpad and provide a visual representation of the removal procedure Steps 1 Open the latch and disconnect the touchpad cable from the system board 2 Remove the three screws M1 6x2 that secure the touchpad bracket to the palm rest and keyboard assembly 3 Lift the touchpad bracket off the palm rest and keyboard assembly 4 Peel the tape off the touchpad 48 Removing and install...

Page 49: ...the installation procedure Steps 1 Align and place the touchpad into the slot on the palm rest and keyboard assembly 2 Replace the two screws M2x2 and adhere the tape that secures the touchpad to the palm rest and keyboard assembly 3 Adhere the tape to secure the touchpad to the palm rest and keyboard assembly 4 Align and place the touchpad bracket into the slot on the palm rest and keyboard assem...

Page 50: ...Removing the speakers in 3 cell battery configuration Prerequisites 1 Follow the procedure in Before working inside your computer 2 Remove the base cover 3 Remove the battery About this task The following images indicate the location of the speaker and provide a visual representation of the removal procedure 50 Removing and installing components ...

Page 51: ...sition of the rubber grommets before lifting the speakers 4 Lift the speakers along with the cable off the palm rest and keyboard assembly Installing the speakers in 3 cell battery configuration Prerequisites If you are replacing a component remove the existing component before performing the installation procedure About this task The following image indicates the location of the speaker and provi...

Page 52: ...er cable to the system board 4 Connect the keyboard backlight cable and the keyboard cable to the system board Next steps 1 Install the battery 2 Install the base cover 3 Follow the procedure in After working inside your computer Removing the speakers in 4 cell battery configuration Prerequisites 1 Follow the procedure in Before working inside your computer 2 Remove the base cover 3 Remove the bat...

Page 53: ...sition of the rubber grommets before lifting the speakers 4 Lift the speakers along with the cable off the palm rest and keyboard assembly Installing the speakers in 4 cell battery configuration Prerequisites If you are replacing a component remove the existing component before performing the installation procedure About this task The following image indicates the location of the speaker and provi...

Page 54: ...back in place before replacing the speakers 2 Route the speaker cable through the routing guides on the palm rest and keyboard assembly 3 Connect the speaker cable to the system board 4 Connect the keyboard backlight cable and the keyboard cable to the system board Next steps 1 Install the battery 2 Install the base cover 3 Follow the procedure in After working inside your computer 54 Removing and...

Page 55: ...ficient time for the heat sink to cool before you touch it The following images indicate the location of the heat sink and provide a visual representation of the removal procedure Steps 1 In the reverse order 4 3 2 1 loosen the four captive screws M2x5 85 that secure the heat sink to the system board NOTE The number of screws varies depending on the configuration ordered 2 Lift the heat sink off t...

Page 56: ...eat sink to the system board NOTE The number of screws varies depending on the configuration ordered Next steps 1 Install the base cover 2 Follow the procedure in After working inside your computer Removing the heat sink for discrete GPU Prerequisites 1 Follow the procedure in Before working inside your computer 2 Remove the base cover About this task CAUTION For maximum cooling of the processor d...

Page 57: ... component remove the existing component before performing the installation procedure About this task CAUTION Incorrect alignment of the heat sink can damage the system board and processor NOTE If either the system board or the heat sink is replaced use the thermal pad or thermal paste provided in the kit to ensure that the thermal conductivity is achieved The following image indicates the locatio...

Page 58: ...side your computer Power button with optional fingerprint reader Removing the power button with optional fingerprint reader Prerequisites 1 Follow the procedure in Before working inside your computer 2 Remove the base cover 3 Remove the battery 3 cell or 4 cell 4 Remove the fan 5 Remove the I O board About this task The following images indicate the location of the base cover and provide a visual ...

Page 59: ... button with optional fingerprint reader if applicable along with the fingerprint reader cable if applicable off the palm rest and keyboard assembly Installing the power button with optional fingerprint reader Prerequisites If you are replacing a component remove the existing component before performing the installation procedure About this task The following image indicates the location of the po...

Page 60: ...he screw M2x2 that secures the power button bracket to the palm rest and keyboard assembly Next steps 1 Install the I O board 2 Install the battery 3 cell or 4 cell 3 Install the fan 4 Install the base cover 5 Follow the procedure in After working inside your computer System board Removing the system board Prerequisites 1 Follow the procedure in Before working inside your computer 2 Remove the bas...

Page 61: ... board and provide a visual representation of the removal procedure Steps 1 Remove the two screws M2 5x5 that secure the right display hinge to the system board 2 Peel the transparent tape open the latch and disconnect the display cable Removing and installing components 61 ...

Page 62: ...rd 12 Disconnect the keyboard backlight cable from the system board 13 Disconnect the keyboard cable from the system board 14 Remove the screw M2x2 that secures the system board to the palm rest and keyboard assembly 15 Remove the screw M2x3 that secures the system board to the palm rest and keyboard assembly 16 Lift the system board off the palm rest and keyboard assembly Installing the system bo...

Page 63: ...ype C port bracket 11 Connect the I O board cable to the system board and close the latch 12 Connect the fan cable to the system board 13 Adhere the mylar that covers the I O board cable 14 Connect the power adapter port cable to the system board 15 Connect the display cable to the system board and close the latch 16 Adhere the transparent tape that secures the display cable to the system board 17...

Page 64: ...t one 6 Remove the solid state drive from M 2 slot two 7 Remove the fan 8 Remove the battery 3 cell or 4 cell 9 Remove the power adapter port 10 Remove the display assembly 11 Remove the I O board 12 Remove the touchpad 13 Remove the coin cell battery 14 Remove the heat sink 15 Remove the power button board with optional fingerprint reader 16 Remove the system board NOTE The system board can be re...

Page 65: ...d with optional fingerprint reader 4 Install the heat sink 5 Install the coin cell battery 6 Install the touchpad 7 Install the I O board 8 Install the display assembly 9 Install the power adapter port 10 Install the battery 3 cell or 4 cell 11 Install the fan 12 Install the solid state drive in M 2 slot two 13 Install the solid state drive in M 2 slot one 14 Install the WLAN card 15 Install the m...

Page 66: ...rivers and downloads When troubleshooting downloading or installing drivers it is recommended that you read the Dell Knowledge Based article Drivers and Downloads FAQ SLN128938 3 66 Drivers and downloads ...

Page 67: ...ling base devices Entering BIOS setup program Steps 1 Turn on your computer 2 Press F2 immediately to enter the BIOS setup program NOTE If you wait too long and the operating system logo appears continue to wait until you see the desktop Then turn off your computer and try again Navigation keys NOTE For most of the System Setup options changes that you make are recorded but do not take effect unti...

Page 68: ...Service Tag Displays the Service Tag of the computer Asset Tag Displays the Asset Tag of the computer Ownership Tag Displays the ownership tag of the computer Manufacture Date Displays the manufacture date of the computer Ownership Date Displays the ownership date of the computer Express Service Code Displays the express service code of the computer Ownership Tag Displays the ownership tag of the ...

Page 69: ...rmation of the computer Video BIOS Version Displays the video BIOS version of the computer Video Memory Displays the video memory information of the computer Panel Type Displays the Panel Type of the computer Native Resolution Displays the native resolution of the computer Audio Controller Displays the audio controller information of the computer Wi Fi Device Displays the wireless device informati...

Page 70: ... mode of the integrated SATA hard drive controller Default RAID SATA is configured to support RAID Intel Rapid Restore Technology Drives Enables or disables various onboard drives M 2 PCIe SSD 0 SATA 2 Default ON SATA 0 Default ON Drive Information Displays the information of various onboard drives Miscellaneous Devices Enables or disables various onboard devices Enable Camera Enables or disables ...

Page 71: ...in password Default ON Non Admin Setup Changes Allow Wireless Switch Changes Enables or disables changes to the setup option when an Administrator password is set Default OFF Enable UEFI Capsule Firmware Updates Enables or disables BIOS updates through UEFI capsule update packages Computrace Enable or disable the BIOS module interface of the optional Computrace R Service from Absolute Software Int...

Page 72: ...gacy Option ROMs option needs to be turned off Secure Boot Mode Selects the Secure Boot operation mode Default Deployed Mode NOTE Deployed Mode should be selected for normal operation of Secure Boot Table 10 System setup options Expert Key Management menu Expert Key Management Enable Custom Mode Enables or disables the keys in the PK KEK db and dbx security key databases to be modified Default OFF...

Page 73: ...the day to a specified work period Advanced Battery Charged maximizes battery health while still supporting heavy use during the work day Default OFF Block Sleep Blocks the computer from entering Sleep S3 mode in the operating system Default OFF NOTE If enabled the computer will not go to sleep Intel Rapid Start will be disabled automatically and the operating system power option will be blank if ...

Page 74: ...ode Default ON Lock Mode Default Lock Mode Secondary Lock Mode Secondary If this option is selected the F1 F12 keys scan the code for their secondary functions Pull Screen Logo Enabled or disabled the computer to display full screen logo if the image match screen resolution Default OFF Warnings and Errors Selects an action on encountering a warning or error during boot Default Prompt on Warnings a...

Page 75: ...from Hard Drive to be set to Enabled Default OFF Start Data Wipe CAUTION This Secure Wipe Operation will delete information in a way that it cannot be reconstructed If enabled the BIOS will queue up a data wipe cycle for storage devices that are connected to the motherboard on the next reboot Default OFF Allow BIOS Downgrade Controls flashing of the system firmware to previous revisions Default ON...

Page 76: ...for only THIS PC XXXXXXX NOTE XXXXXXX denotes the Service Tag 9 Select the latest BIOS file and click Download 10 After the download is complete browse to the folder where you saved the system BIOS executable file 11 Double click the system BIOS executable file NOTE Follow the on screen instructions Updating BIOS on systems with BitLocker enabled CAUTION If BitLocker is not suspended before updati...

Page 77: ... from the F12 One Time boot menu Updating your system BIOS using a BIOS update exe file copied to a FAT32 USB key and booting from the F12 one time boot menu About this task BIOS Update You can run the BIOS update file from Windows using a bootable USB key or you can also update the BIOS from the F12 One Time boot menu on the system Most Dell systems built after 2012 have this capability and you c...

Page 78: ...TION Do not power off the system during the BIOS update process Powering off the system could make the system fail to boot Steps 1 From a power off state insert the USB key where you copied the flash into a USB port of the system 2 Power on the system and press the F12 key to access the One Time Boot Menu Highlight BIOS Update using the mouse or arrow keys then press Enter 3 The flash BIOS menu wi...

Page 79: ...5 Once the file is selected Double click the flash target file then press submit 6 Click the Update BIOS then system will reboot to flash the BIOS System setup 79 ...

Page 80: ...vide a basic level of security for the data on your computer CAUTION Anyone can access the data that is stored on your computer if it is not locked and left unattended NOTE System and setup password feature is disabled Assigning a system setup password Prerequisites You can assign a new System or Admin Password only when the status is in Not Set About this task To enter the system setup press F12 ...

Page 81: ...System Setup screen select System Security and press Enter The System Security screen is displayed 2 In the System Security screen verify that Password Status is Unlocked 3 Select System Password update or delete the existing system password and press Enter or Tab 4 Select Setup Password update or delete the existing setup password and press Enter or Tab NOTE If you change the System and or Setup ...

Page 82: ...NOTE For information on how to reset Windows or application passwords refer to the documentation accompanying Windows or your application 82 System setup ...

Page 83: ...uccessfully View error messages that indicate if problems were encountered during the test NOTE Some tests are meant for specific devices and require user interaction Ensure that you are present in front of the computer when the diagnostic tests are performed For more information see SupportAssist Pre Boot System Performance Check Built in self test BIST About this task There are three different t...

Page 84: ...mber when there is a failure with the system board 3 Replace the system board to fix the issue NOTE The battery status LED will not illuminate if there is no failure present with the system board If further troubleshooting is required proceed with the applicable Guided Resolution for No Power No POST etc Display panel power rail built in self test L BIST About this task Next steps L BIST LCD Power...

Page 85: ...eds to ensure that the colors are being displayed correctly without distortion or graphical anomalies 4 The computer reboots at the end of the last solid color Outcome About this task The following table shows the outcome of running different types of BIST Table 21 BIST outcome M BIST Off No fault detected with system board Solid amber Indicates a problem with the system board Table 21 BIST outcom...

Page 86: ...cted and the battery has more than 5 charge Amber Computer is running on battery and the battery has less than 5 charge Off Power adapter is connected and the battery is fully charged Computer is running on battery and the battery has more than 5 charge Computer is in sleep state hibernation or turned off The power and battery status light may blink amber or white according to pre defined beep cod...

Page 87: ...reen select a compatible fast drive and then click Yes to continue enabling Intel Optane memory 5 Click Intel Optane memory Reboot to complete enabling your Intel Optane memory NOTE Applications may take up to three subsequent launches after enablement to see the full performance benefits Disabling Intel Optane memory About this task CAUTION After disabling Intel Optane memory do not uninstall the...

Page 88: ...e operating system To drain residual flea power perform a hard reset Steps 1 Turn off your computer 2 Disconnect the power adapter from your computer 3 Remove the base cover 4 Remove the battery 3 cell or 4 cell 5 Press and hold the power button for 20 seconds to drain the flea power 6 Install the battery 3 cell or 4 cell 7 Install the base cover 8 Connect the power adapter to your computer 9 Turn...

Page 89: ...ick Search to retrieve the related articles Learn and know the following information about your product Product specifications Operating system Setting up and using your product Data backup Troubleshooting and diagnostics Factory and system restore BIOS information See Me and My Dell at www dell com support manuals To locate the Me and My Dell relevant to your product identify your product through...

Reviews: