background image

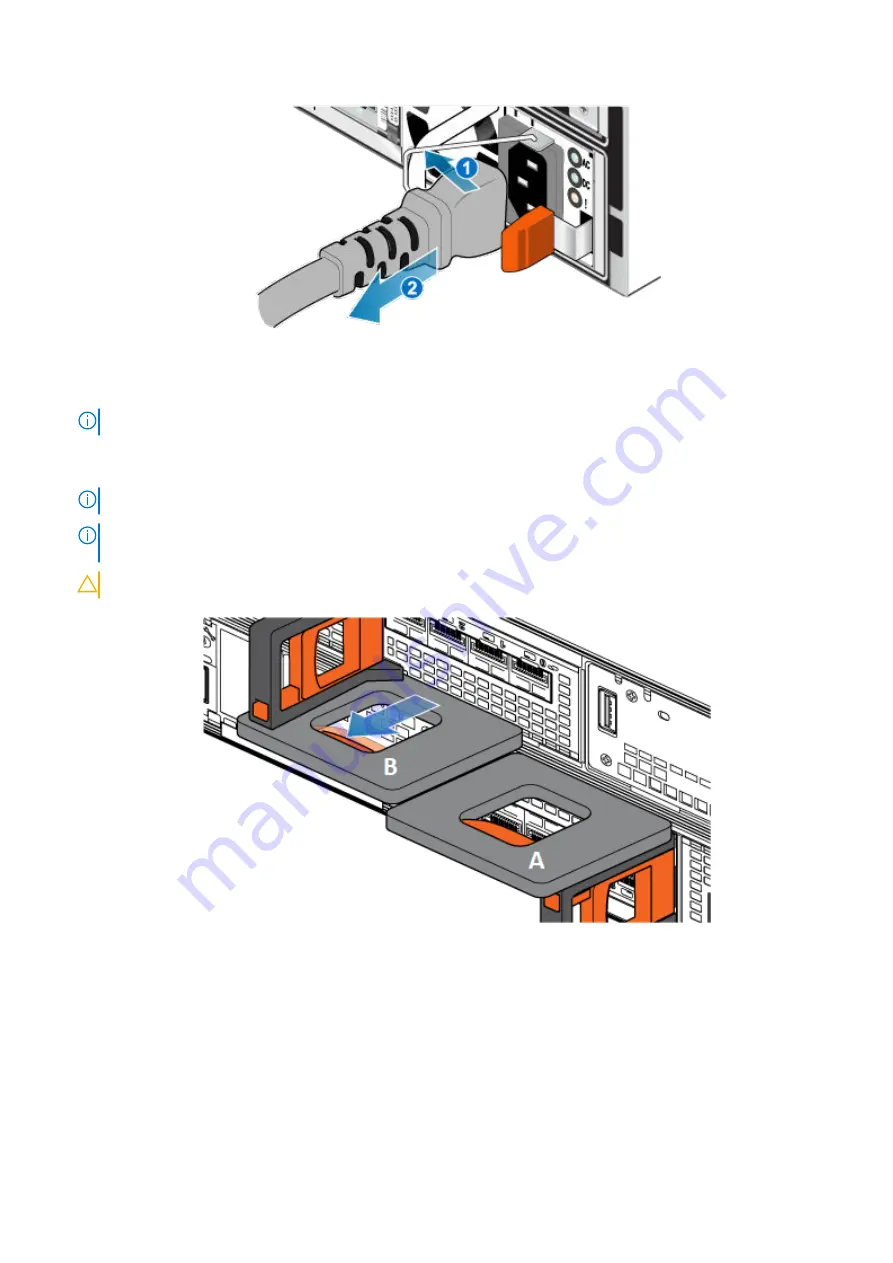
Figure 67. Removing the power cable

2. Disconnect the network and all other cables from the back of the I/O modules and network ports on the node.

NOTE:

 Do not remove any cables from the other node.

3. Pull the orange release trigger while gently pushing in on the node.

The hook disengages from the locking mechanism, and the release tab slides out.

NOTE:

 The node comes completely out of the chassis. Be prepared to support the node to avoid dropping it.

NOTE:

 The release trigger and handle for node B is on the top left. The release trigger and handle for node A is on the

bottom right.

CAUTION:

 Removing the incorrect node will lead to loss of system power and cached data will be lost.

Figure 68. Disengaging the locking mechanism for node B

4. Before removing the node, ensure that the wire bail is properly secured to the power supply cable of the other node to

prevent accidental loss of power and cache.

5. Use the release handle to pull the node outward enough to grasp the sides with both hands. Then, with both hands

supporting the node, pull the node fully out of the enclosure.

62

Base enclosure service procedures

Summary of Contents for Inspiron 1000

Page 1: ...Dell EMC PowerStore Installation and Service Guide for PowerStore 1000 3000 5000 7000 and 9000 Models Version 2 x June 2021 Rev A06 ...

Page 2: ...tial damage to hardware or loss of data and tells you how to avoid the problem WARNING A WARNING indicates a potential for property damage personal injury or death 2020 2021 Dell Inc or its subsidiaries All rights reserved Dell EMC and other trademarks are trademarks of Dell Inc or its subsidiaries Other trademarks may be trademarks of their respective owners ...

Page 3: ...stalling the front bezel 16 Cable the base enclosure to the expansion enclosure 17 Connect expansion enclosure power cables 18 Add a 25 drive expansion enclosure 19 Summary of tasks for adding an expansion enclosure 19 Verify shipping package contents 19 Choose where to install the expansion enclosure 20 Removing a filler panel 20 Install the rails in the cabinet 21 Install the expansion enclosure...

Page 4: ...rd from PowerStore Manager 42 Identify a faulted part from PowerStore Manager 42 Embedded module LEDs 42 Power down the node 44 Remove an embedded module 44 Remove a 4 port card 45 Install a 4 port card 46 Install an embedded module 47 Power up the node 48 Verify the operation of a new 4 port card 48 Return a faulted part 48 Replace an SFP 49 Identify a faulted SFP module from PowerStore Manager 4...

Page 5: ...ule from PowerStore Manager 68 Power down the node 68 Remove the node 69 Remove the top cover from the node 70 Remove the faulted internal M 2 boot module 71 Install the internal M 2 boot module 72 Install the top cover on the node 73 Install the node 74 Power up the node 75 Verify the operation of a replacement internal M 2 boot module 75 Return a faulted part 76 Replace an M 2 boot module adapto...

Page 6: ... 97 Removing a faulted LCC 97 Installing a replacement LCC 99 Verify the operation of a replacement LCC 101 Return a faulted part 101 Replace a power cooling module in a 25 drive expansion enclosure 102 Identify a faulted power cooling module from PowerStore Manager 102 Removing a faulted power cooling module 102 Installing a replacement power cooling module 104 Verify the operation of a replaceme...

Page 7: ... model appliance 118 Powering on procedures for PowerStore appliances 119 Power on a PowerStore T model appliance 119 Power on a PowerStore X model appliance 119 Powering off procedures for PowerStore cluster 120 Power off a PowerStore T model cluster 120 Power off a PowerStore X model cluster 121 Powering on procedures for PowerStore cluster 122 Power on a PowerStore T model cluster 122 Power on ...

Page 8: ...be obtained as follows Product information For product and feature documentation or release notes go to the PowerStore Documentation page at https www dell com powerstoredocs Troubleshooting For information about products software updates licensing and service go to https www dell com support and locate the appropriate product support page Technical support For technical support and service reques...

Page 9: ...nes or small holes in the channels 2 If this is the second base enclosure to be installed in the rack install it directly into the 2U space above the first base enclosure NOTE For additional rack space considerations refer to the PowerStore Planning Guide 3 Considering these recommendations choose a 2U space in the cabinet for the base enclosure NOTE It is recommended that you include 36 inches of...

Page 10: ... of the rack pull the rail straight back until the latch is locked 3 To install the front end piece of the rail press the blue latch release button until the latch rotates open 4 Pull the rail forward until the pins slide into the holes on the front of the rack then release the latch to secure the rail in place Figure 1 Installing the rails 5 Repeat for the other rail Install the base enclosure on...

Page 11: ... X Models NOTE Do not connect the power cables until you have completed network configuration Connect power cables Prerequisites If you are also installing an expansion enclosure wait to power up the base enclosure until after you have powered up the expansion enclosure Steps 1 Plug each power cable into the base enclosure power supply Figure 3 Inserting the power cable Install a new base enclosur...

Page 12: ...e into a running system NOTE During the initial system installation do not power on the system until you have finished cabling all of the 25 drive expansion enclosures Summary of tasks for installing an expansion enclosure To install an expansion enclosure complete the tasks below in the order in which they appear This document provides instructions for completing each task 1 Verify the contents o...

Page 13: ...back the last expansion enclosure to the node 2 Choose where to install the expansion enclosure Before installing the new expansion enclosure you should determine the placement of the new expansion enclosure within the rack Steps 1 It is recommended that you install the expansion enclosure in the next available 2U space directly above the base enclosure or the last expansion enclosure in the syste...

Page 14: ...stalling one rail repeat the procedure for the other rail The procedure is the same for both the left and right rail You can install the rails into either a square or round hole rack Steps 1 Position the rail end piece so the label FRONT is located at the front of the rack and facing towards the inside of the rack while orienting the rear of the rail to align level with the holes on the rear of th...

Page 15: ...n enclosure onto the rails 2 Push the expansion enclosure into the rack until the slam latches engage and lock the system into the rack Figure 7 Securing the system in the rack 3 If securing the system for shipment in the rack or in other unstable environments locate the hard mount captive screw under each latch and tighten using a 2 Phillips screwdriver Install a new base enclosure and optional e...

Page 16: ...ush the latch down until it locks into place Figure 8 Installing a drive The activity light flashes to indicate that the spin up sequence has begun Installing the front bezel Prerequisites CAUTION If the protective plastic strip is present on the front of the bezel it must be removed before placing the system into operation Failure to remove the protective plastic strip will cause the system to ov...

Page 17: ...on the first expansion enclosure in the stack a Connect node A SAS port B to LCC A port A on the expansion enclosure b Connect node B SAS port B to LCC B port A on the expansion enclosure 2 Cable SAS port A from each node on the base enclosure to the LCCs on the last expansion enclosure in the stack a Connect node A SAS port A to LCC B port B on the last expansion enclosure b Connect node B SAS po...

Page 18: ...l Worksheet Connect expansion enclosure power cables Steps 1 Connect the power cable to the power cooling module Figure 11 Attaching power cable 2 Attach the retention bail strain relief to the base of the power cable The retention bail prevents the power cable from pulling out of the connection 18 Install a new base enclosure and optional expansion enclosure ...

Page 19: ... expansion enclosure 4 Install the rails for the new expansion enclosure in the cabinet 5 Install the expansion enclosure on the rails 6 If the new expansion enclosure shipped without its drives installed install the drives in the expansion enclosure 7 Install the front bezel on the new expansion enclosure 8 Attach the power cables to the new expansion enclosure 9 Attach the expansion back end cab...

Page 20: ... increments with horizontal lines or small holes in the channels 2 Considering these recommendations choose a 2U space in the cabinet for the expansion enclosure Removing a filler panel About this task In most cases the front space into which you will install the enclosure is covered by a filler panel which is attached to latch brackets If one or more filler panels cover the space where you want t...

Page 21: ... rack pull the rail straight back until the latch is locked 3 To install the front end piece of the rail press the blue latch release button until the latch rotates open 4 Pull the rail forward until the pins slide into the holes on the front of the rack then release the latch to secure the rail in place Figure 13 Installing the rails 5 Repeat for the other rail Install the expansion enclosure on ...

Page 22: ...e you are ready to install the bezel Installing a drive About this task NOTE If you are installing multiple drives in a system that is powered up wait at least 10 seconds before sliding the next drive into position Steps 1 Align the drive with the guides in the slot 2 With the latch fully opened gently push the drive into the slot The latch begins to rotate downward when it meets the enclosure 3 P...

Page 23: ...ctive plastic strip will cause the system to overheat About this task Refer to Installing the bezel on page 23 while performing the procedure that follows Steps 1 If present remove the protective plastic strip from the front of the bezel 2 Align the bezel with the enclosure 3 Gently push the bezel into place on the cabinet until it latches 4 If the bezel has a key lock lock the bezel with the prov...

Page 24: ...sure refers to the last expansion enclosure that is currently installed The new expansion enclosure refers to the expansion enclosure that you are adding in this procedure Steps 1 Disconnect the SAS cable from LCC B port B of the last expansion enclosure and move it to LCC B port B of the new expansion enclosure 2 Disconnect the SAS cable from LCC A port B of the last expansion enclosure and move ...

Page 25: ...B A Expansion enclosure 0 B A Node B A Expansion enclosure 1 Figure 18 Cabling the base enclosure to two expansion enclosures Install a new base enclosure and optional expansion enclosure 25 ...

Page 26: ...sion enclosure 1 B A Expansion enclosure 2 Figure 19 Cabling the base enclosure to three expansion enclosures NOTE For additional cabling diagrams refer to the Cable Label Worksheet 26 Install a new base enclosure and optional expansion enclosure ...

Page 27: ...ollowing actions to remove a faulted drive and install the replacement drive into the base enclosure Identify a faulted drive from PowerStore Manager Before you replace a drive ensure that you have identified its location within the system Using PowerStore Manager you can identify and locate a faulted drive Steps 1 From PowerStore Manager select Hardware 2 Select the appliance that includes the dr...

Page 28: ...ing multiple drives in a system that is powered up wait at least 10 seconds before sliding the next drive into position Steps 1 Align the drive with the guides in the slot 2 With the latch fully opened gently push the drive into the slot The latch begins to rotate downward when it meets the enclosure 3 Push the orange button until the drive is fully seated in the slot 4 Push the latch down until i...

Page 29: ...lect the drive The status of the replacement drive should read Healthy If the status is still Faulted wait a few minutes and refresh PowerStore Manager If the status does not change ensure that the drive is correctly seated or contact your service provider 4 Click Stop Blink LED Return a faulted part About this task For US customers return defective material within five business days For Internati...

Page 30: ...how the Return Part link contact your service provider for instructions Add a new drive to the base enclosure Take the following actions to add a new drive to the base enclosure Removing the front bezel Steps 1 If the bezel has a lock insert the key that shipped with your enclosure into the lock and turn the key to unlock the bezel 2 Press the two latch buttons on the bezel surface to release the ...

Page 31: ...efore sliding the next drive into position Steps 1 Align the drive with the guides in the slot 2 With the latch fully opened gently push the drive into the slot The latch begins to rotate downward when it meets the enclosure 3 Push the orange button until the drive is fully seated in the slot 4 Push the latch down until it locks into place Base enclosure service procedures 31 ...

Page 32: ... added the drive 3 On the Components card under Drives expand BaseEnclosure and select the drive The status of the drive should read Healthy If the status is still Faulted wait a few minutes and refresh PowerStore Manager If the status does not change ensure that the drive is correctly seated or contact your service provider Replace a power supply Take the following actions to remove the faulted p...

Page 33: ...ase enclosure power supply LEDs LED Location State Description AC power input Green AC power is on Off AC power is off Verify source power DC power output Green DC power is on Off DC power is off Verify source power Fault Solid amber Power supply or backup fault Check cable connection Off No fault Remove a power supply About this task There are two power supplies The power supplies are installed i...

Page 34: ...ply About this task The power supplies are installed in the top and bottom nodes meaning that the top power supply is installed upside down This procedure works for installing either power supply Steps 1 Align the power supply with the slot in the node The power cable retention bail will be on the right for the bottom power supply and on the left for the top power supply 2 Push the power supply in...

Page 35: ... and then select PSU0 The status of the replacement power supply should read Healthy If the status is still Faulted wait a few minutes and refresh PowerStore Manager If the status does not change ensure that the power supply is correctly seated or contact your service provider Return a faulted part About this task For US customers return defective material within five business days For Internation...

Page 36: ... the system Using PowerStore Manager you can identify and locate a faulted embedded module Steps 1 From PowerStore Manager select Hardware 2 Select the appliance that includes the embedded module that you need to replace 3 On the Components card under Rear View expand BaseEnclosure 4 Expand the node that includes the embedded module and then select EmbeddedModule Faulted parts appear in red in the...

Page 37: ...o remove White Do not remove the node Improper removal could cause data loss Off Safe to remove the node when the node has been properly prepared Power down the node Power down the node as described in Power control procedures Remove a faulted embedded module Steps 1 Label and disconnect all cables that are attached to the embedded module CAUTION Do not pull the node from the base enclosure Pullin...

Page 38: ...ule 3 Pull the release lever away from the system The embedded module releases from the system as you pull the lever Figure 32 Removing the embedded module from the system 4 Remove the embedded module from the slot 38 Base enclosure service procedures ...

Page 39: ...s at the front of the embedded module by loosening the captive screws 3 Push down the two blue tabs on the back of the 4 port card to release the 4 port card Figure 33 Opening the retaining tabs 4 Lift the 4 port card off the pegs and pull the 4 port card away from the embedded module Figure 34 Removing the 4 port card Install a 4 port card Steps 1 Align the 4 port card in the embedded module so t...

Page 40: ...ft circle on the 4 port card 4 Push up on the blue tabs until they lock into place Figure 36 Locking the 4 port card into position 5 Replace both air dams and tighten the captive screws 6 Install the SFPs into the embedded module Install an embedded module Steps 1 Align the embedded module with the empty slot and carefully push it into the slot As the embedded module is installed the release lever...

Page 41: ...replacement embedded module Steps 1 From PowerStore Manager select Hardware 2 Select the appliance where you replaced the embedded module 3 On the Components card under Rear View expand BaseEnclosure 4 Expand the node that includes the embedded module and then select EmbeddedModule The status of the replacement embedded module should read Healthy If the status is still Faulted wait a few minutes a...

Page 42: ...m PowerStore Manager Before you replace a 4 port card ensure that you have identified its location within the system Using PowerStore Manager you can identify and locate a faulted 4 port card Steps 1 From PowerStore Manager select Hardware 2 Select the appliance that includes the 4 port card that you need to replace 3 On the Components card under Rear View expand BaseEnclosure 4 Expand the node th...

Page 43: ...d speed Off Link down Node fault Amber Fault has occurred Amber or blue blinking System is booting Blue and amber alternating green for 3 seconds System not initialized A management IP address has not been assigned Blue and amber alternating at one second intervals Node in Service Mode Off No fault has occurred normal operation Node power Green Node is on main power Green blinking Node is initiali...

Page 44: ... CAUTION Do not pull the node from the base enclosure Pulling the node from the base enclosure disrupts the system cache 2 Push the orange tab on the embedded module to release the lever Figure 40 Releasing the lever on the embedded module 3 Pull the release lever away from the system The embedded module releases from the system as you pull the lever 44 Base enclosure service procedures ...

Page 45: ...n the two blue tabs on the back of the 4 port card to release the 4 port card Figure 42 Opening the retaining tabs 3 Lift the 4 port card off the pegs and pull the 4 port card away from the embedded module NOTE If you are having difficulty removing the 4 port card loosen the four captive screws that secure the air dam to the front of the embedded module Base enclosure service procedures 45 ...

Page 46: ... embedded module 2 Align the white pegs beneath the holes on the 4 port card CAUTION Do not force the 4 port card into place If the 4 port card does not smoothly seat realign the pegs and try again Figure 44 Seating the 4 port card 3 Gently push down on the upper left circle on the 4 port card 4 Push up on the blue tabs until they lock into place 46 Base enclosure service procedures ...

Page 47: ...e Install an embedded module Steps 1 Align the embedded module with the empty slot and carefully push it into the slot As the embedded module is installed the release lever rotates inward Figure 46 Installing the embedded module 2 When the embedded module is fully seated push the release lever back into the system until the orange tab locks the lever in place Base enclosure service procedures 47 ...

Page 48: ... correctly seated or contact your service provider Return a faulted part About this task For US customers return defective material within five business days For International customers return defective material within 10 business days The materials required to return your defective part are supplied with the good part shipment Steps 1 Package the faulted part in the shipping box that contained th...

Page 49: ... mismatched Indicates that the supported speeds of this SFP module are unsupported by the port SFP unsupported Indicates that this SFP module is not qualified with this product SFP asymmetric Indicates that this SFP module does not have the same supported speeds and connector type as its partner Remove an SFP module Steps 1 If a cable is connected to the SFP disconnect the cable 2 Gently pull down...

Page 50: ...that the SFP module is correctly seated or contact your service provider Return a faulted part About this task For US customers return defective material within five business days For International customers return defective material within 10 business days The materials required to return your defective part are supplied with the good part shipment Steps 1 Package the faulted part in the shipping...

Page 51: ...red in the image of the system and report a status of Faulted in the State field Base enclosure I O module LEDs Use the fault LEDs to identify the faulted part NOTE The ports look different depending on whether they are for copper or optical connections The image below shows ports for copper cables Figure 50 Base enclosure I O module LEDs Table 4 Base enclosure I O module LEDs LED Location State D...

Page 52: ...e module with the empty slot and carefully push the module into the slot Figure 53 Installing an I O module 2 When the I O module appears seated push and release the small button on the handle If the button remains in the module is fully seated If the button springs back gently push the module further into the chassis then push it again If the button still does not rest flush with its handle remov...

Page 53: ...k For US customers return defective material within five business days For International customers return defective material within 10 business days The materials required to return your defective part are supplied with the good part shipment Steps 1 Package the faulted part in the shipping box that contained the replacement part 2 Ship the failed part to your service provider as described in the ...

Page 54: ...the bottom node The procedure for removing the top node and the bottom node is the same About this task WARNING Do not remove the node within five minutes of system power down to ensure that the system has had time to complete caching CAUTION Do not remove a node while the Unsafe to remove LED is lit The location of this LED is described in Embedded module LEDs If the LED is lit the node has not b...

Page 55: ...tom right CAUTION Removing the incorrect node will lead to loss of system power and cached data will be lost Figure 56 Disengaging the locking mechanism for node B 4 Before removing the node ensure that the wire bail is properly secured to the power supply cable of the other node to prevent accidental loss of power and cache 5 Use the release handle to pull the node outward enough to grasp the sid...

Page 56: ...over towards the rear of the system until it stops Figure 58 Releasing the top cover 2 Lift the top cover upward and remove it from the node Figure 59 Removing the top cover Remove the faulted fan module Steps 1 Disconnect the fan module power cable from the motherboard 56 Base enclosure service procedures ...

Page 57: ...way from the motherboard Figure 61 Removing the fan from the motherboard Install a new fan module Steps 1 Place the fan module into the mounting position in the node 2 Squeeze the blue tabs and press downward to lock the fan module into position 3 Connect the fan module power cable to the connector on the motherboard Base enclosure service procedures 57 ...

Page 58: ...op cover on the node Steps 1 Position the top cover over the node and align it with the slots in the sides at the rear of the node Figure 63 Aligning the top cover 2 Pull the top cover forward to secure it in place 58 Base enclosure service procedures ...

Page 59: ...he chassis 2 Slide the node into the chassis until it stops about halfway in Figure 65 Sliding the node halfway into the chassis 3 Pull the black release tab out completely and slide the rest of the node back into the chassis The black release tab slides back into the system as it is inserted Base enclosure service procedures 59 ...

Page 60: ...sure that the fan module is correctly seated or contact your service provider Return a faulted part About this task For US customers return defective material within five business days For International customers return defective material within 10 business days The materials required to return your defective part are supplied with the good part shipment Steps 1 Package the faulted part in the shi...

Page 61: ...Power down the node Power down the node as described in Power control procedures Remove the node This procedure describes how to remove a node from the chassis There are two nodes The top node is considered to be upside down and mirrors the bottom node The procedure for removing the top node and the bottom node is the same About this task WARNING Do not remove the node within five minutes of syste...

Page 62: ...he release trigger and handle for node B is on the top left The release trigger and handle for node A is on the bottom right CAUTION Removing the incorrect node will lead to loss of system power and cached data will be lost Figure 68 Disengaging the locking mechanism for node B 4 Before removing the node ensure that the wire bail is properly secured to the power supply cable of the other node to p...

Page 63: ...e Remove the top cover from the node Steps 1 While pushing down the two blue release buttons slide the top cover towards the rear of the system until it stops Figure 70 Releasing the top cover 2 Lift the top cover upward and remove it from the node Base enclosure service procedures 63 ...

Page 64: ...aulted DIMM in the node by using the picture below as a reference for orientation The DIMMs are identified by white or black retaining tabs Figure 72 Top view of the node NOTE The leftmost DIMM slot is 23 and the slots decrease sequentially to slot 0 on the far right 2 Depress the white or black retaining tabs downward to free the DIMM from its slot 64 Base enclosure service procedures ...

Page 65: ...y more force is required to push the module down During this stage keep in mind the following precautions Do not insert the DIMM at an angle Do not rock the DIMM Do not insert the DIMM by pushing on one end Do not seat one end of the DIMM and then the other Figure 74 Installing the DIMM 3 Proper DIMM insertion will automatically close the latch ejectors and lock the DIMM into the socket Verify tha...

Page 66: ...to secure it in place Figure 76 Securing the top cover Install the node Steps 1 Align the pins on the top of the node with the grooves on the top of the chassis 2 Slide the node into the chassis until it stops about halfway in 66 Base enclosure service procedures ...

Page 67: ...ntly to re engage the locking mechanism If the black release tab comes out when pulled the locking mechanism is not engaged Power up the node Power up the node as described in Power control procedures Verify the operation of a replacement DIMM Steps 1 From PowerStore Manager select Hardware 2 Select the appliance where you replaced the DIMM 3 On the Components card under Internal View expand the n...

Page 68: ...s not show the Return Part link contact your service provider for instructions Replace an internal M 2 boot module Take the following actions to remove the faulted internal M 2 boot module and install the replacement internal M 2 boot module into the system The internal M 2 boot module are located within the node You can access the internal M 2 boot module by removing the node from the chassis and...

Page 69: ...e Steps 1 Rotate the power cable retention bail to the left right for top power supply Disconnect the power cable from the power supply NOTE If the I O module and network cables are not already labeled label them clearly for reconnecting later Figure 79 Removing the power cable 2 Disconnect the network and all other cables from the back of the I O modules and network ports on the node NOTE Do not ...

Page 70: ... handle to pull the node outward enough to grasp the sides with both hands Then with both hands supporting the node pull the node fully out of the enclosure Figure 81 Removing the node 6 Place the node on a clean flat static free work surface Remove the top cover from the node Steps 1 While pushing down the two blue release buttons slide the top cover towards the rear of the system until it stops ...

Page 71: ...module Steps 1 Locate the M 2 boot module adaptor in the node You can identify the M 2 boot module adaptor by the blue retaining tabs 2 Press the blue retaining tabs downward to free the M 2 boot module adaptor from its slot 3 Touching only the outside edges of the M 2 boot module adaptor remove the M 2 boot module adaptor Base enclosure service procedures 71 ...

Page 72: ...ll straight up on the pull tab to free it from the M 2 boot module adaptor 7 Remove the internal M 2 boot module from the M 2 boot module adaptor Figure 85 Removing the internal M 2 boot module from the M 2 boot module adaptor Install the internal M 2 boot module Steps 1 Place the internal M 2 boot module into the M 2 boot module adaptor NOTE The side of the internal M 2 boot module with the barco...

Page 73: ...ush the M 2 boot module adaptor straight down into the connector When the M 2 boot module adaptor is fully seated you will hear a snap and feel the connector latches click into place Figure 87 Installing the M 2 boot module adaptor Install the top cover on the node Steps 1 Position the top cover over the node and align it with the slots in the sides at the rear of the node Base enclosure service p...

Page 74: ...to secure it in place Figure 89 Securing the top cover Install the node Steps 1 Align the pins on the top of the node with the grooves on the top of the chassis 2 Slide the node into the chassis until it stops about halfway in 74 Base enclosure service procedures ...

Page 75: ... If the black release tab comes out when pulled the locking mechanism is not engaged Power up the node Power up the node as described in Power control procedures Verify the operation of a replacement internal M 2 boot module Steps 1 From PowerStore Manager select Hardware 2 Select the appliance where you replaced the internal M 2 boot module 3 On the Components card under Internal View expand the ...

Page 76: ...w the Return Part link contact your service provider for instructions Replace an M 2 boot module adaptor Take the following actions to remove the faulted M 2 boot module adaptor and install the replacement M 2 boot module adaptor into the system The M 2 boot module adaptor is located within the node You can access the M 2 boot module adaptor by removing the node from the chassis and opening the to...

Page 77: ...e Steps 1 Rotate the power cable retention bail to the left right for top power supply Disconnect the power cable from the power supply NOTE If the I O module and network cables are not already labeled label them clearly for reconnecting later Figure 92 Removing the power cable 2 Disconnect the network and all other cables from the back of the I O modules and network ports on the node NOTE Do not ...

Page 78: ... handle to pull the node outward enough to grasp the sides with both hands Then with both hands supporting the node pull the node fully out of the enclosure Figure 94 Removing the node 6 Place the node on a clean flat static free work surface Remove the top cover from the node Steps 1 While pushing down the two blue release buttons slide the top cover towards the rear of the system until it stops ...

Page 79: ...daptor Steps 1 Locate the M 2 boot module adaptor in the node You can identify the M 2 boot module adaptor by the blue retaining tabs 2 Press the blue retaining tabs downward to free the M 2 boot module adaptor from its slot 3 Touching only the outside edges of the M 2 boot module adaptor remove the M 2 boot module adaptor Base enclosure service procedures 79 ...

Page 80: ...moving the internal M 2 boot modules from the M 2 boot module adaptor Install the M 2 boot module adaptor Steps 1 Place the internal M 2 boot modules that you removed from the faulted M 2 boot module adaptor into the new M 2 boot module adaptor NOTE The side of the internal M 2 boot module with the barcodes should be facing up 2 Align the blue tab on the replacement internal M 2 boot module with t...

Page 81: ...ush the M 2 boot module adaptor straight down into the connector When the M 2 boot module adaptor is fully seated you will hear a snap and feel the connector latches click into place Figure 100 Installing the M 2 boot module adaptor Install the top cover on the node Steps 1 Position the top cover over the node and align it with the slots in the sides at the rear of the node Base enclosure service ...

Page 82: ...to secure it in place Figure 102 Securing the top cover Install the node Steps 1 Align the pins on the top of the node with the grooves on the top of the chassis 2 Slide the node into the chassis until it stops about halfway in 82 Base enclosure service procedures ...

Page 83: ...g mechanism If the black release tab comes out when pulled the locking mechanism is not engaged Power up the node Power up the node as described in Power control procedures Verify the operation of a replacement M 2 boot module adaptor About this task The M 2 boot module adaptor is not visible in PowerStore Manager but you can view the associated internal M 2 boot module Steps 1 From PowerStore Man...

Page 84: ... Drives Power Supplies and Other Parts click Return Part e If your screen does not show the Return Part link contact your service provider for instructions Replace a node Take the following actions to remove the faulted node from the enclosure and install the replacement node Identify a faulted node from PowerStore Manager Before you replace a node ensure that you have identified its location with...

Page 85: ...beled label them clearly for reconnecting later Figure 105 Removing the power cable 2 Disconnect the network and all other cables from the back of the I O modules and network ports on the node NOTE Do not remove any cables from the other node 3 Pull the orange release trigger while gently pushing in on the node The hook disengages from the locking mechanism and the release tab slides out NOTE The ...

Page 86: ... handle to pull the node outward enough to grasp the sides with both hands Then with both hands supporting the node pull the node fully out of the enclosure Figure 107 Removing the node 6 Place the node on a clean flat static free work surface Remove the top cover from the node Steps 1 While pushing down the two blue release buttons slide the top cover towards the rear of the system until it stops...

Page 87: ...er only one component at a time NOTE Confirm that all parts are fully seated before inserting the node into the base enclosure NOTE Do not add any components while the node is powering on Transfer the power supply Transfer the I O modules and fillers Transfer the embedded module without removing the 4 port card Transfer the internal M 2 boot modules without removing them from the adapters Transfer...

Page 88: ...e sides at the rear of the node Figure 110 Aligning the top cover 2 Pull the top cover forward to secure it in place Figure 111 Securing the top cover Install the node Steps 1 Align the pins on the top of the node with the grooves on the top of the chassis 2 Slide the node into the chassis until it stops about halfway in 88 Base enclosure service procedures ...

Page 89: ... and push in gently to re engage the locking mechanism If the black release tab comes out when pulled the locking mechanism is not engaged Power up the node Power up the node as described in Power control procedures Verify the operation of a replacement node Steps 1 From PowerStore Manager select Hardware 2 Select the appliance where you replaced the node 3 On the Components card under Rear View e...

Page 90: ...o return your defective part are supplied with the good part shipment Steps 1 Package the faulted part in the shipping box that contained the replacement part 2 Ship the failed part to your service provider as described in the instructions that were included with the replacement part 3 For more information about returning customer replaceable parts a Open PowerStore Manager b Click Settings on the...

Page 91: ...ive in a 25 drive expansion enclosure Take the following actions to add a new drive to a 25 drive expansion enclosure Removing the front bezel About this task NOTE Remove the front bezel of the expansion enclosure to gain access to the drives The bezel is required for EMI compliance when the enclosure is powered up Remove it only to replace or add a drive Steps 1 If the bezel has a lock insert the...

Page 92: ...e About this task NOTE If you are installing multiple drives in a system that is powered up wait at least 10 seconds before sliding the next drive into position Steps 1 Align the drive with the guides in the slot 2 With the latch fully opened gently push the drive into the slot The latch begins to rotate downward when it meets the enclosure 3 Push the orange button until the drive is fully seated ...

Page 93: ...ure 117 Installing the bezel Verify the operation of an added drive Steps 1 From PowerStore Manager select Hardware 2 Select the appliance where you added the drive 3 On the Components card under Drives expand ExpansionEnclosure and select the drive The status of the drive should read Healthy If the status is still Faulted wait a few minutes and refresh PowerStore Manager If the status does not ch...

Page 94: ...ive Faulted parts appear in red in the image of the system and report a status of Faulted in the State field 4 Click Blink LED The amber fault light on the drive starts blinking Removing the front bezel About this task NOTE Remove the front bezel of the expansion enclosure to gain access to the drives The bezel is required for EMI compliance when the enclosure is powered up Remove it only to repla...

Page 95: ...TE If you are installing multiple drives in a system that is powered up wait at least 10 seconds before sliding the next drive into position Steps 1 Align the drive with the guides in the slot 2 With the latch fully opened gently push the drive into the slot The latch begins to rotate downward when it meets the enclosure 3 Push the orange button until the drive is fully seated in the slot 4 Push t...

Page 96: ...e on the cabinet until it latches 3 If the bezel has a key lock lock the bezel with the provided key CL5262 Figure 121 Installing the bezel Verify the operation of a replacement drive Steps 1 From PowerStore Manager select Hardware 2 Select the appliance where you replaced the drive 3 On the Components card under Drives expand ExpansionEnclosure and select the drive 96 Expansion enclosure service ...

Page 97: ...ngs on the upper right of the screen c Click General Support d Under Drives Power Supplies and Other Parts click Return Part e If your screen does not show the Return Part link contact your service provider for instructions Replace a link control card in a 25 drive expansion enclosure Take the following actions to remove a faulted link control card LCC from a 25 drive expansion enclosure and insta...

Page 98: ...ed to the LCC by gently pulling the connector latches to release the cable from the connector Note where the cables connect to the LCC because you will reconnect them later CL5983 Figure 123 Disconnecting an LCC cable 3 Remove the LCC CAUTION The LCC comes completely out of the DAE chassis In addition to holding the latches be prepared to support the LCC to avoid dropping it a Locate the orange ha...

Page 99: ...ic free surface Installing a replacement LCC Steps 1 Attach an ESD wristband to your wrist and the enclosure 2 Pull out the latches on the LCC and make sure they stay in the open position 3 Align the LCC with the enclosure opening and gently push the LCC straight into the enclosure being sure the LCC is completely seated in the enclosure Expansion enclosure service procedures 99 ...

Page 100: ...2 1 Figure 125 Installing an LCC 4 Press the latches to secure the LCC 5 Reconnect each cable to the port from which it was removed Results The LCC power LED turns on 100 Expansion enclosure service procedures ...

Page 101: ... within five business days For International customers return defective material within 10 business days The materials required to return your defective part are supplied with the good part shipment Steps 1 Package the faulted part in the shipping box that contained the replacement part 2 Ship the failed part to your service provider as described in the instructions that were included with the rep...

Page 102: ...the system and report a status of Faulted in the State field Removing a faulted power cooling module Prerequisites Identify the faulted power cooling module by the amber fault LED CL5987 Figure 127 Fault LED on an AC power cooling module About this task CAUTION Access to the drives in your enclosure will time out and the drives will spin down two minutes after a power cooling module is removed fro...

Page 103: ...igure 129 Unplugging the power cord from a DC power supply cooling module 4 Remove the power cooling module as follows a Press the orange handle button to release the module b Pull the latch outward and remove the power cooling module from its slot CAUTION To protect a running system from overheating the enclosure powers down unless you replace the power cooling module within two minutes Expansion...

Page 104: ...ing module Steps 1 Install the power cooling module in the enclosure within two minutes a Gently insert the power cooling module into the enclosure being sure that the module is completely seated b Press the latch in to secure the power cooling module 104 Expansion enclosure service procedures ...

Page 105: ...e 2 For an AC power cooling module a Plug the power cord into the power cooling module b Secure the cord with the retention bail at the connector The bail prevents the power cord from pulling out of the connector Expansion enclosure service procedures 105 ...

Page 106: ...provider Return a faulted part About this task For US customers return defective material within five business days For International customers return defective material within 10 business days The materials required to return your defective part are supplied with the good part shipment Steps 1 Package the faulted part in the shipping box that contained the replacement part 2 Ship the failed part ...

Page 107: ...f using an ESD wristband with a strap Attach the clip of the ESD wristband to the ESD bracket or bare metal on a cabinet rack or enclosure Wrap the ESD wristband around your wrist with the metal button against your skin If a tester is available test the wristband If an emergency arises and the ESD kit is not available follow the procedures in Emergency Procedures without an ESD kit Emergency proce...

Page 108: ...in the rear of the component Ensure that the back end of the replaceable unit is supported while installing or removing it Dropping a replaceable unit could result in personal injury or damage to the equipment NOTE For a module that must be installed into a slot in an enclosure examine the rear connectors on the module for any damage before attempting its installation CAUTION A sudden jar drop or ...

Page 109: ... be attached to ensure EMI compliance Make sure you reattach the bezel after replacing a component Also each slot should contain a component or filler panel to ensure proper air flow throughout the system Unpacking a part Use these best practices to unpack a part Steps 1 Wear ESD gloves or attach an ESD wristband to your wrist and the enclosure in which you are installing the part 2 Unpack the par...

Page 110: ...you also record the Dell service tag numbers of all enclosures in your cluster A PowerStore X model appliance consists of two ESXi host nodes node A and node B running VMware ESXi version 6 7 and a controller VM on each that runs the PowerStore operating environment Powering off a PowerStore X model node or cluster requires operations in the associated VMware vCenter server See the VMware document...

Page 111: ...use VMware vCenter server If the node was not removed from the chassis run a service script and use VMware vCenter server Reboot Use PowerStore Manager Or Run a service script Use VMware vCenter server Appliance Power off Use PowerStore Manager Use PowerStore Manager Power on If the nodes or expansion enclosures were removed from the chassis reseat the expansion enclosures and nodes Reconnect powe...

Page 112: ...iew expand Base Enclosure and then select the node that you want to power off 4 Under More Actions select Power Down 5 On the confirmation prompt enter the service password and then click Power Down Next steps To verify that the node has powered off check the status of the LEDs in the rear of chassis Other than the LEDs for the power supply unit management port and service port all LEDs on the nod...

Page 113: ...e are sufficient and healthy paths from all connected hosts to the peer node About this task Use the following procedure to power off power down a PowerStore X model node Steps 1 Log in to the associated vCenter server 2 If there are user VMs that are not configured for automatic migration to the ESXi host of the peer node migrate them manually NOTE vSPHERE Remote Office Branch Office Advanced doe...

Page 114: ...moved from the chassis Embedded module I O module and 4 port card were replaced Steps 1 Launch an SSH client and connect to the appliance using the management IP address Since only the peer node is powered on you are connected directly to the peer node of the appliance 2 Enter the username and password that is associated with the service account and log in 3 Run the following command svc_node powe...

Page 115: ...owerStore X model node by reseating the node About this task Use the following procedure to power on power up a PowerStore X model node when it was removed from the chassis Steps 1 Reseat the node into the chassis The node will power on automatically 2 Reconnect the power cable 3 Wait for the ESXi host for the node to complete powering on 4 Log in to the associated vCenter server and exit the ESXi...

Page 116: ...anagement IP address associated with the appliance Service account credentials NOTE Do not power off or reboot a node if the peer node is not operating normally If the peer node is experiencing any major issues associated alerts and events appear in PowerStore Manager Also to avoid service interruptions ensure that there are sufficient and healthy paths from all connected hosts to the peer node Ab...

Page 117: ...e Mode The controller VM powers on automatically 8 Monitor the vCenter server console to ensure that the ESXi host and controller VM have returned to normal operation Powering off procedures for PowerStore appliances This section includes the following procedures Power off a PowerStore T model appliance on page 117 Power off a PowerStore X model appliance on page 118 Power off a PowerStore T model...

Page 118: ...connect host access from all storage resources Obtain the following information Address of the VMware vCenter server associated with the appliance Associated vCenter server account credentials Service tags of the appliance and if applicable the associated expansion enclosures About this task Use the following procedure to power off a single PowerStore X model appliance To power off all of the appl...

Page 119: ...res for PowerStore appliances This section includes the following procedures Power on a PowerStore T model appliance on page 119 Power on a PowerStore X model appliance on page 119 Power on a PowerStore T model appliance About this task Use the following procedure to power on a PowerStore T model appliance Steps 1 If nodes were removed reseat the nodes into the base enclosure chassis 2 If applicab...

Page 120: ...he ESXi host for the node B from Maintenance Mode Wait for the task to complete Controller VM for node B automatically gets restarted 9 Power on user VMs on the ESXi hosts for both nodes 10 Verify that the PowerStore X model cluster is operating normally in both vCenter server and PowerStore Manager Powering off procedures for PowerStore cluster This section includes the following procedures Power...

Page 121: ...e you begin ensure that you temporarily disconnect host access from all storage resources When the cluster is powered off you have no access to the PowerStore Manager API or CLI interfaces Print the power on instructions to ensure that you have the information you require to power on the cluster in a specific order You can also find these instructions on https www dell com powerstoredocs Obtain th...

Page 122: ...se enclosure chassis 2 If applicable for each appliance in the cluster ensure that expansion enclosures are also reseated into the cabinet 3 If applicable for each appliance in the cluster reconnect the power cables to each expansion enclosure in the following order Expansion enclosure 0 Expansion enclosure 1 Expansion enclosure 2 The power status LEDs on each expansion enclosure turns on when the...

Page 123: ...he power cables to each expansion enclosure in the following order Expansion enclosure 0 Expansion enclosure 1 Expansion enclosure 2 The power status LEDs on each expansion enclosure turns on when the power cable is connected 4 Reconnect the power cables to node A first and then node B The Node Power LEDs on both nodes turn on when a power cable is connected to either node ESXi hosts for both the ...

Page 124: ...battery backup module Install the internal battery backup module Remove the internal battery backup module Steps 1 Lift the gray padding away from the internal battery backup module 2 Remove the clip around the internal battery backup module by pulling the tab on the left side 3 Disconnect the internal battery backup module cable from the motherboard Figure 133 Releasing the BBU 4 Lift the interna...

Page 125: ...dule into position on the motherboard Figure 135 Placing the internal battery backup module into position 2 Close the clip around the center of the internal battery backup module until it clicks into place 3 Replace the gray padding around the top of the internal battery backup module 4 Connect the internal battery backup module cable to the motherboard Transferring the internal battery backup mod...

Page 126: ...Figure 136 Connecting the internal battery backup module cable to the motherboard 126 Transferring the internal battery backup module ...

Page 127: ...ntials profile Use the svc_dc service script to collect support materials for other profiles See the PowerStore Service Scripts Guide for more information about the svc_dc service script and the available profiles NOTE The system can run only one collection job at a time You can perform the following actions on a collection of support materials View information about existing collections Upload a ...

Page 128: ...nished you can download the support materials collection to a client send the collection to support or delete the collection Select the support materials collection then select Download Send to Support or Delete 128 Data collection ...

Page 129: ...in hours field type a number of hours that will be longer than the time of the procedure 6 Click Apply Results On the Disable Support Notifications screen for the appliance the Maintenance Mode column will show Enabled and End Time on Cluster will show the time when the system will resume sending support notifications Enable support notifications Enable support notifications when you have finished...

Page 130: ...he system Reinitializing the system resets the entire system to the original default factory settings You can reinitialize the system using service scripts To use service scripts to reinitialize the system refer to the PowerStore Series Service Scripts Guide CAUTION Reinitializing the system could result in data loss F 130 Reinitialize the system ...

Reviews: