
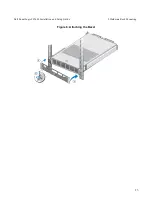


6. Attach the bezel to the appliance. See
Attaching the Bezel on page 12
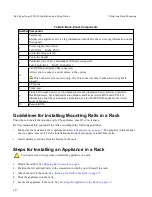
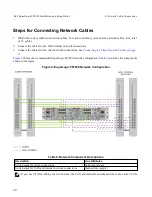
These steps are described in detail in the following sections.
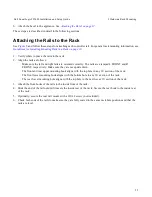
Attaching the Rails to the Rack
See
and follow these steps for attaching each controller rail. For general rack mounting information, see
Guidelines for Installing Mounting Rails in a Rack on page 10
1. Verify where to place the rails in the rack.
2. Align the rails as follows:
–
Make sure the left and right rails are oriented correctly. The rails are stamped L FRONT and R
FRONT, respectively. Make sure they are not upside down.
–
The front and rear upper mounting hook aligns with the top hole in any 1U section of the rack.
–
The front lower mounting hook aligns with the bottom hole in any 1U section of the rack.
–
The rear lower mounting hole aligns with the top hole in the next lower 1U section of the rack.
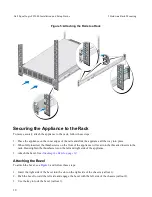
3. Attach the front hooks of the rails to the inside front of the rack.
4. Slide the end of the rail out until it meets the inside rear of the rack. Secure the rear hook to the inside rear
of the rack.
5. Optionally, secure the rear rail mount with a #10-32 screw (not included).
6. Check both ends of the rails to make sure they are fully seated in the same rack hole positions and that the
rails are level.
11
Dell EqualLogic FS7600 Installation and Setup Guide
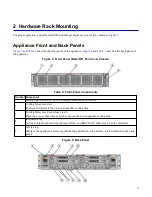
2 Hardware Rack Mounting
Summary of Contents for EqualLogic FS7600
Page 4: ...iv Dell EqualLogic FS7600 Installation and Setup Guide ...
Page 20: ...14 Dell EqualLogic FS7600 Installation and Setup Guide 2 Hardware Rack Mounting ...
Page 22: ...16 Dell EqualLogic FS7600 Installation and Setup Guide 3 Power Connections ...
Page 28: ...22 Dell EqualLogic FS7600 Installation and Setup Guide 4 Network Cable Connections ...
Page 34: ...28 Dell EqualLogic FS7600 Installation and Setup Guide 5 NAS Cluster Configuration ...
Page 42: ...Glossary 36 ...


