Removing and Replacing Parts
4-15
C
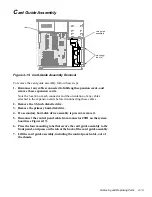
ard Guide Assembly
Figure 4-15. Card-Guide Assembly Removal
To remove the card guide assembly, follow these steps:
1. Disconnect any cables connected to full-length expansion cards, and
remove these expansion cards.
Note the location of each connector and the orientation of any cables
attached to the expansion cards before disconnecting these cables.
2. Remove the 3.5-inch diskette drive.
3. Remove the primary hard-disk drive.
4. If a secondary hard-disk drive assembly is present, remove it.
5. Disconnect the control panel cable from connector J9D1 on the system
board (see Figure 4-17).
6. Press the four mounting tabs that secure the card guide assembly to the
front panel, and press on the tab at the back of the card guide assembly.
7. Lift the card guide assembly, including the control panel cable, out of
the chassis.
card guide
assembly
mounting
tabs (4)
tab
Summary of Contents for Dimension XPS H233
Page 1: ... HOO LPHQVLRQ 36 DQG 36 6 VWHPV 6 59 0 18 ...
Page 2: ......
Page 3: ... HOO LPHQVLRQ 36 DQG 36 6 VWHPV 6 59 0 18 ...
Page 84: ...A 16 Dell Dimension XPS H233 and XPS H266 Systems Service Manual ...
Page 88: ......


