31
www.degometal.com
①
②
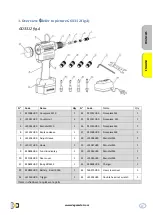
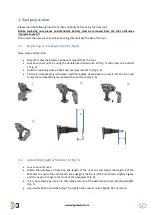
4. Stroke fine tuning (GO3312 fig.A)
Fine tuning function of GO3312 enables fine tuning of stroke by using the fine tuning hand wheel
(5) (Fig. 1), ensuring best riveting result (Fig. 2).
As shown in the figure (GO3312 fig.A), turn the fine tuning hand wheel to the directions shown
(+/-) till the rivet nut is at its best condition.
Fine tuning hand
(5)
(+/-) Direction
Pushing direction of rivet nut
5. Install rivet nut
Please note the important note before starting :
Different rivet nuts from different suppliers are different in models, specifications provided by different
suppliers, the installation performance will be very different, so it is necessary to test riveting when setting
the working tension and the working stroke.
Choosing corresponding value according to the model and specification of rivets nuts and thickness of
working object. (Take M5-2.5 as an example, select L for tension and 4 for stroke).
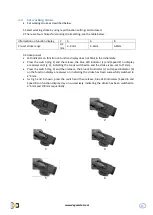
5.1 Place a rivet nut at the end of mandrel 3, do not tile (refer to key points 3.1
and 3.2, fig 5/6)
It is recommended to manually screw the rivet nut for about ½ round to make it easier to insert
the mandrel 3.
Manually push the rivet nut to the nose piece (refer to Fig. 1 above), and the rivet nut is
automatically screwed into the mandrel 3 until it fits tightly with the nose piece.
The screwing process ends automatically.
Note: the rivet nut must be fixed during the whole pre-screw process to prevent screwing. If
release it too early, the rivet nut will exit automatically. After the pre-screw process, the rivet nut
should be placed precisely on nose piece 2, otherwise the length setting of mandrel 3 should be
adjusted (refer to key points 3.1 and 3.2).
5.2
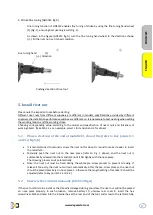
Unscrew the rivet nut manually (GO3312 fig.A).
If the rivet nut fails to be install or the thread is damaged during pre-screw, the rivet nut will not be placed
on nose piece properly. In such situation, remove battery 10, unscrew rear cover 8, insert the hex
screwdriver SW5 enclosed into the internal hex at the rear end of the tool, and screw to the left carefully,
FRAN
CA
IS
EN
GLISH
Summary of Contents for GO 3312
Page 4: ...4 www degometal com ...
Page 9: ...9 www degometal com GO3312 fig B FRANCAIS ENGLISH ...
Page 21: ...21 www degometal com GO3312 Battery Rivet Nut tool User Manual FRANCAIS ENGLISH ...
Page 22: ...22 www degometal com ...
Page 27: ...27 www degometal com GO3312 fig B FRANCAIS ENGLISH ...
Page 39: ...39 www degometal com ...

