background image


DV-302 OPERATION MANUAL 

50 

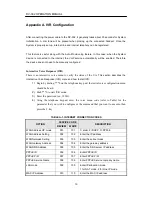
Appendix A. IVR Configuration


After connecting the power cable to the DV-302, it generally takes about 30 seconds for System 

Initialization.  A  dial  tone  will  be  present  when  picking  up  the  connected  handset.  Once  the 

System is properly set up, internet line and internet telephony can be registered. 


This  feature  is  useful  along  with  the  Auto-Provisioning  feature.  In  this  case,  when  the  System 

device  is  connected  to  the  internet,  the  VoIP  service  automatically  will  be  enabled.  Therefore 

the device does not need to be manually configured. 


Interactive Voice Response (IVR) 

There  is  an  interactive  voice  menu  to  verify  the  status  of  the  UA. 

This section  describes the 

Interactive Voice Response (IVR) menu and how to start IVR: 

1) 

Begin by dialing, ***0 on the telephone key pad; the initial voice configuration menu 

should be heard.


2) 

Push ***0 to start IVR mode.


3) 

Enter the password (ex., 1234#).


4) 

Using  the  telephone  keypad,  enter  the  voice  menu  code  (refer  to  Table)  for  the 

parameter that you wish to configure or the command that you want to execute, then 

press the # .key.


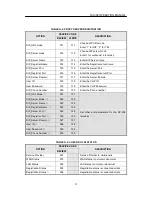
TABLE A-1. INTERNET CONNECTION CODES 

OPTION 

SERVICE CODE 

DESCRIPTION 

REVIEW 

WRITE 

WAN Address OP mode 

001 

101 

1=static, 2=DHCP, 3=PPPoE 

WAN Address Setting 

002 

102 

Enter the IP address 

WAN Netmask Setting 

003 

103 

Enter the subnet mask 

WAN Gateway Address 

004 

104 

Enter the gateway address 

WAN DNS Address 

005 

105 

Enter the DNS server IP address 

PPPoE ID 

006 

106 

Enter PPPoE ID 

PPPoE P/W 

007 

107 

Enter PPPoE P/W 

PPPoE Service Name 

008 

108 

Enter PPPoE Service company name 

LAN mode 

009 

109 

Enter IP allocation mode 

1 for NAT mode, 2 for One IP mode 

MAC IP Address 

010 

110 

Enter the MAC IP address 

Summary of Contents for DV-302

Page 1: ...Internet Telephony Gateway System Operation Manual ...

Page 2: ......

Page 3: ...ceded by a bold title in capital letters WARNING Indicates a potentially hazardous situation which if not avoided could result in death or serious injury to humans and animals CAUTION Indicates a potentially hazardous situation which if not avoided may result in minor or moderate injury to humans and animals It may also be used to alert against unsafe practices and give a general caution NOTE Indi...

Page 4: ...n or blanket This may cause the device to fail and is also a fire hazard Do not install in a poorly ventilated area This may cause the device to fail and is also a fire hazard Do not install in areas of high humidity such as a bathroom or kitchen Do not install in areas subject to wind and rain Damp areas can cause electric shock and is also a fire hazard Do not place liquids near the device Accid...

Page 5: ...y cause the phone line to be noisy Do not install in a dusty area This is an electric shock and fire hazard Do not install in an area subject to frequent vibration This may shorten lifetime of the device Do not install in a dusty area This is an electric shock and fire hazard Do not overload power outlets This is an electric shock and fire hazard To avoid electric shock always disconnect the power...

Page 6: ...knots in the power cord as this is a fire and electric shock hazard Do not modify or attempt to repair the power cord It must be replaced To avoid a potential fire hazard make sure the power plug contacts are clean and the power plug is firmly plugged into the power outlet When moving the device to a new location be sure to unplug the power and later recheck all the connections Before connecting t...

Page 7: ... touch it disconnect the device from power and call the service center for assistance If there has been a gas leak in the room do not operate the phone equipment as sparks may cause explosion Ensure the room is well ventilated before operating the phone equipment Do not touch the phone equipment or power pack during an electrical storm This is an electric shock hazard If there is the smell of some...

Page 8: ...tions 4 2 1 Basic Specifications 4 2 2 Operation Environment Conditions 4 3 System Functions 5 3 1 Call Processing Functions 5 3 2 Analog FXS Control Functions 5 3 3 Emergency Call Switchover Function 5 3 4 DTMF Call Progress Tone Detection Generation Function 5 3 5 Voice Compression Decompression Function 5 3 6 VoIP Function 6 3 7 TCP UDP IP Protocol Processing Function 6 3 8 Ethernet Control Fun...

Page 9: ... Steps 9 4 2 2 Cable connection 11 4 2 3 Connecting Ethernet Cable 11 4 2 4 FXS port 12 4 2 5 Backup port 13 4 2 6 Cable Length 13 4 2 7 Connection to Network 13 4 2 8 LED Status 14 5 Configuration 15 5 1 IP Configuration on PC 15 5 2 Web Manager 19 6 Status 20 6 1 Software 20 6 2 Connection 21 6 3 Security 22 7 Basic Configuration 23 7 1 Setup 23 7 2 DHCP 25 7 3 DDNS 26 7 4 Time 26 8 Netword Addr...

Page 10: ...3 Parental Control 34 8 3 1 User Setup 34 8 3 2 Basic Parental Control 35 8 3 3 ToD Filter 36 8 3 4 Local Log 37 9 Voice 38 9 1 Basic 38 9 2 Configuration 39 9 3 Service 40 9 4 Speed Dial 42 9 5 Dial plan 43 10 Reset 44 11 Upgrade 45 11 1 Auto Upgrade 45 11 2 Manual Upgrade 45 Appendix A IVR Configuration 50 ...

Page 11: ... optimal voice quality under high data traffic conditions 1 1 System Features 1 1 1 IP function PPPoE LLC SNAP DHCP Client Server IPCP Half Full Bridge Mode Port Triggering Forwarding Port Filtering IP Filtering MAC address Filtering ICMP Proxy DNS UPnP DMZ 1 1 2 Voice Functions SIP RFC3261 Call Transfer Call Hold Call Waiting Call Forwarding CID Type Ⅰ Ⅱ Local mixed 3 way conference Emergency cal...

Page 12: ...ewall IP packet filtering MAC filtering DMZ Parental Control HTTPS 1 1 4 Management Function Web based GUI management SNMP SNTP Telnet FTP TFTP UPnP Traffic statistics tracing debugging Configuration backup and restore Telephone based management IVR 1 2 QoS enhancement functions G 168 echo cancellation Voice Activity Detection VAD Comfort Noise Generation CNG Dynamic jitter buffer control 1 3 Oper...

Page 13: ...ATION MANUAL 3 1 4 Service Configuration Below figure shows general service configuration of the DV 302 which act as a Home Router to connect analog phones and PC FIGURE 1 INTERNET TELEPHONY NETWORK CONFIGURATION ...

Page 14: ...T 38 etc Optional H 323 Voice Capability G 729 G 711U G723 1 Echo Cancellation G 165 VAD CNG Fax Capabilities Fax Modem pass through T 38 Power 60Hz DC 12V 1 2A External Adaptor Input voltage 220VAC 2 2 Operation Environment Conditions TABLE 2 OPERATING CONDITIONS ITEMS REQUIREMENTS Temperature Normal Operation Optimal Operation Limited Operation 5 40º 18 26º 2 50 º Humidity Normal Operation Optim...

Page 15: ...ne when Internet Connectivity is unavailable Carrier Network Failure Power failure Device Malfunction By default the DV 302 is set to play an error message instructing the user on how to switch to the PSTN backup line 3 4 DTMF Call Progress Tone Detection Generation Function DTMF Call Progress Tone Detection and Tone Generation Function detect and generate an in band tone transmitted over an analo...

Page 16: ...les you to place and receive fax calls over a VoIP network in addition to voice calls 3 10 STUN Function STUN is an abbreviated word of Simple Traversal of User Datagram Protocol UDP through Network Address Translators NATs It is a lightweight protocol that allows applications to discover the presence and types of NATs and firewalls between them and the public Internet It also provides the ability...

Page 17: ...on parameters remotely through web browser 3 15 Operation Authentication Function Operation authentication function is used to authenticate an operator by prompting the user ID and password when the operator accesses the DV 302 3 16 On Phone IP Address Configuration Function On phone IP Address Configuration function enables users to set the DV 302 IP Address or change the current IP Address and n...

Page 18: ...P based telephony networks DV 302 supports two FXS Foreign Exchange Station port and two Ethernet interfaces as integration of voice and data effectively fills up the data communication channels efficiently 4 1 2 Package Contents DV 302 is packaged with the following accessories Please check packaging to verify complete contents have been received 1 DV 302 2 AC DC Power Adaptor 3 Tel line RJ 11 to...

Page 19: ... DV 302 where the temperature is kept in the range of 0 40 When removing or connecting cables always unplug the DV 302 power Check the electricity quality especially when the device is located adjacent to a large motor Make sure all ventilation chambers on the system are not obstructed at any time Do not put heavy equipment or machinery on the system Instruction Completely read this manual before ...

Page 20: ...e power plug of adaptor into the power jack of the DV 302 WARNING Use only the power adaptor supplied with the product 5 Connect the plug end of the 12V DC power adaptor cord into a functional electrical outlet 6 When the DV 302 is properly connected and powered up the green power PWD illuminates and the green status STS LED flashes to indicate that the DV 302 is working as it should CAUTION Do no...

Page 21: ...e The Straight cable is also used to connect the LAN port to a terminal like workstation PC or notebook When connecting the LAN port to a HUB Straight through or Crossover unshielded twisted pair UTP category 5 cables can be used as shown in Figure 8 NOTE Maximum length of RJ 45 should be less than 85m FIGURE 4 RJ 45 CABLE UTP CABLE 1 2 3 4 5 6 7 8 1 Rx 2 Rx 3 Tx 6 Tx PC Port FIGURE 5 ETHERNET POR...

Page 22: ... 1 TX 2 TX 2 TX 3 RX 3 RX 4 NC 4 NC 5 NC 5 NC 6 RX 6 RX 7 NC 7 NC 8 NC 8 NC 4 2 4 FXS port The FXS port is for interfacing the telephone or FAX connection through a RJ 11 cable TABLE 4 FXS PORT CABLE PIN CONNECTION ANALOG PHONE FAX PORT CONNECT FXS PORT PIN SIGNAL PIN SIGNAL 1 NC 1 NC 2 NC 2 NC 3 Ring 3 Ring 4 Tip 4 Tip 5 NC 5 NC 6 NC 6 NC ...

Page 23: ... The maximum Length of cable for each interface must comply with the following Ethernet Maximum length of 10 100BaseT Ethernet is 330 ft 100m IEEE802 3 standard Analog Line Maximum length of analog line is defined by loop resistance Approximately 1 5Km 1REN Maximum loop resistance is up to 600Ω included telephone voice switch 4 2 7 Connection to Network Figure 9 below illustrates the connections t...

Page 24: ...ed physically Light OFF Lost Physical WAN connection Blink Data is being transferred over the connection PC LED Light ON Connected physically Light OFF Lost Physical LAN connection Blink Data is being transferred over the connection TEL LED Light ON In USE Off hook Light OFF Not in USE On hook Blink Ringing according to Ring cadence Voice Message Waiting Indication If there is no LED light check t...

Page 25: ... like pulg n play Manual configuration permits assignment of all parameters required to gain full operation of the DV 302 However manual configuration is time consuming and thus intended only to augment the automated process and to allow customizing user preferences In the next paragragh we describe how to setup a dynamic IP address on Local PC when DHCP server function is activated 5 1 IP Configu...

Page 26: ...DV 302 OPERATION MANUAL 16 2 Double click on Network Connections a similar screen should appear like below 3 Double click or right click on Local Area Connection and then select Properties ...

Page 27: ...n If you want to get a dynamic IP address from DV 302 Click the obtain an IP address automatically Otherwise you should select the Use the following IP address when you want to set a static IP on your computer then click the OK button when finished to accept changes made NOTE Windows XP and 2000 do not need to restart the PC to reload the new IP address Other Windows OSs have to restart to activat...

Page 28: ... the Command Prompt screen type ping 192 168 0 1 and press Enter NOTE If the following message is displayed your computer is properly connected to the PC port of the DV 302 Ex c ping 192 168 0 1 Pinging 192 168 0 1 with 32 bytes of data Reply from 192 168 0 1 bytes 32 time 1ms TTL 255 Reply from 192 168 0 1 bytes 32 time 1ms TTL 255 Reply from 192 168 0 1 bytes 32 time 1ms TTL 255 Reply from 192 1...

Page 29: ...ss WEB Manager 1 Open a new Web browser window and enter the DV 302 s IP address of the LAN interface PC port 2 Enter http 192 168 0 1 for the URL without any specific port number At this point the PC should present an authentication window similar to the one shown below NOTE You have to enter http the IP address of DV 302 WAN interface NET port 8000 through the internet remotely 3 Enter root in t...

Page 30: ... you with to view the information contained in each sub menu will be displayed within the right window The following sections detail the sub menus for each 6 1 Software As shown in the Status Software screen the hardware and software version is displayed NOTE Remember that build date and time could be different from each other sometimes although the same software version So it is important to chec...

Page 31: ...ne number etc it will attempt to register on the SIP server When the registration succeeds as shown below the Registration Status will show as Success If the registration fails the status will show as Idle 1 VoIP Registration shows registration status of each port Idle It has never sent REGISTER request Check out the phone number of the port and IP related parameters Trying It has been sending REG...

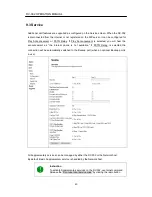
Page 32: ...the User will be prompted to enter the appropriate User ID and Password that coordinates with their access privilege for Authentication Generally the root password account can be changed on the following screen From this screen the system password also can be changed to the factory default value The default password of the default account is admin NOTE A new USER ID can not be added Only password ...

Page 33: ...ubsequent sections describe the following submenus 1 Setup 2 DHCP 3 DDNS 4 Time 7 1 Setup In this page you can configure the IP address LAN port and WAN connection type etc By default the LAN IP address is 192 168 0 1 and WAN connection type is DHCP The following screen is for DHCP setting on WAN Interface First of all select appropriate WAN type using the WAN Connection Type dropdown menu If the ...

Page 34: ...P 1 Enter the IP address subnet mask default gateway and DNS IP address etc as appropriate 2 Click on the Apply button If the WAN connection type is PPPoE the following screen will be displayed To activate a PPPoE connection 1 Enter the User ID and password 2 For the Maximum Idle time and Keep Alive Period use the default value ...

Page 35: ...P enter the MAC address of your PC in Spoofed MAC address field Because some ISP may require the pre registered PC s MAC address for authorization 7 2 DHCP DV 302 can operate as a DHCP server for Local Area Network The number of CPEs and lease time can be specified as appropriate NOTE The Number of CEPs means the DHCP pool range To set up the DHCP server 1 Designate Yes to have current DHCP client...

Page 36: ...e in any of the many domains allowing the DV 302 to be more easily accessed from various locations on the Internet The following screen shows the DDNS submenu selection 7 4 Time The Time submenu allows the system s time configuration to be set up and changed as needed The following screen depicts the configuration selection items ...

Page 37: ...on the Internet 2 Enable PPTP PassThrough to make proper communication of VPN device which is behind the DV 302 3 When the PC behind DV 302 needs Multicast service for any specific PC based services enables the Multicast Enable 4 If the Remote Config Management feature is disabled DV 302 access is disabled 8 1 2 IP Filtering The DV 302 can be configured to prevent local PCs to gaining access the W...

Page 38: ...pecified local PCs can be denied access to the WAN 2 To activate the IP address filter click on the Apply button the new filter rule will be applied without rebooting the system 8 1 3 MAC Filtering The DV 302 can be configured to allow configuration of MAC address filters in order to block internet traffic to specific network devices on the LAN ...

Page 39: ... various addresses over time 8 1 4 Port Filtering The DV 302 can be configured to prevent local PCs from gaining access to the internet by specifying port number used and protocol types that should be filtered To adjust port filtering 1 Port number can be entered as a range by entering the starting number and ending number 2 Designate TCP UDP or Both protocols 3 Click on Apply to accept changes NO...

Page 40: ... entering the starting number and ending number NOTE Refer to the black box on right side of the screen shown which lists the port numbers in use It can be useful when appropriate the port number is not otherwise easily at hand 2 Designate TCP UDP or Both protocols 3 Click on Apply to accept changes 8 1 6 Port Triggers Port Triggers are similar to Port Forwarding except that they are not static po...

Page 41: ...ations on specific port numbers in order to operate correctly One of the most common applications that requires this are video conferencing applications that require separate IP ports for video and audio transmissions to management servers in the public WAN network For example a special application is used to communicate with any PC on the Private LAN that tries to first connect with outgoing port...

Page 42: ...s that use random port numbers and do not function correctly with specific port triggers or port forwarding Once set up the PC should be able to run the application properly from behind the NAT firewall To set a PC as the DMZ Host perform the following 1 Within the NAT Advanced screen enter the computer IP address 2 Click Apply to activate the DMZ host To deactivate a DMZ Host PC 1 Within the NAT ...

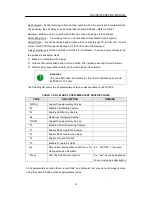
Page 43: ...up windows etc are blocked by embedded firewall For example if the Enable radio button is clicked to activate Filter Popup Windows pop up windows will be not opened when any web site is accessed 1 Proxy Cookies Java Applets Block specified application 2 Block Fragemented IP Packets Block all fragemented packets 3 Port Scan Detection Block port scan activation on both WAN and LAN 4 IP Flood Detecti...

Page 44: ...stomers can create several parental policies and allocate them to a specific user configuration as needed To configure Parental Controls perform the following 1 Enter a user name then click the Add User button 2 After selecting a user names click on the Enable checkbox to apply the selected Content Rules NOTE Login information will be requested as soon as the Parental Control feature is activated ...

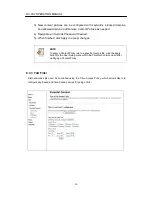
Page 45: ... time expire time for login when there is no activity during the allowable time minute To configure Trusted Computers 1 From the Parental Control screen enter the MAC address of Trusted Computers to your PC 8 3 2 Basic Parental Control Basic Parental Control set up allows the User to block specific internet content and websites To configure Basic Parental Control set up 1 Click on the Enable Paren...

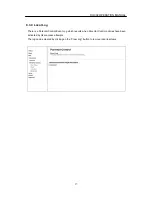
Page 46: ...ired 5 When finished click Apply to accept changes NOTE To apply a Content Policy rule to a specific User profile click the apply button for the User Setup menu within the Parental Control screen after modifying a Content Policy 8 3 3 ToD Filter Internet access also can be controlled using the Time Access Policy which allows Users to configure day based and time based policies for going online ...

Page 47: ... 8 3 4 Local Log There is a Parental Control Event Log which reports when Parental Control policies have been activated by User access attempts The log can be cleared by clicking on the Clear Log button to remove reported items ...

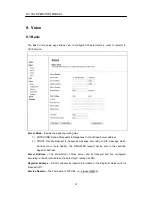
Page 48: ... Handle Request Response message according to SIP message which includes via or route header The REGISTER request will be sent to the specified Registrar Address Server Address The information of Proxy server and its transport port are configured according to the Server Address the default port number is 5060 Registrar Address DV 302 updates its location information to the Registrar Server with it...

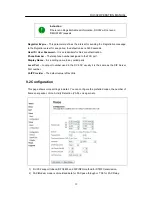
Page 49: ...he telephone number assigned to the FXS port Display Name It is a calling name to any called party Local Port Local port number used in the DV 302 usually it is the same as the SIP Server Port number VoIP Provider The default value is Davolink 9 2 Configuration This page shows voice settings in detail You can configure the preferred codec the number of frames per packet Voice Activity Detection VA...

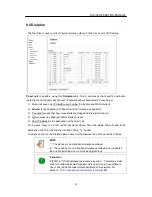
Page 50: ...ill hear the announcement as the internet phone is not available If PSTN Relay is selected the connection will be automatically switched to the Backup port when an optional Backup port is in use All Supplementary services can be managed by either the DV 302 or the Network host By default Basic Supplementary service is handled by the Network host Instruction To activate Supplementary services on th...

Page 51: ... 3 After making conversation with B push Hook Flash or flash button Instruction Only one LBR codec is permitted So the other conference party should be PCM G 711 codec The following list shows the Supplementary service codes available on the DV 302 TABLE 7 DV 302 HOST SUPPLEMENTARY SERVICE CODES CODE DESCRIPTION REMARK 6 0189 Support Supplementary Service 60 Disable Call Waiting Feature 61 Enable ...

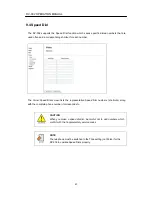
Page 52: ...h number The Voice Speed Dial screen lists the representative Speed Dial numbers shortcuts along with the complete phone number it corresponds to CAUTION When you make a speed dial list be careful not to add numbers which conflict with the Supplementary service codes NOTE The telephone must be switched to the Tone setting not Pulse for the DV 302 to operate Speed Dials properly ...

Page 53: ...ore digits send out 5 Peer IP Address is the destination of the direct call For instance there is a direct call list like above figure Then the dialed 123 will head to the destination 192 168 2 52 directly with 4563 at the To header To delete any list on the Dialplan table check out the Remove then click on the Set Values NOTE The star key is on a traditional telephone dialpad The pound key is on ...

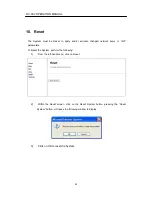
Page 54: ...anged network items or VoIP parameters To Reset the System perform the following 1 From the left hand menu click on Reset 2 Within the Reset screen click on the Reset System button pressing the Reset System button will cause the following window to display 3 Click on OK to reset the System ...

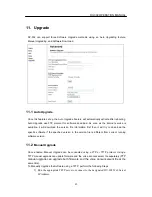
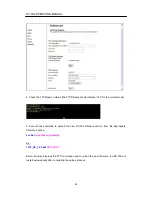
Page 55: ...ormation first then it will try to download the specific software if the specified version in the version file is different from current running software version 11 2 Manual Upgrade Once enabled Manual Upgrade can be conducted using a FTP or TFTP protocol Using a TFTP manual upgrade can update firmware and the voice announcement file separately FTP manual upgrade can upgrade both firmware and the ...

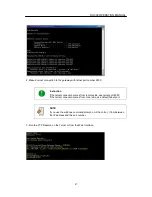
Page 56: ...ke FTP Daemon to upgrade new software NOTE The default FTPD is disabled To upgrade using the Manual FTP method 1 The computer should be set up to make a Telnet connection to the Gateway from the LAN side or WAN side in order to enable the FTP Daemon FTP Server as shown 2 Make sure that the DV 302 and PC are connected by performing a ping test 3 The default IP address for the gateway PC port is 192...

Page 57: ...on If the telnet connection comes from remote side use telnet port 6000 If the telnet connection comes from Local side use default telnet port NOTE If you use the windows command prompt omit the colon from between the IP address and the port number 3 Run the FTP Daemon on the Telnet or from the Web Interface ...

Page 58: ...e 5 Execute the command to upload the new DV 302 software version from the appropriate directory location xxx bat ip address of gateway Ex 101F_SE_1 29 bat 192 168 0 1 Below following displays the FTP command used to upload the new firmware the DV 302 will restart automatically after completing the upload process ...

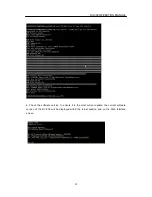
Page 59: ... OPERATION MANUAL 49 6 Check the software version to ensure it is the most current update the current software version of the DV 302 will be displayed within the telnet session and on the Web Interface screen ...

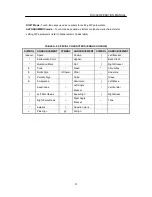
Page 60: ... start IVR 1 Begin by dialing 0 on the telephone key pad the initial voice configuration menu should be heard 2 Push 0 to start IVR mode 3 Enter the password ex 1234 4 Using the telephone keypad enter the voice menu code refer to Table for the parameter that you wish to configure or the command that you want to execute then press the key TABLE A 1 INTERNET CONNECTION CODES OPTION SERVICE CODE DESC...

Page 61: ...oIP ID User Password 019 119 Enter the VoIP Password SIP_Phone Number 020 120 Enter the Phone number SIP_URL Mode Ⅱ 021 121 Set other port parameters for the DV 302 terminal SIP_Server Mode Ⅱ 022 122 SIP_Server Name Ⅱ 023 123 SIP_Registrar Name Ⅱ 024 124 SIP_Server Port Ⅱ 025 125 SIP_Registrar Port Ⅱ 026 126 SIP_Server Domain Ⅱ 027 127 User ID Ⅱ 028 128 User Password Ⅱ 029 129 SIP_Phone Number Ⅱ 0...

Page 62: ... 146 047 G 107 g 147 050 H 110 h 150 051 I 111 i 151 052 J 112 j 152 053 K 113 k 153 054 L 114 l 154 055 M 115 m 155 056 N 116 n 156 057 O 117 o 157 0 060 P 120 p 160 1 061 Q 121 q 161 2 062 R 122 r 162 3 063 S 123 s 163 4 064 T 124 t 164 5 065 U 125 u 165 6 066 V 126 v 166 7 067 W 127 w 167 8 070 X 130 x 170 9 071 Y 131 y 171 072 Z 132 z 172 073 133 173 074 134 174 075 135 175 076 136 176 077 _ 1...

Page 63: ...TERS ENGLISH USAGE SYMBOL ANNOUNCEMENT SYMBOL ANNOUNCEMENT SYMBOL ANNOUNCEMENT space Space Comma Left Bracket Exclamation Point Hyphen Back Slash Quotation Mark Dot Right Bracket Pond Slash Circumflex Dollar Sign Others Other _ Underline Percent Sign Colon Grave Ampersand Semicolon Left Brace Apostrophe Left Angle Bracket Vertical Bar Left Parenthesis Equal Sign Right Brace Right Parenthesis Right...

Page 64: ...ormation contained herein may be copied translated transcribed or duplicated for any commercial purposes or disclosed to third parties in any form without the prior written consent of Davolink TRADEMARKS Product names mentioned in this document may be trademarks and or registered trademarks of their respective companies ...

Page 65: ...DV 302 OPERATION MANUAL 55 End of Page ...

Reviews: