background image

11 


3.2 Multiple Cameras Cascade 

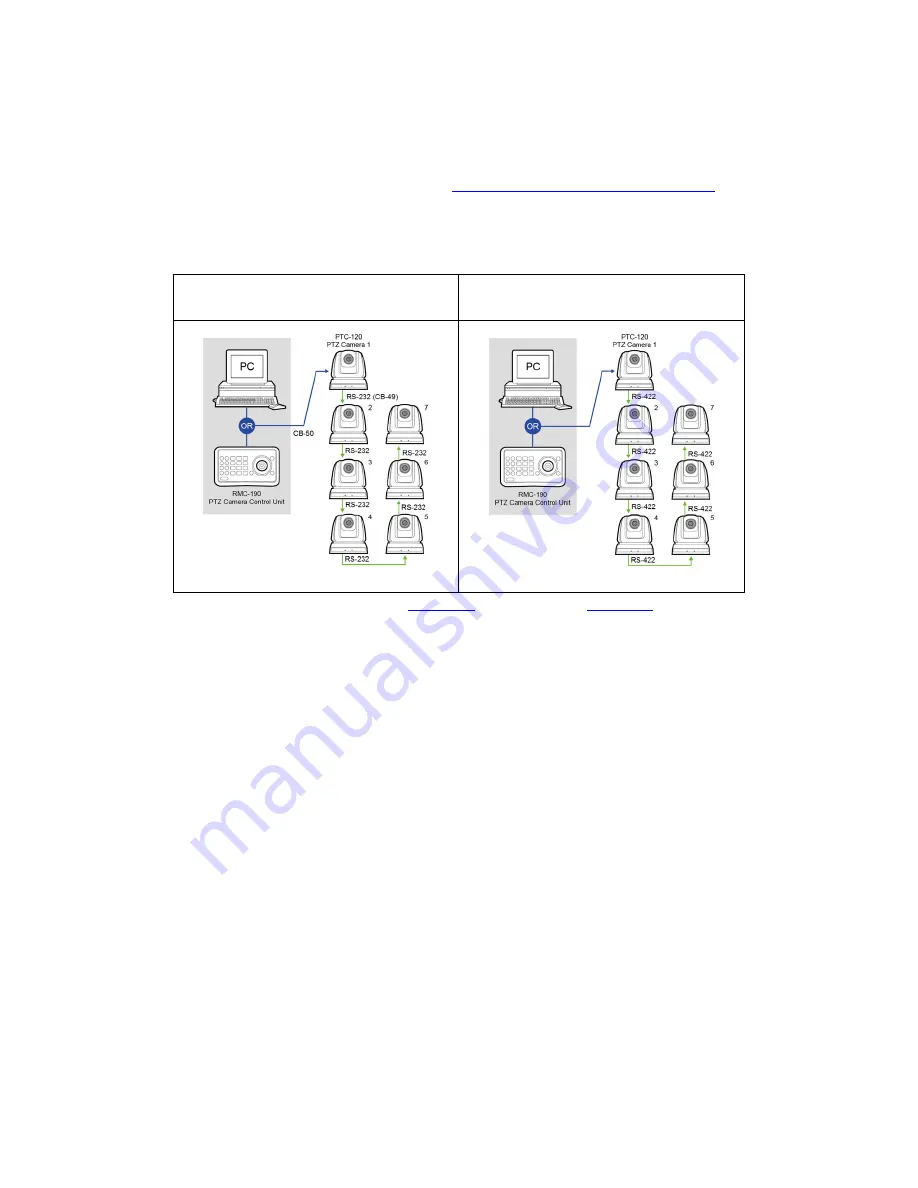
The PTC-120 camera can also be used in an environment where multiple cameras 

are required. With RS-232 INPUT/OUTPUT ports, the user is allowed to cascade up 

to seven cameras, which are subsequently controlled by either a computer (Please 

download a utility program first  from 

http://www.serialporttool.com/PTZ.htm

  in 

case  you need to control the camera via a PC) or a SONY VISCA compatible 

controller. RS-232C and RS-422 system setups for connection of multiple cameras 

are illustrated in the respective diagrams below.  


RS-232C Cascade Connection


RS-422 Cascade Connection


For wiring information, please see 

section 11

 for RS-232C and 

section 12

 for RS-422. 


However, the connection will be broken if one unit is powered off. In other words, 
the cameras connected subsequent to the broken one will become uncontrollable 
by RMC-190. For example, in the above diagram, if cameras #2 and #3 are defective 
or  powered off, all camera connections (4/5/6/7) after camera #3 will be cut off 
from the daisy chain and RMC-190 will not be able to control them even if the 
cameras are still operable.  

The cameras have to be at least in the standby mode for the entire daisy chain 
connection to stay controllable by RMC-190. In the above example, if cameras #2 
and #3 are in standby mode, the user will still be able to control all cameras after 
camera #3 from RMC-190.  

If the camera is powered off or defective, there will be no LED lighting in standby 
mode.  The user should check the LED lighting first if the daisy chain is found to be 
broken. 

Summary of Contents for PTC-120

Page 1: ...1 ...

Page 2: ...System Configuration 8 3 1 Single Camera Connection 9 IR Remote Control 9 SONY VISCA Compatible Controller 10 3 2 Multiple Cameras Cascade 11 4 Location and Function of Parts 12 5 Remote Control and On Screen Menu 15 5 1 Remote Control Functions 15 5 2 Descriptions of Major Functions 16 Switching between PTC 120 devices 16 Saving current lens position data 16 ...

Page 3: ...ating image 17 Displaying current status 17 Changing camera direction 17 5 3 On Screen Menu 18 Example 1 Adjusting Auto Focus Sensitivity 27 Example 2 Adjust Auto Focus Speed 28 6 Instruction for installation 29 6 1 Preparation before Installation 29 6 2 Installation of PTC 120 on the desk 29 6 3 Installation of PTC 120 on the ceiling 30 7 Frequently Asked Questions 36 8 Specification 40 9 DIP Swi...

Page 4: ... 46 10 Component Video Output DSub PIN Assignments 47 11 RS 232 PIN Assignments 48 11 1 PIN Descriptions 48 11 2 Wiring Diagrams 49 12 RS 422 PIN Assignments 50 12 1 PIN Descriptions 50 12 2 Physical Connection 51 12 3 Wiring Diagrams 52 13 VISCA Commands 54 14 Optional Accessory Cables 61 15 Service Support 64 ...

Page 5: ...ing to rest on the power cord Do not locate this unit where the power cord will be walked on rolled over or otherwise stressed 9 If an extension cord must be used with this unit make sure that the total of the ampere ratings on the products plugged into the extension cord do not exceed the extension cord s rating 10 Make sure that the total amperes of all the units that are plugged into a single w...

Page 6: ...ranty All mail or transportation costs including insurance are at the expense of the owner All other claims of any nature are not covered Cables batteries are not covered under warranty Warranty only valid within the country or region of purchase Your statutory rights are not affected Two Year Warranty All Datavideo products purchased after 01 Oct 2008 qualify for a free one year extension to the ...

Page 7: ...ehold waste It must be handed over to the applicable take back scheme for the recycling of electrical and electronic equipment For more detailed information about the recycling of this product please contact your local Datavideo office Packing List 1 x PTC 120 PTZ Camera 1 x Accessory List 1 x PTC 120 Quick Start Guide ...

Page 8: ...mpatible with all video equipment with up to 128 preset settings A dedicated remote control is available PTC 120 delivers a continuous clear and vivid live image without any distortions It is ideally suited for lecture recording video conferencing and stage performance 2 Features HD Resolution 1 2 8 High Definition 2 0 M Pixels CMOS sensor 20x optical zoom 12x digital zoom High definition formats ...

Page 9: ...following video output connections are available from the rear of the camera 3G SDI Component DVI and CVBS Below scenario diagrams show each of these connections in use with an appropriate cable and monitor TV PTC 120 to an HDTV or a computer monitor DVI Cable Optional PTC 120 to a TV Composite Video Cable Optional PTC 120 to a monitor 3G SDI Cable Optional PTC 120 to an HDTV or a TV Component Cab...

Page 10: ...d remotely using a SONY VISCA compatible controller such as the Datavideo RMC 190 unit This camera can be controlled over an RS 232C or RS 422 connection as shown in the diagrams below The camera video output is connected to the monitor via one of the four available video interfaces RS 232 System Setup RS 422 System Setup ...

Page 11: ... 12 for RS 422 However the connection will be broken if one unit is powered off In other words the cameras connected subsequent to the broken one will become uncontrollable by RMC 190 For example in the above diagram if cameras 2 and 3 are defective or powered off all camera connections 4 5 6 7 after camera 3 will be cut off from the daisy chain and RMC 190 will not be able to control them even if...

Page 12: ... second 3 Standby LED Indicator Orange Standby mode No Light Power on Rear of Camera 4 DVI Video Output Transfer of digital video content A DVI to HDMI cable can be used 5 Component Video Output Outputs camera images as analog component video standards 6 DC IN 12V Connector Connect the supplied AC power adaptor 7 IR Select Page 41 Assigns the camera an identification number when you operate multip...

Page 13: ... VISCA Control Page 52 12 RS 422 I O Connection VISCA Control Page 52 and Connection of multiple cameras 13 Composite VIDEO Output Analog Video Transmission 14 3G SDI Output Video Streaming Bottom of Camera 15 System Switch Page 42 DIP 1 selects RS 232C or RS 422 DIP 2 turns ON OFF IR Signal Output Switch DIP 3 selects communication baud rate DIP 4 is reserved Side of Camera ...

Page 14: ...14 16 Service Switch Page 43 Service switch is used to set the respective firmware upgrades ...

Page 15: ...ust the focus with the FAR and NEAR buttons 5 Focus Auto Press the AUTO button to adjust the focus automatically 6 Freeze Press Freeze button to freeze the current image on the display 7 Home Enter Go back to the main page Execute 8 Info Press Info button to display the current status information 9 L R Direction Set L R Direction OFF Normal 10 Menu Display OSD menu 11 Mirror Rotate the image Off M...

Page 16: ... shall be a digit 0 9 VISCA Command Page 52 can store up to 128 camera positions Clearing saved position data Press Reset ID on the remote control to clear the given position data ID shall be a digit 0 9 Use VISCA Command Page 52 to clear the position data of 0 127 Turning on backlight compensation function Press Back Light on the remote control to turn on or turn off the back light compensation A...

Page 17: ... Manual on the remote control to turn on the manual focal length adjustment function Press Far or Near to adjust the focal length manually Setting image mode Press Picture on the remote control to switch between Off Neg B W Freezing images Press Freeze on the remote control to freeze the current image on the display Rotating image Press Mirror on the remote control to switch between Off Mirror Fli...

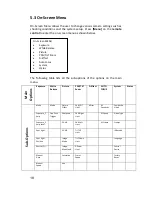
Page 18: ...O FOCUS System Status Sub Options Mode Mode Picture Effect PAN TILT Limit Mirror AF Sensitivity Composite Video Exposure_C omp One Push Trigger Sharpness PAN Right Limit AF Speed Video Type Exposure_C omp Level 2D NR PAN Left Limit AF Frame Prompt Spot Light 3D NR TILT UP Limit IR Receive Spot Light Position Image Mode TILT Down Limit Language Shutter Pri Image Mode Load D Zoom Limit Control Devic...

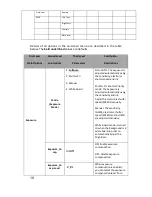
Page 19: ...tter Priority mode The exposure is adjusted automatically using the sensitivity and iris Adjust the electronic shutter speed SPEED manually Manual The sensitivity GAIN electronic shutter speed SPEED and iris IRIS are adjusted manually White Board mode is turned on when the background is a white board in order to automatically adjust the brightness Exposure_Co mp On Off ON Enable exposure compensat...

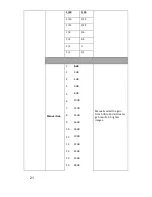
Page 20: ...ion X 0 8 Y 0 6 The value can be adjusted only after Spot Light is enabled Shutter Pri 60 30 mode 50 25 mode Shutter priority setting fast shutter results in a darker image and slow shutter results in a bright image 1 10000 1 10000 1 5000 1 5000 1 3000 1 3000 1 2500 1 2500 1 2000 1 1750 1 1500 1 1250 1 1000 1 1000 1 725 1 600 1 500 1 425 1 350 1 300 1 250 1 215 1 180 1 150 1 120 1 120 1 100 1 100 ...

Page 21: ... 6 1 4 1 3 1 2 1 1 1 1 Manual Gain 1 0 dB Manually select the gain from 0 dB to 30 dB Greater gain results in brighter images 2 2 dB 3 4 dB 4 6 dB 5 8 dB 6 10 dB 7 12 dB 8 14 dB 9 16 dB 10 18 dB 11 20 dB 12 22 dB 13 24 dB 14 26 dB 15 28 dB ...

Page 22: ...s in a darker image and slow shutter results in a bright image 1 10000 1 10000 1 5000 1 5000 1 3000 1 3000 1 2500 1 2500 1 2000 1 1750 1 1500 1 1250 1 1000 1 1000 1 725 1 600 1 500 1 425 1 350 1 300 1 250 1 215 1 180 1 150 1 120 1 120 1 100 1 100 1 90 1 75 1 60 1 50 1 30 1 25 1 15 1 12 1 8 1 6 1 4 1 3 1 2 1 2 ...

Page 23: ...dB 4 14 dB 5 16 dB 6 18 dB 7 20 dB 8 22 dB 9 24 dB 10 26 dB 11 28 dB 12 30 dB Wide Dynamic Range WDR 1 Off WDR Setting 2 1 3 2 4 3 5 4 6 5 White Balance Mode 1 Auto Auto Adjust the white balance automatically Select the color temperature mode 2 Indoor 3 Outdoor 4 One Push WB ...

Page 24: ...uto One Push Trigger ENTER One push trigger Picture Picture effect 1 Off Set the picture effect 2 Neg 3 B W Sharpness 1 A 16 Adjust the sharpness of the image 2D NR 1 Auto Set 2D noise reduction 2 Off 3 1 4 2 5 3 6 4 7 5 3D NR 1 Off Set 3D dynamic noise reduction 2 Low 3 Typ ...

Page 25: ... 6 Mode6 7 Custom Image Mode Load 1 Mode1 Adjustable when Image Mode is set to Custom The user may load an Image Mode and apply it to Custom after adjustment 2 Mode2 3 Mode3 4 Mode4 5 Mode5 6 Mode6 Saturation 0 A 25 Adjustable when Image Mode is set to Custom Hue 0 A 14 Adjustable when Image Mode is set to Custom Gamma 0 A 3 Adjustable when Image Mode is set to Custom Skin Tone 1 A 5 Set skin tone...

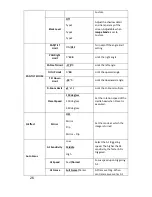
Page 26: ...lt Down Limit 30 0 Limit the downward angle D Zoom Limit x1 x12 Limit the D Zoom multiple Preset Speed 150 deg sec 250 deg sec 350 deg sec Set the rotation speed of the cradle head when Preset is executed D Effect Mirror OFF Mirror Flip Mirror Flip Set the mode at which the image is turned Auto Focus AF Sensitivity Low Middle High Select the AF triggering speed The higher the AF sensitivity the fa...

Page 27: ...ff the infrared reception Language English Chinese Language Control Device Encoder Controller Set control device Factory Reset ON OFF Reset all configurations to factory default settings Status Display current setting status Example 1 Adjusting Auto Focus Sensitivity AF triggering speed The higher the AF sensitivity the faster AF is triggered To shoot fast moving objects AF can be set to High or M...

Page 28: ...ess MENU to exit Example 2 Adjust Auto Focus Speed The focus speed after AF is triggered Normal default Image flickering may not occur Fast The focus speed is fast but image flickering is more likely to occur 1 Press MENU to activate the on screen menu 2 Press or to select Auto Focus 3 Press ENTER to activate 4 Press or to select AF Speed 5 Press ENTER to activate 6 Press or to select Normal Fast ...

Page 29: ... proper place for installation of PTC 120 beforehand Please determine an installation location based on the following Position of the object to be captured PTC 120 placed at a proper distance from other light sources 6 2 Installation of PTC 120 on the desk Precautions for Installation Please install the device on a flat desk Avoid touching the camera head when handling the device Do not rotate the...

Page 30: ...f the parts and equipment required for installation Accessories of PTC 120 in the box metal plates A B and M3 screws Screw for locking on ceiling mounted hangers Drilling machine screw driver ladder Dimension Length x Width x Height 174x186x182 7mm Weight 2 0Kg ...

Page 31: ...31 Size Diagram Metal plate B Ceiling Side Metal plate B locking screw Metal plate B locking bolt M3 threaded hole M3 threaded hole M3 threaded hole Metal plate B Ceiling Side ...

Page 32: ...32 Metal plate A Machine Side Metal plate A Locking Screw Metal plate A Machine Side ...

Page 33: ...lative to the object to be captured It is recommended that the device should be set at a distance of more than 1 meter away from the object to be captured Please adjust for the optimized distance according to the magnification ratio of the lens The device including metal plates weighs approximately 2 5 kg If it is to ...

Page 34: ...al Plate A to the base of the camera using 4 M3 screws Fix the metal Plate B to a secure ceiling position using 4 M3 screws Caution Please use the hanger that has obtained the UL security certification Please reserve the hole for connecting wires of the camera Mechanically slide metal plate A into metal plate B so they marry and latch together Secure using 3 M3 screws How to Remove Remove the conn...

Page 35: ...35 Finally remove the screws on the hanger and the device ...

Page 36: ...be 1080p60 50 1080i60 50 720p60 50 4 Replace the cables and make sure they are not faulty 3 PTC 120 image is severely delayed Please use 1080p or 720p 60 50 Hz signals rather than 25 30 Hz signals 4 Not working after changing DIP Switch setting After configuring DIP Switch Setting unplug and reconnect the power cord and turn on the machine to change the setting 5 PTC 120 cannot be operated by remo...

Page 37: ... with SONY s RM BR300 Keyboard Controller 1 R B Gain is not an available function on PTC 120 2 Commands of L R Direction differ from PTC 120 thus L R Direction is not functional 9 PTC 120 Cabling 1 For RS 422 if CAT 6 is used transmission will be able to reach 100M 2 22AWG twisted cable is recommended 10 Resolution 1080p59 94 is not supported The connected switcher should use the resolution 1080p6...

Page 38: ...TXD IN 8 TXD IN 9 TXD IN 9 TXD IN 12 How to control multiple PTC 120 cameras using SONY RM BR300 Keyboard Controller via RS 422 interface Multiple PTC 120 cameras can also be connected in a daisy chain fashion The following diagram shows the user how to cascade multiple PTC 120 cameras with SONY RM BR300 Keyboard Controller via RS 422 interface ...

Page 39: ...nterface The diagram below shows the user how they can connect SONY s RM BR300 Keyboard Controller to the PTC 120 camera via RS 232 interface Camera RS 232C Terminal SONY RM BR300 1 DTR 1 DTR 2 DSR 2 DSR 3 TXD 3 TXD 4 GND 4 GND 5 RXD 5 RXD 6 GND 6 GND 7 IR OUT 7 OPEN 8 N C 8 OPEN ...

Page 40: ... Shutter 1 1 1 10 000 sec Electric Sensitivity UP N A Gamma Yes 4 modes Iris Control Auto Digital Noise Reductions 2D 3D On Screen Display OSD English Simplified Chinese OSD Control IR Controller Remote controller White Balance Auto indoor outdoor one push manual AGC Gain Control Auto Manual Zoom Ratio 20x Optical zoom 12x Digital zoom Mirror Mirror Flip Focus Mode Auto Manual Day Night IR Color G...

Page 41: ...20x Optical Zoom 12x Digital Zoom Focal Length f 4 7 94 mm Angle of View Horizontal 63 Video Output Video Output 3G SDI x 1 DVI D x 1 Component x 1 CVBS x 1 Video Format Output 1 V p p 75 Ohms Control Protocol SONY VISCA Baud Rate 9600 38400 bps Remote Control RS 232 RS 422 Remote Controller RMC 190 F W Update By RS 232 DVIP N A IR Receiver 5 IR Receivers ...

Page 42: ...ing Temperature 0 45 Storage Temperature 10 60 Operating Humidity 20 to 80 no condensation Certifications CE FCC Class A Dimensions W x H x D 6 9 x 7 3 x 7 2 174 x 186 x 182 7 mm W x D x H Weight 4 4 lbs 2 0 kg Accessories IR Controller Mounting Bracket for table or ceiling Mounting Bracket for main unit Mounting Screws DC In Power Adaptor Power Cord ...

Page 43: ...h setting The four types of DIP switch are 1 Output Switch 2 IR Select 3 Camera Address Selector 4 System Switch 9 1 OUTPUT Switch Output switch sets the output resolution The supported resolutions are listed in the table below Output Resolution Setting Output Resolution Setting 1920x1080 60p 1920x1080 50p 1920x1080 30p 1920x1080 25p 1920x1080 60i 1920x1080 50i 1280x720 60p 1280x720 50p 1280x720 3...

Page 44: ...tion number when the user desires to operate multiple cameras using the Remote Control Page 14 ID Setting 1 2 3 9 3 Camera Address Selector Camera Address Selector sets the camera address used in the cascade connection scenario The user is allowed to cascade up to 7 cameras which are controlled via either RS 232C interface or RS 422 interface ...

Page 45: ...itch adjusts the basic system settings such as communication protocol IR signal and communication baud rate Setting Function Descriptions DIP 1 RS 232C RS 422 Selector OFF RS 232C ON RS 422 DIP 2 Infrared Signal Output Switch OFF OFF ON ON When turned on CODEC installed inside the machine is required DIP 3 Communication Baud Rate Selector OFF 9600 ON 38400 DIP 4 Reserved ...

Page 46: ...are listed in the table below Before Firmware upgrade please make sure 1 DIP 1 of the System Switch is set to OFF 2 Camera Address Selector is set to zero Setting Function Descriptions OFF Default Upgrade of Camera DSP FW Camera Protocol FW M3 Control FW PAN Motor Firmware Upgrade N B Please contact Datavideo s technical team for firmware upgrade SOP TILT Motor Firmware Upgrade ...

Page 47: ...2 GREEN Green Video 3 BLUE Blue Video 4 ID2 RES Reserved 5 GND Ground HSync 6 RED_RTN Red return 7 GREEN_RTN Green return 8 BLUE_RTN Blue return 9 KEY PWR 5V DC 10 GND Ground VSync 11 ID0 RES Reserved 12 ID1 SDA I2 C Data 13 HSync Horizontal sync 14 VSync Vertical sync 15 ID3 SCL I2 C Clock ...

Page 48: ...PIN Descriptions PIN No PIN Name Signals 1 DTR Data Transmission Read Output 2 DSR Data Set Read Input 3 TXD Transmit Data Output 4 GND Ground 5 RXD Receive Data Input 6 GND Ground 7 IR OUT IR Commander Signal Output 8 N C No Connection ...

Page 49: ...120 can be controlled using a home PC The diagram below shows the connection in a PC controlled scenario Camera RS 232C Terminal PC RS 232C Terminal 1 DTR 1 CD 2 DSR 2 RXD 3 TXD 3 TXD 4 GND 4 DTR 5 RXD 5 GND 6 GND 6 DSR 7 IR OUT 7 RTS 8 N C 8 CTS 9 RI ...

Page 50: ...ignments PTC 120 PTZ control function can be remotely controlled at any location via RS 422 interface 12 1 PIN Descriptions PIN No Function 1 RXD OUT 2 RXD OUT 3 TXD OUT 4 TXD OUT 5 GND 6 RXD IN 7 RXD IN 8 TXD IN 9 TXD IN ...

Page 51: ...nector and pull out in the direction indicated by the arrow in the figure below 2 Peel off a section of copper wire AWG Nos 28 to18 and insert it into the connector hole use a flat head screwdriver to fix the copper wire in the connector hole with a slotted screw ...

Page 52: ...tion Note When RS 422 connection is being used do not use RS 232C connection 12 3 Wiring Diagrams To control PTC 120 with an external keyboard controller establish RS 422 interface connections between PTC 120 and RMC 190 keyboard controller as shown below RS 422 Interface on PTC 120 ...

Page 53: ...53 ...

Page 54: ...pqrs 0000 to FFFF Power Off Timer pqrs 0000 Timer Off to FFFF 65535min Initial value 0000 CAM_Zoom Stop 8x 01 04 07 00 FF Zoom Position 0 0x4000 Tele Standard 8x 01 04 07 02 FF Wide Standard 8x 01 04 07 03 FF Tele Step 8x 01 04 07 04 FF Wide Step 8x 01 04 07 05 FF Tele Variable 8x 01 04 07 2p FF p 0 Low to 7 High Wide Variable 8x 01 04 07 3p FF Direct 8x 01 04 47 0p 0q 0r 0s FF pqrs Zoom Position ...

Page 55: ...F One Push Trigger 8x 01 04 18 01 FF Enabled during manual mode One Push AF Trigger CAM_ZoomFocus Direct 8x 01 04 47 0p 0q 0r 0s 0t 0u 0v 0w FF pqrs Zoom Position 0x0000 0x4000 tuvw Focus Position 0x00 0x1C6 CAM_Initialize Lens 8x 01 04 19 01 FF Lens Initialization Start Camera 8x 01 04 19 03 FF Camera reset Resolution Setting 8x 01 06 35 00 0p FF p 0x00 1080p 60 0x01 1080p 50 0x02 1080p 30 0x03 1...

Page 56: ...h WB mode One push WB trigger CAM_AE Full Auto 8x 01 04 39 00 FF Automatic exposure mode Manual 8x 01 04 39 03 FF Manual control mode Shutter Priority 8x 01 04 39 0A FF Shutter priority automatic exposure mode White Board 8x 01 04 39 5F FF White board mode CAM_Shutter Reset 8x 01 04 0A 00 FF Shutter Setting Enabled in Shutter Priority Manaual Mode Up 8x 01 04 0A 02 FF Down 8x 01 04 0A 03 FF Direct...

Page 57: ... 0q 0r 0s FF pq X 00 To 08 rs Y 00 To 06 CAM_WD Set Parameter 8x 01 04 2D 0p FF p 0 5 0 Off 1 5 mode 1 5 CAM_Aperture Sharpness Reset 8x 01 04 02 00 FF Aperture Control Up 8x 01 04 02 02 FF Down 8x 01 04 02 03 FF Direct 8x 01 04 42 00 00 0p 0q FF Aperture Gain pq 00 to 0F CAM_HR On 8x 01 04 52 02 FF High Resolution Mode ON OFF Off 8x 01 04 52 03 FF CAM_2DNR 8x 01 04 53 0p FF NR Setting p 0 to 6 0 ...

Page 58: ...FF Off 8x 01 04 75 03 FF On Off 8x 01 04 75 10 FF CAM_IDWrite 8x 01 04 22 0p 0q 0r 0s FF Camera ID pqrs 0000 to FFFF CAM_Day Night Mode On 8x 01 04 6B 02 FF Alarm ON OFF Off 8x 01 04 6B 03 FF SetDayNighLevel 8x 01 04 6D 0p 0p 0p 0q 0q 0q FF Day judgment level setting ppp 000 to FFF Night judgment level setting qqq 000 to FFF Alarm Reply y0 07 04 6B 01 FF Detection level Low High y camera address 8...

Page 59: ...0x18 high speed VV 0x01 to 0x18 WW 0x01 to 0x18 Pan Position YYYY 0000 to 0AD4 F52C to FFFF center 0000 Tilt Position ZZZZ 0000 to 05C1 FE1B to FFFF center 0000 Down 3 8x 01 06 01 VV WW 03 02 FF Left 3 8x 01 06 01 VV WW 01 03 FF Right 3 8x 01 06 01 VV WW 02 03 FF UpLeft 3 8x 01 06 01 VV WW 01 01 FF UpRight 3 8x 01 06 01 VV WW 02 01 FF DownLeft 3 8x 01 06 01 VV WW 01 02 FF DownRight 3 8x 01 06 01 V...

Page 60: ...e second 1 250 degree second 2 300 degree second Motor Table Select Select Motor Speed Table 8x 01 06 20 30 40 0p FF p Table number 0 Default mode 1 Engineer mode CAM Prompt Set Prompt On Off 8x 01 04 07 00 0p FF p 2 to 3 2 Prompt On 3 Prompt Off CAM_MemSave Write Mem Data 8x 01 04 23 0X 0p 0p 0q 0q FF Address X 00 to 07 total 16 bytes Data ppqq 0x0000 to 0xFFFF CAM Model ID Set Camera model ID 8x...

Page 61: ...t 0 when power on and reset Pan tilt 8x 01 04 75 6A 02 FF Load preset 0 when power on 8x 01 04 75 6A 03 FF Load last status when power on SYS_Menu On 8x 01 06 06 02 FF turn on the menu screen Off 8x 01 06 06 03 FF turn off the menu screen On Off 8x 01 06 06 10 FF turn on off the menu screen CAM_AE_Bright_Ctrl Reset 8x 01 04 0D 00 FF AE Bright Control Using EV Up 8x 01 04 0D 02 FF Down 8x 01 04 0D ...

Page 62: ...62 Notes ...

Page 63: ...63 Notes ...

Page 64: ...64 15 Service Support ...

Reviews: