


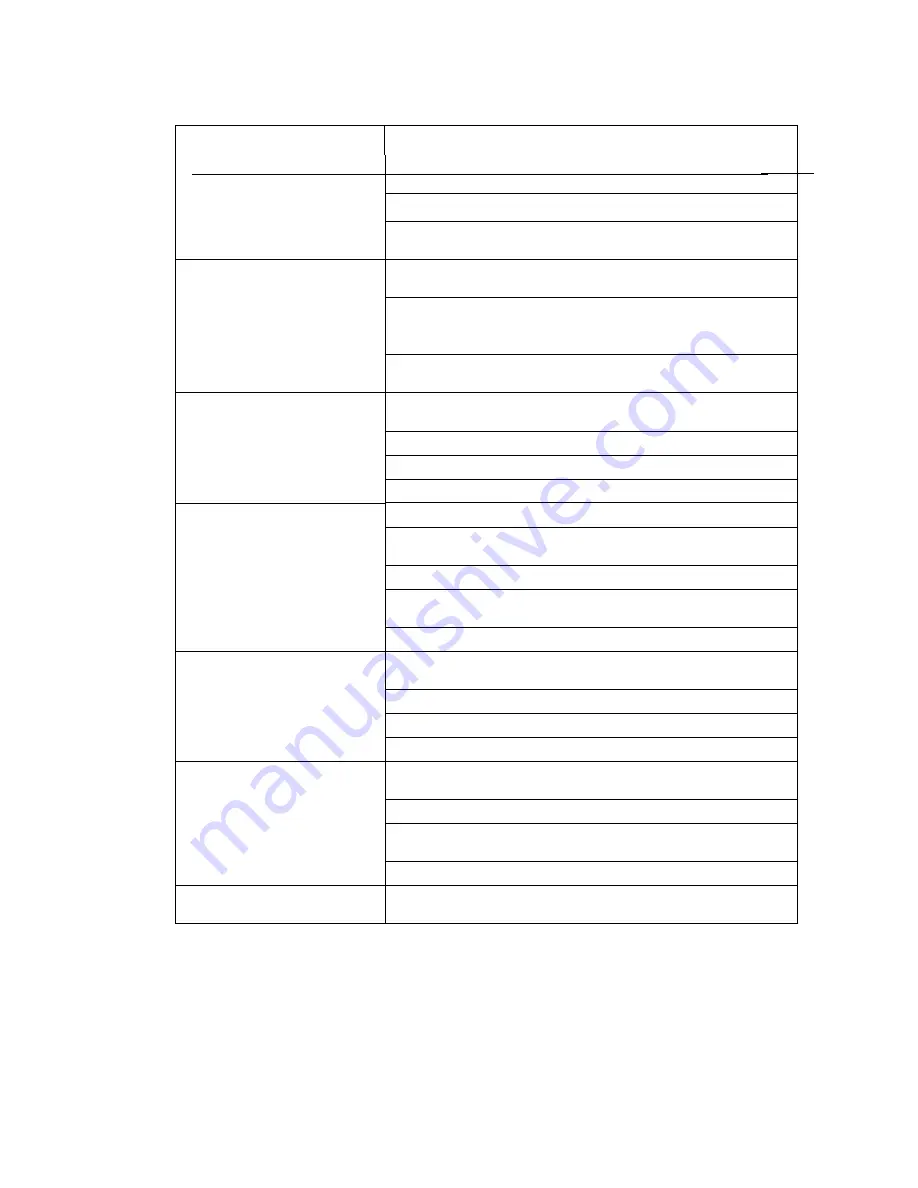
Symptom
Corrective Action
No Print
Verify installation of ribbon and ribbon guide.
Run a self test. See "Diagnostic Tests".
Verify form thickness setting as described under the "Form
Thickness Adjustment" of this manual.
Short Ribbon Life
Inspect failed ribbon. Ribbon should have two distinct wear
bands. If only one band is visible, ribbon is defective
If ribbon fabric shows vertical runs, printhead gap is too
small or printhead is damaged. Check print gap and
printhead.
Ribbon life can be affected by application. Heavy
Graphics, Barcode and printing can shorten ribbon life.
Parallel
Check interface cable (pin outs), cable connections, use a
shielded cable, or try a new cable.
Verify emulation selected.
Handshaking (Ack and/or Busy), 8th bit control
Reset profile and re-setup the printer.
Corrupted Print
Verify properly selected profile.
Serial
Check interface cable (pin outs), cable connections, or try a
new cable.
Verify emulation selected.
Verify baud rate, serial type (RS-232, RS-422), parity, data
bits, DTR, handshaking.
Reset profile and re-setup the printer.
Loss Of Data
Buffer Overflow
Check interface cable (pin outs), cable connections, or try a
new cable.
Parallel
Verify emulation selected.
Handshaking (Ack and/or Busy), 8th bit control
Reset profile and re-setup the printer.
Loss Of Data
Buffer Overflow
Check interface cable (pin outs), cable connections, or try a
new cable.
Serial
Verify emulation selected.
Verify baud rate, serial type (RS-232, RS-422), parity, data
bits, DTR, handshaking.
Reset profile and re-setup the printer.
Printhead Moves But No
Printing Occurs
Check Form Length feature. Form length must be equal to
the length of the form being used.
5-17
Summary of Contents for Documax A6300 Series
Page 1: ...Documax A6300 Series User s Manual Part No 107052 Rev B ...
Page 9: ...THIS PAGE INTENTIONALLY LEFT BLANK vi ...
Page 21: ...Figure 1 4 Install Power Cord 1 10 ...
Page 23: ...Figure 1 5 Open Access Cover Both Options ...
Page 30: ...Figure 1 11 Self Test Sample 1 19 ...
Page 41: ...3 1 ...
Page 45: ...Figure 3 3 Forms Loading 3 5 ...
Page 49: ...3 8 Figure 3 7 Loading Cut Sheet Form ...
Page 52: ...3 11 ...
Page 54: ...Figure 3 9 Set First Print Line 3 13 ...
Page 56: ...Figure 3 10 Printer Located Under Countertop 3 15 ...
Page 59: ...Figure 3 11 Manually Move Form Thickness Adjustment Knob 3 18 3 8 Heavy Forms Adjustment ...
Page 62: ...Figure 3 12 Main And Alternate Paper Paths Cut Sheet Not Shown 3 21 ...
Page 70: ...THIS PAGE INTENTIONALLY LEFT BLANK 3 29 ...
Page 75: ...Diagnostic Tests 4 5 Self Test ...
Page 86: ...Print Zero as 0 Ø Prints Zero without a slash Prints Zero with a slash 4 15 ...
Page 87: ......
Page 90: ...4 17 ...
Page 97: ...THIS PAGE LEFT INTENTIONALLY BLANK 4 23 ...
Page 99: ...Figure 5 1 Cleaning The Printer 5 2 ...
Page 141: ...D 5 Appendix E Ribbon Life Monitor ...
Page 148: ...THIS PAGE INTENTIONALLY LEFT BLANK F 4 ...
Page 150: ...G 2 7 Bit ASCII Character Set G 2 ...
Page 151: ...7 Bit ASCII Character Set Cont d ...
Page 152: ...G 3 IBM Code Page 437 Symbol Set G 3 ...
Page 153: ...IBM Code Page 437 Symbol Set Cont d G 4 ...
Page 154: ...G 4 IBM Code Page 850 Symbol Set G 5 ...
Page 155: ...IBM Code Page 850 Symbol Set Cont d G 6 ...
Page 156: ...G 5 Epson Italic Symbol Set G 7 ...
Page 157: ...Epson Italic Symbol Set Cont d G 8 G 9 ...
Page 158: ...G 6 Epson Graphics Symbol Set ...
Page 159: ...Epson Graphics Symbol Set Con t G 10 ...
Page 160: ...G 7 Epson Italic Graphics Symbol Set G 11 ...
Page 161: ...Epson Italic Graphics Symbol Set Cont d G 12 ...
Page 162: ...G 8 DEC Supplemental Symbol Set G 12 G 13 ...
Page 163: ...DEC Supplemental Symbol Set Cont d ...
Page 164: ...G 9 Nationality Overlay Character Set G 15 G 14 ...
Page 180: ...H 18 THIS PAGE INTENTIONALLY LEFT BLANK H 19 ...


