20
Panel Layouts
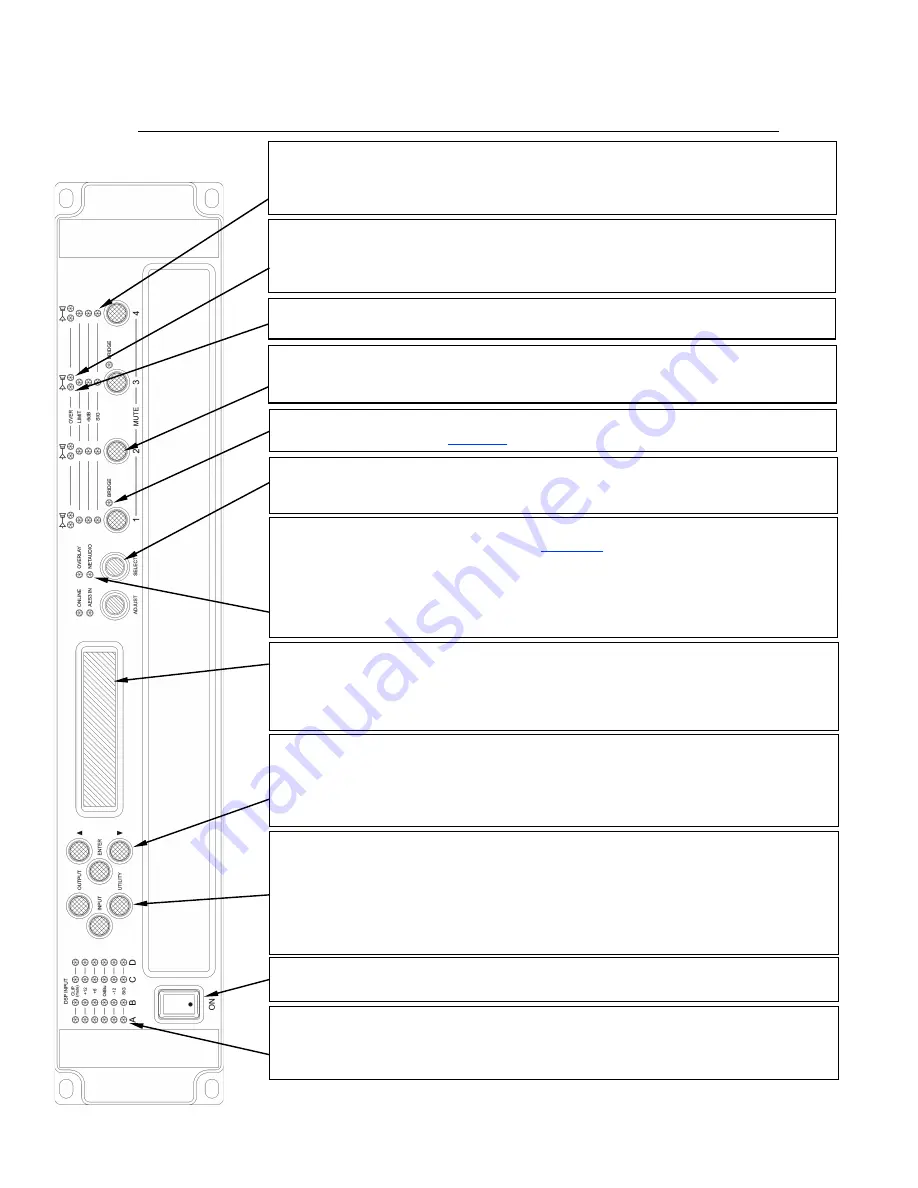
Menu Buttons-‐
There are three buttons to determine which section of the device to view or edit. The <
OUTPUT
>
button displays pages of parameters associated with a particular output channel. The <
INPUT
> button displays pages of
parameters associated with a particular input socket or input DSP channel. Pressing <
INPUT
> or <
OUTPUT
> buttons
repeatedly will scroll through the inputs/outputs of the processor. After the last channel, navigation returns to the
Home screen. The <
UTILITY
> button displays pages of miscellaneous parameters not associated with any particular
channel. While in Edit mode, one of these three buttons will be illuminated. They are mutually exclusive – pressing one
of the buttons will deselect any others that are active. Pressing Utils will escape back to the Home screen.
Page Selection Buttons-‐
When one of the buttons <
INPUT
>, <
OUTPUT
> or <
UTILITY
> is illuminated, the up <
p
> and
down <
q
> arrows will also illuminate, informing the user that these buttons may be used to scroll through the various
pages of parameters that may be viewed and edited. The <
ENTER
> button is used to confirm an operation such as
storing or recalling a preset or snapshot. It will illuminate when the user is being invited to press it. It will flash when
warning the user that pressing this button will activate an important function.
Power Switch-‐
Applies mains power to the device. If the device has entered Sleep mode, it may be woken up again
either from the PodWare application, or by switching this switch off, then on again.
Input Signal Indicators-‐
A set of five indicators show
“Sig
”, “
-‐12
”, “
0dBu
”, “
+6
” and “
+12
” and “
Clip
(mute)” for each of
the DSP inputs “
A
” “
B
” “
C
” “
D
”. The signal present Indicators operate at approximately –40 dBu. The “
0dBu
” indicators
are intended to show nominal operating level and can also be useful for setting system gain structure. The
Clip/mute
Indicators-‐ warn the user of input overload and operate at 1dB before clip. This indicator also shows a muted input
state, and will remain illuminated at all times whilst mute is active. Input mute is turned on/off in the <
INPUT>
gain
Graphical Display-‐
When the device is switched on, it will show the Home screen. This provides a useful overview of
channel allocation and Drive Module presets. The screen contrast can be changed by pressing the <
UTILITY
> button to
navigate to “Screen” and using the encoders to change the percentage; this can also optimise the viewing angle. In
most pages the currently selected channel and parameter information is displayed on the upper part of the screen and
the parameter value on the lower part of the screen.
Status Indicators
-‐ The “
OVERLAY
” indicator shows when there are parameters active on a group layer, which the user
cannot access through the front panel of the device (see
Overlay Flush
). The “
NETAUDIO
” indicator shows that a
networked digital audio card is installed and routed (Such as Dante™). The “
ONLINE
” indicator has three states: Off –
the unit is offline and not connected to a computer or network. Flashing-‐ the unit is searching for an IP address; if the
unit does not find an IP address the unit will assign itself an IP address automatically and the indicator will stop
flashing. On-‐ the unit is online and connected with software. IP settings can be viewed or changed within the <
UTILITY>
pages. The “
AES3 IN
” indicator illuminates when one or more of the inputs is using an AES3 source.
Parameter Encoders-‐
Two velocity sensitive parameter encoders are used to adjust parameters shown on the display.
Up to three parameters at a time are displayed on the screen. The parameter name is shown above the parameter
value in each of the three screen sections. Use SELECT to highlight the parameter, then ADJUST to change it.
Mute Buttons-‐
DSP output mute status is indicated and controlled by and illuminated button for each channel. These
flash when the entire unit is muted from the AUX port or from PodWare Mute-‐All, or if this channel has been muted by
the protection systems.
Limiter Indicators-‐
The output indicators shows the status of the limiter and output level. The <
SIG
> indicator shows
signal presence and will illuminate when a signal is present in the output. The second indicator <
-‐6dB
> shows that the
signal has reached 6dB below the limiter threshold. The third <
LIMIT
> indicator indicates that the threshold of that
output channel has been reached.
Driver Indicator-‐
This indicates a signal 6dB higher than the limiter threshold, or when the threshold of the excursion
limiter has been exceeded, or when the thermal limiter is active, protecting against long term thermal stress. Please
note that because of the long release time of the thermal limiter, this indicator may remain illuminated for several
seconds after signal on that channel is reduced.
Amplifier Indicator-‐
This indicates when the amplifier protection systems are reducing the gain to keep the
parameters of the amplifier within specification, or that the channel is clipping.
Bridge Indicator-‐
This will illuminate when the channel pair is in Bridge mode. The controls for the left channel of the
pair will determine the settings. See
Bridge Mode
Summary of Contents for DNA 10K4
Page 12: ...12 INSTALLATION INSTRUCTIONS Mechanical Installation 431 360 37 482 88...
Page 40: ...40 Processing Block Diagram...
Page 43: ...43 EQ and Filter Response Graphs...
Page 44: ...44...
Page 45: ...45...
Page 46: ...46...


