background image

RXYQ8~18P7W1BR1
VRVIII System air conditioner
4PW44039-1E – 07.2010

Installation manual

4

4.

I

NSPECTING


AND


HANDLING


THE


UNIT

At delivery, the package should be checked and any damage should
be reported immediately to the carrier claims agent.

When handling the unit, take into account the following:

1

Fragile, handle the unit with care.

Keep the unit upright in order to avoid compressor

damage.

2

Choose on beforehand the path along which the unit is to be
brought in.

3

Bring the unit as close as possible to its final installation position
in its original package to prevent damage during transport. 

(See

figure 4)

4

Lift the unit preferably with a crane and 2 belts of at least 8 m
long. 

(See figure 4)

Always use protectors to prevent belt damage and pay attention
to the position of the unit's centre of gravity.

5

If a forklift is to be used, preferably transport the unit with pallet
first, then pass the forklift arms through the large rectangular
openings on the bottom of the unit. 

(See figure 5)

5.1

From the moment you use a forklift to move the unit to its final
position, lift the unit under the pallet.

5.2

Once at final position, unpack the unit and pass the forklift arms
through the large rectangular openings on the bottom of the unit.

5.

U

NPACKING


AND


PLACING


THE


UNIT

Remove the four screws fixing the unit to the pallet.

Make sure the unit is installed level on a sufficiently strong base
to prevent vibration and noise.

Make sure the base under the unit is larger than the 765 mm of
the unit depth. 

(See figure 3)

The height of the foundation must at least be 150 mm from the
floor.

The unit must be installed on a solid longitudinal foundation
(steelbeam frame or concrete) as indicated in 

figure 3

.

Support the unit with a foundation of 67 mm wide or more. (The
support leg of the unit is 67 mm wide, see 

figure 3

).

Fasten the unit in place using four
foundation bolts M12. It is best to screw in
the foundation bolts until their length
remains 20 

mm above the foundation

surface.

6.

R

EFRIGERANT


PIPING

6.1.

Installation tools

Make sure to use installation tools (gauge manifold charge hose, etc.)
that are exclusively used for R410A installations to withstand the
pressure and to prevent foreign materials (e.g. mineral oils such as
SUNISO and moisture) from mixing into the system.
(The screw specifications differ for R410A and R407C.)

Use a 2-stage vacuum pump with a non-return valve which can
evacuate to –100.7 kPa (5 Torr, –755 mm Hg).

1

Packaging material

2

Opening (large)

3

Belt sling

4

Opening (small) (40x45)

5

Protector

NOTE

Use a belt sling of 

20 mm wide that adequately

bears the weight of the unit.

NOTE

Use filler cloth on the forklift arms to prevent
damaging the unit. If the paint on the bottom
frame peels off, the anti corrosion effect may
decrease.

Do not use stands to only support the corners. 

(See

figure 8)

Model

A

B

RXYQ8~12

930

792

RXYQ14~18

1240

1102

X

Not allowed

O

Allowed (units: mm)

Prepare a water drainage channel around the
foundation to drain waste water from around the unit.

If the unit is to be installed on a roof, check the
strength of the roof and its drainage facilities first.

If the unit is to be installed on a frame, install the
waterproofing board within a distance of 150 mm
under the unit in order to prevent infiltration of water
coming from under the unit.
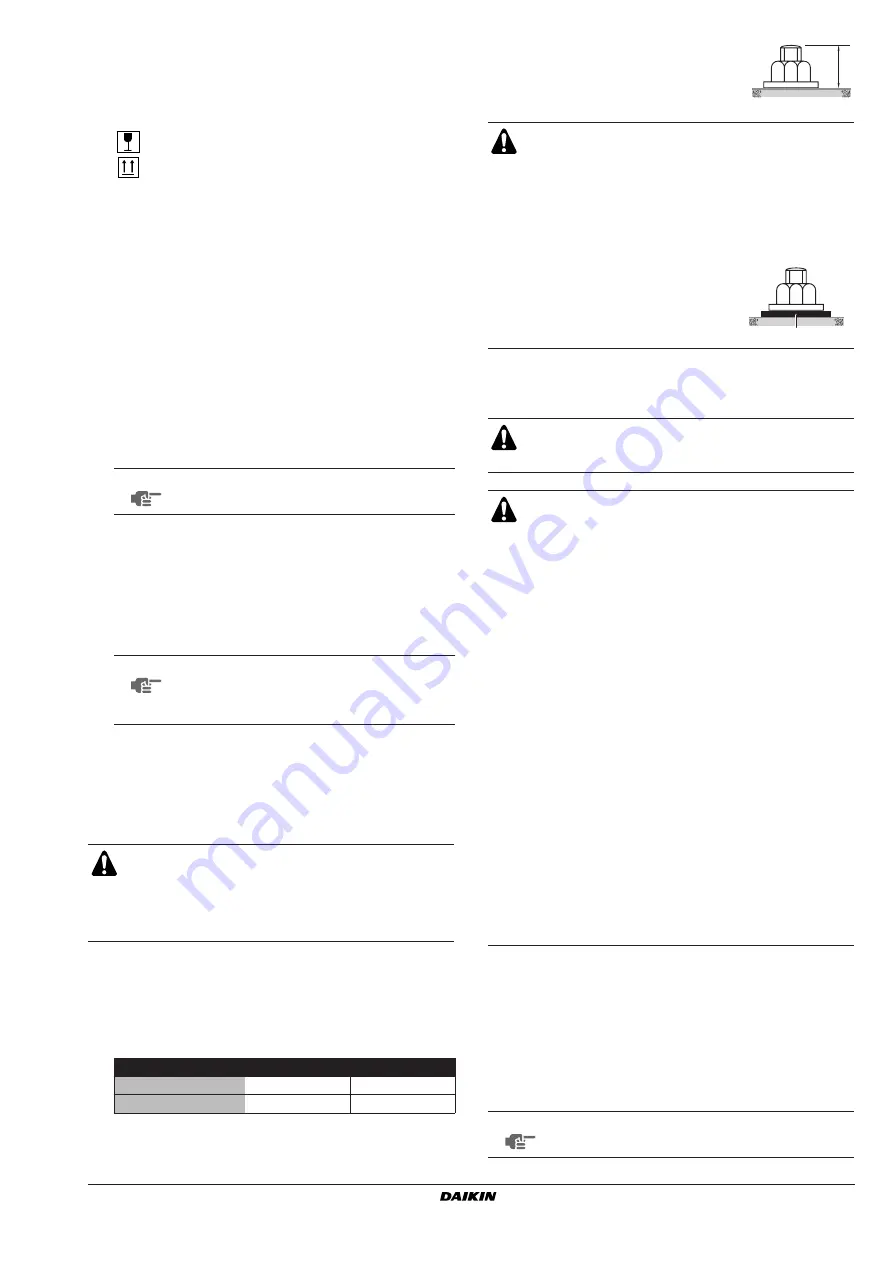
When installed in a corrosive
environment, use a nut with
plastic washer (1) to protect the
nut tightening part from rust.

Do not insert fingers, rods or other objects into the air
inlet or outlet. When the fan is rotating at high speed, it
will cause injury.

Use R410A to add refrigerant.

All field piping must be installed by a licensed refrigeration
technician and must comply with relevant local and
national regulations.

Caution to be taken when brazing refrigerant piping

Do not use flux when brazing copper-to-copper refrigerant
piping. (Particularly for the HFC refrigerant piping)
Therefore, use the phosphor copper brazing filler metal
(BCuP) which does not require flux.

Flux has extremely harmful influence on refrigerant piping
systems. For instance, if the chlorine based flux is used, it
will cause pipe corrosion or, in particular, if the flux
contains fluorine, it will damage the refrigerant oil.

Be sure to perform a nitrogen blow when brazing. Brazing
without performing nitrogen replacement or releasing
nitrogen into the piping will create large quantities of
oxidized film on the inside of the pipes, adversely affecting
valves and compressors in the refrigerating system and
preventing normal operation.

After completing the installation work, check that the
refrigerant gas does not leak.

Toxic gas may be produced if the refrigerant gas leaks into
the room and comes in contact with a source of fire.

Ventilate the area immediately in the event of a leak.

In the event of a leak, do not touch the leaked refrigerant
directly. Frostbite may be caused.

NOTE

Make sure the pump oil does not flow oppositely into
the system while the pump is not working.

20 mm

1

Summary of Contents for VRVIII RXYQ10P7W1BR1

Page 1: ...VRVIII System air conditioner INSTALLATION MANUAL RXYQ8P7W1BR1 RXYQ10P7W1BR1 RXYQ12P7W1BR1 RXYQ14P7W1BR1 RXYQ16P7W1BR1 RXYQ18P7W1BR1 System air conditioner...

Page 2: ...mm d 500 mm a 50 mm b 100 mm c 50 mm d 500 mm a 200 mm b 300 mm a 10 mm b 300 mm c 10 mm d 500 mm e 20 mm a 50 mm b 100 mm c 50 mm d 500 mm e 100 mm a 200 mm b 300 mm e 400 mm A B C D A B 3 a 10 mm b...

Page 3: ...MULTI UNIT A1P 3 8 3 4 1 5 5 2 2 TO IN D UNIT F1 F2 DS1 1 2 3 4 OFF ON O U T I N F1 F2 P1 P2 A B C A B C 1 DS1 1 2 3 4 OFF ON O U T I N P1 P2 1 2 3 6 5 7 8 9 10 11 1 A 4 4 2 2 2 5 6 3 2 3 1 4 5 6 7 1...

Page 4: ...mukaisesti 14 za p edpokladu e jsou vyu v ny v souladu s na imi pokyny odpov daj n sleduj c m norm m nebo normativn m dokument m 15 u skladu sa slijede im standardom ima ili drugim normativnim dokume...

Page 5: ...pie aujam temperat ra TS TSmin Minim l temperat ra zem spiediena pus L C TSmax Pies tin t temperat ra saska ar maksim lo pie aujamo spiedienu PS M C Dzesin t js N Spiediena dro bas ier ces iestat ana...

Page 6: ...nominal heating capacities ranging from 16 0 to 56 5 kW The RXYQ P7 units can be combined with Daikin indoor units for air conditioning purposes and suitable for R410A The present installation manual...

Page 7: ...6 RXYQ18 360 585 29 NOTE The table above shows the possible total capacity and number of possible indoor units If the total capacity of the connected indoor units exceeds the capacity of the outdoor u...

Page 8: ...re Make sure to provide for adequate measures in order to prevent that the outdoor unit be used as a shelter by small animals Small animals making contact with electrical parts can cause malfunctions...

Page 9: ...urn valve which can evacuate to 100 7 kPa 5 Torr 755 mm Hg 1 Packaging material 2 Opening large 3 Belt sling 4 Opening small 40x45 5 Protector NOTE Use a belt sling of 20 mm wide that adequately bears...

Page 10: ...o mm pipes eld supply 6 3 Pipe connection Be sure to perform a nitrogen blow when brazing and to read the paragraph Caution to be taken when brazing refrigerant piping on page 4 rst 6 4 Connecting the...

Page 11: ...til all oil is dripped out 7 Cut the pinched piping off with a pipe cutter just above the brazing point or just above the marking in case there is no brazing point Never remove the pinched piping by b...

Page 12: ...on page 8 6 5 Protection against contamination when installing pipes Take measures to prevent foreign materials like moisture and contamination from mixing into the system Great caution is needed whe...

Page 13: ...een outdoor and BP units H2 40 m Between BP and BP units Difference in height Difference in height between BP and BP units H3 15 m Between indoor and indoor units Difference in height Difference in he...

Page 14: ...290 22 2 290 x 420 28 6 12 7 420 x 585 15 9 Between refrigerant branch kit and BP unit Pipe size for direct connection to BP unit must be based on the total capacity of the connected indoor units c d...

Page 15: ...side stop valve Gas side stop valve Performing the airtightness test and vacuum drying Valve A must always be shut Otherwise the refrigerant in the unit will pour out Close Open Open Close Close NOTE...

Page 16: ...mistor discharge M1C M3C R50 R59 Resistor R95 Resistor current limiting S1NPH Pressure sensor high S1NPL Pressure sensor low S1PH S3PH Pressure switch high T1A Current sensor A6P A7P SD1 Safety device...

Page 17: ...ential in the grounding This unit uses an inverter and therefore generates noise which will have to be reduced to avoid interfering with other devices The outer casing of the product may take on an el...

Page 18: ...the electric box lid 2 Transmission wiring 3 Pipe opening 4 Conduit 5 Power wiring and ground wiring 6 Cut off the shaded zones before use 7 Through cover 1 Knockout hole 2 Burr 3 If there are any po...

Page 19: ...res 3 core wire cables are allowable for the cooler heater changeover remote controller only Be sure to keep the power line and transmission line apart from each other Be careful about polarity of the...

Page 20: ...OL HEAT selector etc Precautions when laying power wiring Do not connect wiring of different thicknesses to the power terminal block Slack in the power wiring may cause abnormal heat When connecting w...

Page 21: ...t may only be charged after performing the leak test and the vacuum drying For factory charge refer to the unit name plate NOTE National implementation of EU regulation on certain uorinated greenhouse...

Page 22: ...ure after the unit has stopped Electric shock warning Close the electric box lid before turning on the main power Perform the settings on the circuit board A1P of the outdoor unit and check the LED di...

Page 23: ...ED display is shown open valve A and close the frontpanel If the frontpanel is left open the system can not operate properly during the refrigerant charging The state of this LED is not important 9 Co...

Page 24: ...st minute x c x x x x w Start up control for the next 2 minutes x c x x x w x Waiting for stable heating conditions for the next 15 minutes according to the system x c x x x w w H1P H2P H3P H4P H5P H6...

Page 25: ...such as a ball point pen to avoid touching live parts Make sure to re attach the inspection cover 1 into the switch box cover 2 after the job is nished WARNING ELECTRIC SHOCK Caution when performing s...

Page 26: ...ton and adjust the LED indication to the settings as shown below in the eld marked 2 Push the button and the setting is de ned 1 LED H1 8P 2 Push button switches BS1 BS5 3 Dip switch 1 DS1 1 4 4 Dip s...

Page 27: ...n of low noise operation state x standard operation factory setting w operation 4 Indication of power consumption limitation setting x standard operation factory setting w operation Possible functions...

Page 28: ...1 Close all front panels except the front panel of the electric box 2 Turn ON the power to all outdoor units and the connected indoor units Be sure to turn on the power 6 hours before operation in ord...

Page 29: ...um concentration level of refrigerant gas is not exceeded in the unlikely event of major leak in the system and this in accordance to the local applicable regulations and standards Maximum concentrati...

Page 30: ...ssary to revise the system Please consult your supplier 15 DISPOSAL REQUIREMENTS Dismantling of the unit treatment of the refrigerant of oil and of other parts must be done in accordance with relevant...

Page 31: ...26 12 13 14 15 16 5 1 7 10 3 2 9 6 6 6 6 7 4 11 8 6 6 6 6 6 6 7 7 9 8 4 11 6 6 1 10 3 2 6 6 6 6 27 2 1 1 1 2 3 4 4 3N 50 Hz 1 50 Hz 26 27...

Page 32: ...4PW44039 1E 07 2010 Copyright 2008 Daikin...

Reviews: