background image

6 Configuration

Installation and operation manual

14

EWAQ016~ EWYQ016~064CAW

Packaged air-cooled water chiller

4P489435-1B – 2017.10

To  continue  the  configuration  of  the  system,  it  is  required  to  give
some  input  to  the  PCB  of  the  unit.  This  chapter  will  describe  how
manual input is possible by operating the pushbuttons/DIP switches
on the PCB and reading the feedback from the LEDs.

INFORMATION

If you get confused in the middle of the process, push BS1.
Then it returns to setting mode 1 (H1P is off).

6.2.2

Field setting components

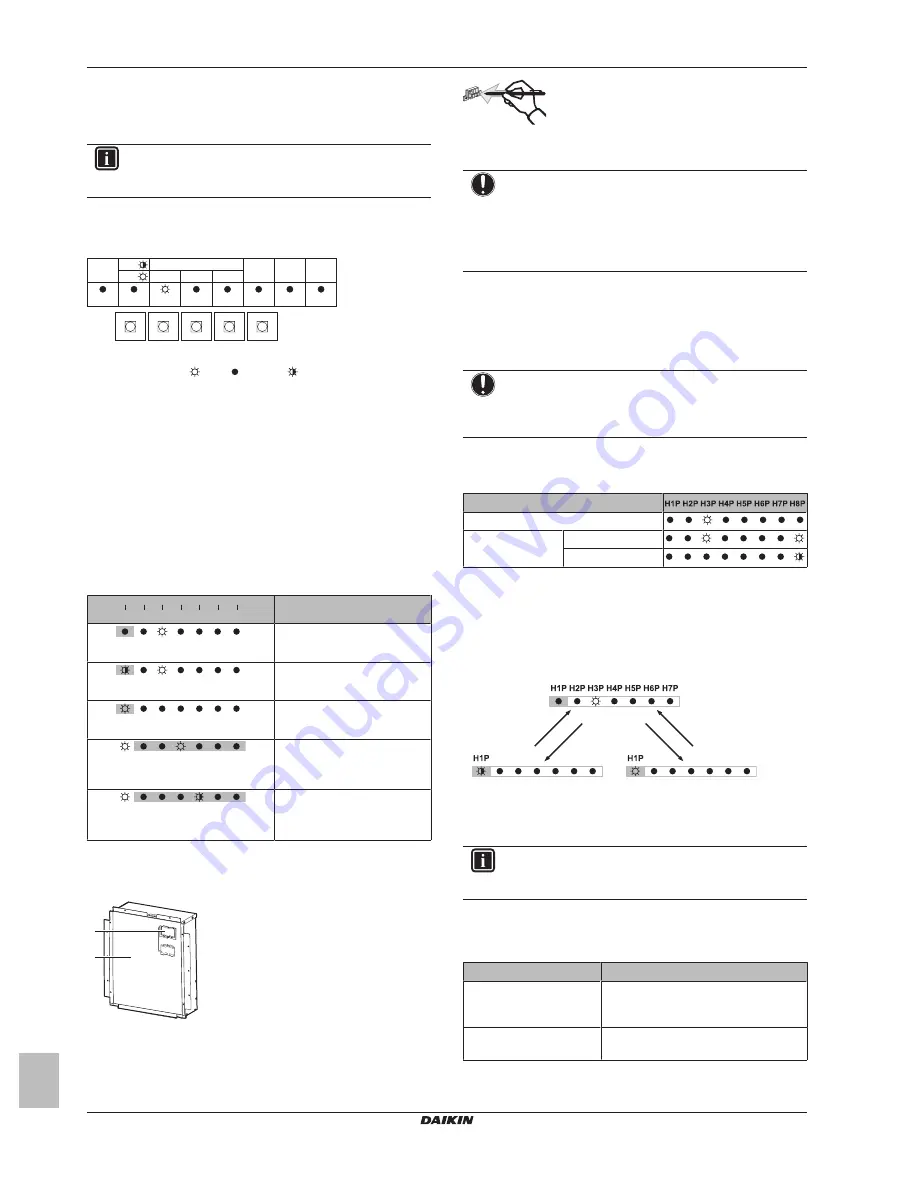
The components to make field settings are as follows:

BS2

SET

BS1

MODE

BS3

RETURN

BS4

TEST

BS5

RESET

H7P

MODE

TEST:

L.N.O.P. DEMAND

C/H SELECT

HWL:

IND MASTER SLAVE

MULTI

H1P

H2P

H3P

H4P

H5P

H6P

H8P

BS1~BS5

Pushbuttons

H1P~H8P

LEDs
ON (

) OFF ( ) Flashing (

)

Pushbuttons

Use the pushbuttons to make the field settings.

BS1

MODE: For changing the set mode

BS2

SET: For field setting

BS3

RETURN: For field setting

BS4

Not used

BS5

Not used

LEDs

The LEDs give feedback about the field settings, which are defined
as [Mode-Setting]=Value.

H1P

Shows the mode

H2P~H7P

Shows the settings and values, represented in binary code

H8P

NOT used for field settings, but used during initialisation

Example: 

H1P H2P H3P H4P H5P H6P H7P

-

+

+

+

+

+

[

H1P

32 16

8

4

2

1]

Description

(H1P OFF)

Default situation

(H1P flashing)

Mode 1

(H1P ON)

Mode 2

+

+

+

+

+

0

0

8

0

0

0

(H2P~H7P = binary 8)

Setting 8

(in mode 2)

+

+

+

+

+

0

0

0

4

0

0

(H2P~H7P = binary 4)

Value 4

(in mode 2)

6.2.3

To access the field setting components

Remove the inspection cover to carry out field settings.

b

a

Operate the switches and pushbuttons with an insulated stick (such
as a closed ball-point pen) to avoid touching of live parts.

Make  sure  to  re-attach  the  inspection  cover  into  the  electrical
component box cover after the job is finished.

NOTICE

Make  sure  that  all  outside  panels,  except  for  the  service
cover  on  the  electrical  component  box,  are  closed  while
working.

Close the lid of the electrical component box firmly before
turning on the power.

6.2.4

To access mode 1 or 2

After  the  units  are  turned  ON,  the  display  goes  to  its  default
situation. From there, you can access mode 1 and mode 2.

Initialisation: default situation

NOTICE

Be  sure  to  turn  on  the  power  6  hours  before  operation  in
order  to  have  power  running  to  the  crankcase  heater  and
to protect the compressor.

Turn  on  the  power  supply  of  the  outdoor  unit,  and  turn  on  the
external  operation  switch.  After  initialisation,  the  display  indication
state will be as below (default situation when shipped from factory).

Single unit

Multi-unit

Left unit (master)

Right unit (slave)

If  the  default  situation  is  not  displayed  after  10~12  minutes,  check
the malfunction code. Solve the malfunction code accordingly.

The HAP LED flashes to indicate normal microcomputer operation.

Switching between modes

Use  BS1  to  switch  between  the  default  situation,  mode  1  and
mode 2.

BS1 [5 s]

BS1

BS1

BS1

a

c

b

a

Default situation (H1P OFF)

b

Mode 1 (H1P flashing)

c

Mode 2 (H1P ON)

BS1

Press BS1.

BS1 [5 s]

Press BS1 for at least 5 s.

INFORMATION

If you get confused in the middle of the process, press BS1
to return to the default situation.

6.2.5

To use mode 1

Mode 1 is used to monitor the status of the unit.

What

How

Accessing monitoring
mode 1

Once mode 1 is selected (push BS1
one time), you can select the wanted
setting. It is done by pushing BS2.

To quit and return to the
initial status

Press BS1.

Summary of Contents for EWAQ016CAW

Page 1: ...oled water chiller English Installation and operation manual Packaged air cooled water chiller EWAQ016CAW EWAQ021CAW EWAQ025CAW EWAQ032CAW EWAQ040CAW EWAQ050CAW EWAQ064CAW EWYQ016CAW EWYQ021CAW EWYQ02...

Page 2: ...os t saik rendelkez seit z p niejszymi poprawkami 18 19 20 21 22 23 24 25 Directivelor cu amendamentele respective Direktive z vsemi spremembami Direktiivid koos muudatustega Direktyvose su papildymai...

Page 3: ...vastaava kyll stysl mp tila M C Kylm aine N Varmuuspainelaitteen asetus P bar Valmistusnumero ja valmistusvuosi katso mallin nimikilpi Maxim ln p pustn tlak PS K bar Minim ln maxim ln p pustn teplota...

Page 4: ...omponents 14 6 2 3 To access the field setting components 14 6 2 4 To access mode 1 or 2 14 6 2 5 To use mode 1 14 6 2 6 To use mode 2 15 6 2 7 Mode 1 Monitoring settings 15 6 2 8 Mode 2 Field setting...

Page 5: ...This installation manual concerns the packaged air cooled water chiller The unit is intended for outdoor installation and can be combined with fan coil units for air conditioning purposes or it can be...

Page 6: ...ystem in order to allow complete drainage of the water circuit Non brass metallic piping When using non brass metallic piping insulate the brass and non brass properly so that they do NOT make contact...

Page 7: ...tions must be avoided a larger minimum water volume will be required To ensure proper operation of the unit when changing the values of setting F 00 for cooling mode the minimum water volume has to be...

Page 8: ...chrader valve of the expansion vessel a a Schrader valve 4 2 5 To check the water volume Examples Example 1 The unit is installed 5 m below the highest point in the water circuit The total water volum...

Page 9: ...2 1 To provide the installation structure Make sure the unit is installed level on a sufficiently strong base to prevent vibration and noise NOTICE When the installation height of the unit needs to be...

Page 10: ...em field supply 5 3 2 To fill the water circuit 1 Connect the water supply to the drain and fill valve 2 Make sure the automatic air purge valve is open at least 2 turns 3 Fill with water until the pr...

Page 11: ...presence may lead to the precipitation of certain components in the glycol s corrosion inhibitor NOTICE Glycol absorbs water from its environment Therefore do NOT add glycol that has been exposed to a...

Page 12: ...set up use and maintain the unit Before operating the remote controller follow this installation procedure Wire specification Value Type 2 wire Section 0 75 1 25 mm2 Wire specification Value Maximum l...

Page 13: ...ation in this chapter is read sequentially by the installer and that the system is configured as applicable DANGER RISK OF ELECTROCUTION 6 2 Making field settings 6 2 1 About making field settings INF...

Page 14: ...lated stick such as a closed ball point pen to avoid touching of live parts Make sure to re attach the inspection cover into the electrical component box cover after the job is finished NOTICE Make su...

Page 15: ...e 2 There are two methods to activate low noise operation of the compressor unit and heat exchanger unit The first method is to enable an automatic low noise operation during night time by field setti...

Page 16: ...ach field setting is assigned a 3 digit number or code e g 5 03 which is indicated on the remote controller display The first digit 5 is the first code or field setting group The second and third digi...

Page 17: ...stop when active at that moment and will start again at the next scheduled ON function The last programmed command overrules the preceding programmed command and will remain active until the next pro...

Page 18: ...ng the night because temperature demands during night and day are not the same INFORMATION The setback function is enabled by default The setback function can be combined with the automatic weather de...

Page 19: ...ave a good control of the system and avoid frequent ON OFF it is advised to use the automatic weather dependent setpoint operation 6 01 Description 0 default External room thermostat not installed 1 E...

Page 20: ...e the fluid to freeze b Settings are not applicable C Leaving water temperature limits This setting is used to limit the selectable leaving water temperature on the remote controller C 00 Maximum leav...

Page 21: ...e powered up You read the complete installation and operation instructions as described in the installer and user reference guide Installation Check that the unit is properly installed to avoid abnorm...

Page 22: ...first running period of the unit the required power may be higher than stated on the nameplate of the unit This phenomenon is caused by the compressor that needs a continuous run time of 48 hours bef...

Page 23: ...b A B C D Possibility 1 Possibility 2 a 300 mm b 100 mm c 500 mm d 500 mm a 500 mm b 500 mm c 500 mm d 500 mm h1 h2 1500 500 F mm ABCD Sides along the installation site with obstacles F Front side Suc...

Page 24: ...Q N h g k g D E a Air purge valve b Temperature sensors R11T R12T R13T R14T c Expansion vessel 12 l d Shut off valve field installed e Water inlet connection f Water outlet connection g Drain port h W...

Page 25: ...or current limiting R1T Thermistor air fin R2T R15T Thermistor H E gas 1 H E de icer 1 sub cool H E gas 1 sub cool H E liquid H E liquid 1 suction 1 liquid 1 suction 2 H E gas 2 H E de icer 2 sub cool...

Page 26: ...stem A full overview of allowable combinations for future system extensions is available in technical engineering data and should be consulted Contact your installer to receive more information and pr...

Page 27: ...or a function is not available An unavailable function can mean insufficient permission level or can mean that a slave remote controller is used see 6 2 9 Field settings on the remote controller on pa...

Page 28: ...stem 12 3 1 About the clock INFORMATION The clock must be set manually Adjust the setting when switching from summertime to wintertime and vice versa The clock cannot be adjusted if the controller is...

Page 29: ...d settings on the remote controller on page 16 INFORMATION Temperature range for cooling 5 C 20 C leaving water temperature 10 C 20 C when glycol is used For setup of the schedule timer function see T...

Page 30: ...point operation 6 Set the leaving water temperature using and INFORMATION During this operation instead of showing the water temperature setpoint the controller shows the shift value which can be set...

Page 31: ...d 13 00 and will remain active until the next programmed command 19 00 occurs So in order to know the actual setting you should consult the last programmed command this may date from the day before Th...

Page 32: ...ture setpoint is enabled by default so only temperature shifts are possible no ON OFF instruction Quiet mode See To program quiet mode on page 33 Switch the mode on or off at a scheduled time Four act...

Page 33: ...seconds to program the detailed actions Result The first programmed action of the selected day appears 7 Select the action number you would like to program or to modify using 8 Set the correct action...

Page 34: ...ogrammed actions of a specific day press once Result You can now select another day using and and restart consulting and programming To copy programmed actions to next day In space heating program it...

Page 35: ...ct are necessary within the warranty period contact your dealer and keep the warranty card at hand 13 2 2 Recommended maintenance and inspection Since dust collects when using the unit for several yea...

Page 36: ...e unit with manufacturing number if possible and the installation date possibly listed on the warranty card 14 1 Error codes Overview In case a malfunction code appears on the indoor unit user interfa...

Page 37: ......

Page 38: ......

Page 39: ......

Page 40: ...4P489435 1B 2017 10 Copyright 2017 Daikin 4P489435 1 B 00000004...

Reviews: