background image

ED72-975

Installation Manual

BRC1E61

45

7.7

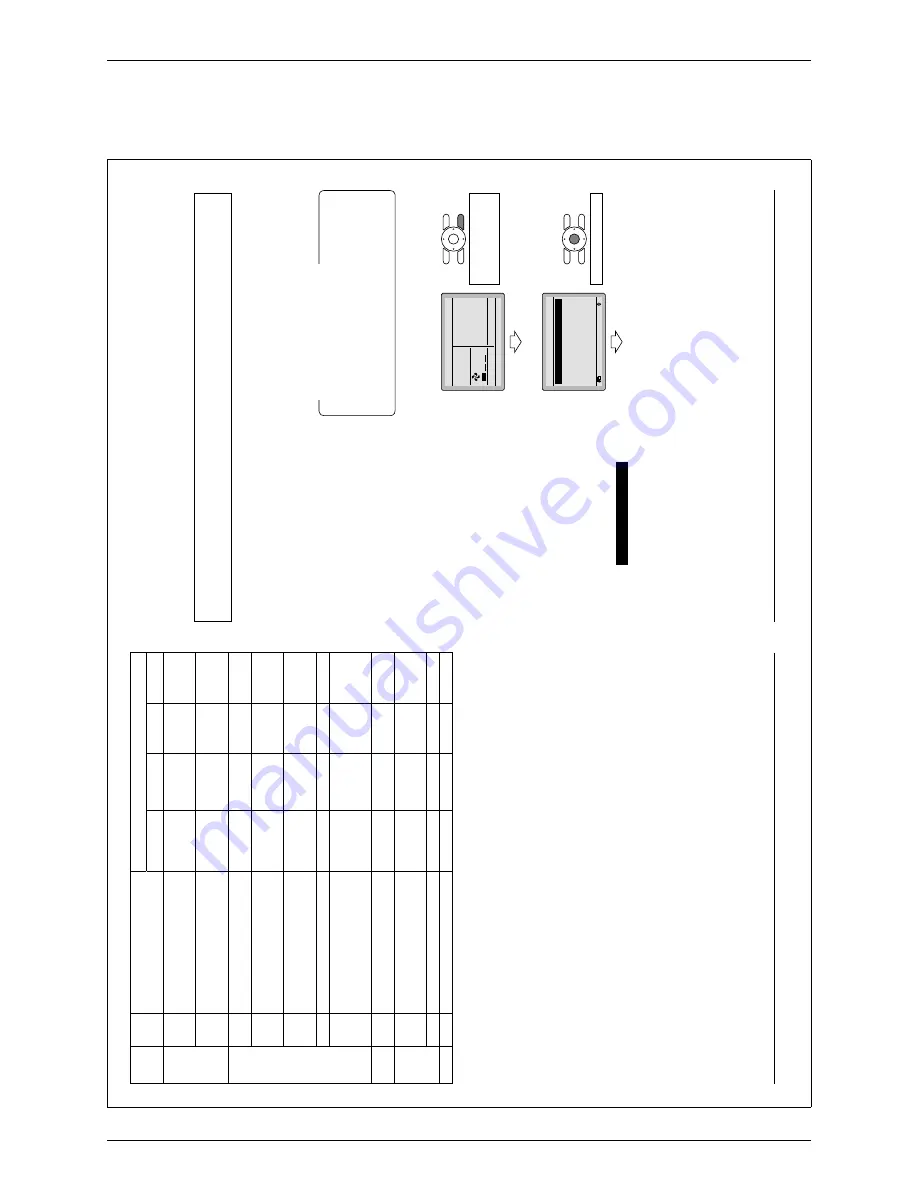
Test operation method (in the case of SkyAir)

3P243521-1

16 

English

T

est operation method (in the case of 

7. 

SkyAir)

In the case of VR

V

, see the manual attached to the outdoor unit. 


Also see installation manuals attached to the indoor unit and the outdoor 

unit.

Check that wiring work of the indoor unit and the outdoor unit is completed.  

Ɣ

Check that EL. COMPO. BOX cover of the indoor unit and the outdoor unit is closed.  

Ɣ

After refrigerant piping, drain piping and electric wiring are completed, clean inside of the indoor unit  

Ɣ

and decorative panel.


Ɣ

Perform the test operation according to following procedure. 

7-1 

Make sure to turn on the power supply 

more than 6 hours before operation 

start with front panel closed to protect 

compressor

Confi

 rm that stop valves of both liquid 

7-2 

and gas are opened. 

<Make sure that outer panel and 

piping cover is closed before 

operation (danger of electric 

shock). >

After air purge by vacuum pump,  

refrigerant pressure may not rise 

even though the stop valve is 

opened. 

The reason is that refriger-

ant system of the outdoor unit is 

blocked by electrical expansion valve 

or the like. Operation is no problem.

Set the operation mode to cooling by 

7-3 

using the remote controller

.

Press and hold Cancel button for 

7-4 

4 seconds or longer

. Field setting 

menu is displayed.

Select 

7-5 

 T

est operation ON/OFF 

 in the 

fi 

eld setting menu, and press Menu/

Enter button. Basic screen returns and 

“T

est operation” is displayed.


Ɣ

The backlight will be light for approximately 

30 seconds by pressing any operation button.

Operate the buttons during the backlight lit.  

Ɣ

However

, On/Of

f can be operated concur-

rently with the backlight lit. 

Notes for backlight

<Basic screen>

3

7-

4

7-

Set temperature

28

°C

Cool

Return

Setting

Press and hold Cancel 

button for 4 seconds or 

longer during backlight lit. 

<Field setting menu screen>

5

7-

Return

Setting

Field setting

T

e

st operation ON/OFF

Register Service Contract

Field setting list

Group No. setting

Indoor unit 

Airnet No. set

Outdoor unit 

Airnet No. set

1/2

Press Menu/Enter button.

01_EN_3P243521-1.indd   16

2/3/2009   1:19:22 PM

English 

15

Mode 

No.

Note) 1

FIRST


 CODE 

 NO.

Description of setting

SECOND CODE NO.  Note) 2

01

02

03

04

12 (22)

1

ON/OFF input from outside (setting 

for when forced ON/OFF is to be 

operated from outside).

Forced OFF

ON/OFF 

operation

————

————

2

Thermostat dif

ferential changeover 

(setting for when using remote 

sensor).

1°C

0.5°C

————

————

13 (23)

0

High air outlet velocity (for high 

ceiling applications).

≤ 

2.7m

> 2.7 

 3.0m

> 3.0 

 3.5m

————

1

Selection of airfl

 ow direction (setting 

for when a blocking pad kit has 

been installed).

4-way 

fl ow

3-way 

fl ow

2-way 

fl ow

————

3

Selection of airfl

 ow function (setting 

for when using a decoration panel 

for outlet).

Equipped

Not equipped

————

————

4

Airfl

 ow direction range setting.

Upper

Normal

Lower

————

6

Setting the external static pressure 

(setting according to the connected 

 duct resistance) (for FHYK, follow 

the high ceiling setting)

Normal

(Normal)

High static 

pressure

(High ceiling)

Low static 

pressure

————

————

————

15 (25)

3

Drain pump operation with 

humidifying.

Equipped

Not equipped

————

————

1c

1

Thermostat sensor in remote 

controller (for limit operation and 

Home leave function only)

Not use

Use

————

————

3

Permission level setting

Level 2

Level 3

————

————

1e

2

Home leave function

Not permitted

Permitted

————

————

Notes)

Though setting is performed totally in the group, set Mode No. in the parenthesis when 
1. 

individual setting per indoor unit or checking after the setting should be performed. 

SECOND CODE NO. at factory shipment is set to “01”. However for the following cases it is 
2. 

set to “02”.

Airfl

 ow direction range setting (except round fl

 ow cassette)


Ɣ

Thermostat sensor in remote controller (SkyAir only) 

Ɣ

Thermostat sensor in remote controller for limit operation and Home leave function only 

Ɣ

Home leave function 

Ɣ

Any function which the indoor unit does not have is not displayed.
3. 

01_EN_3P243521-1.indd   15

2/3/2009   1:19:22 PM

Summary of Contents for BRC1E61

Page 1: ...ED72 975 Navigation Remote Controller Wired Remote Controller BRC1E61...

Page 2: ...Direct Buttons 17 6 4 Quick Reference of Main Menu Items 22 6 5 Menu Manipulation 23 6 6 Maintenance 35 6 7 Useful Information 36 7 Installation Manual 38 7 1 Safety Precautions 38 7 2 Accessories 39...

Page 3: ...Multilingual Display Available for selection of 10 languages to display arbitrarily Other Features Wide variety of functions to meet customer needs such as schedule setting and contact address displa...

Page 4: ...imple and Functional Design 1 3 Simple Operation Compared to the conventional structure of button allocation for each function the number of buttons has been decreased from 15 to 9 Can intuitively han...

Page 5: ...system Available for simple operation with arrow keys and menu driven system Available for simple operation with arrow keys and menu driven system Select the item you wish to set with direction keys a...

Page 6: ...1 5 Available for simple operation with arrow keys and menu driven system Guide on display The item you wish to set can be changed with up or down button The display gives an explanation of each setti...

Page 7: ...r display in 10 different languages Always available for switching display by selecting from main menu 10 languages English German French Spanish Italian Portuguese Greek Dutch Russian and Turkish Ope...

Page 8: ...ED72 975 Features BRC1E61 7 1 5 Other Functions...

Page 9: ...ot be set with the sub remote controller Restriction of operation from the sub remote controller When the On Off button is pressed in the sub remote controller during Home Leave operation in the main...

Page 10: ...te controller DCS303A51 Wiring adaptor for electrical appendices KRP2A5 6 3 Quick Cooling Heating restriction for SkyAir only Under the following conditions Quick Cooling Heating operation stops to re...

Page 11: ...975 10 BRC1E61 4 Dimensions 5 Applicable Models 5 1 Applicable Models 3D064037 Applicable Indoor unit VRV All models that can be connected BRC1C62 or BRC1D61 SkyAir All models that can be connected BR...

Page 12: ...mote controller by yourself Improper installation may result in electric shocks or re Consult your Daikin dealer Do not use ammable materials e g hairspray or insecticide near the product Do not clean...

Page 13: ...nsult the dealer if the air conditioner submerges owing to a natural disaster such as a ood or typhoon Do not operate the air conditioner in that case or otherwise a malfunction electric shock or re m...

Page 14: ...Safety Precautions 01_EN_3P243520 1 indd 6 2 6 2009 5 49 57 PM English 5 CAUTION After prolonged use check the unit stand and its mounts for damage If left in a damaged condition the unit may fall an...

Page 15: ...nd side Each screen is scrolled in the left hand direction Home leave settings are enabled with this button kept pressed for at least four seconds See page 19 On Off button 8 Press this button and sys...

Page 16: ...lay See page 23 Displayed when the key lock is set 9 display See page 34 Displayed if the schedule timer or OFF reminder timer is enabled Under Centralized control 10 Displayed if the system is under...

Page 17: ...on and swing are set see page 28 This item is not displayed if the system is not provided with a function to set air ow directions Clock 24 hours real time clock 14 Displayed if the clock is set see p...

Page 18: ...ayed Return Setting MainMenu Set temp mode changeover Airflow Direction Quick Cool Heat On Off Ventilation Timer setting Service Contact Model info 1 2 Return Setting Timer setting Schedule timer Off...

Page 19: ...h 6 The Operation lamp will be turned OFF and the system will stop operating when On Off button is pressed again While the system is in heating operation the system will be in fan operation for approx...

Page 20: ...main menu see page 28 The air ow direction of the system cannot be changed unless the system is provided with a function to allow air ow direction changes 4 The Operation lamp will be turned OFF and...

Page 21: ...ime Selection Settings 2 Set temperature 28 C Cool Return Setting Set temperature 28 C Cool Return Setting Press Operation Mode Selector button of the remote controller for which the selection eligibi...

Page 22: ...28 C Cool Return Setting Press the remote controller that has the cooling heating selection eligibility or the remote controller without the display Changeover under control several times until the d...

Page 23: ...mer Off reminder timer Home leave 01_EN_3P243520 1 indd 25 2 6 2009 5 50 03 PM 24 English The main menu has the following items Setting and display items Description Reference page Set temp mode chang...

Page 24: ...s highlighted and ready to be changed The set temperature will increase by 1 C when the button is pressed and decrease by 1 C when the button is pressed Note The difference between the maximum and min...

Page 25: ...rn to the basic screen 01_EN_3P243520 1 indd 29 2 6 2009 5 50 04 PM 28 English Air ow Direction Setting Manipulating Air ow Direction Setting Operation Method 1 Return Setting MainMenu Set temp mode c...

Page 26: ...n the main menu screen Press Menu Enter button to return to the basic screen Quick Cooling Heating will no longer appear on the basic screen Quick Cooling Heating is now off 01_EN_3P243520 1 indd 31 2...

Page 27: ...comfortable temperature Fan speed display goes off and fan speed can no longer be switched Cannot be set when in fan and dry modes Quick Cooling Heating mode will run for a maximum of 30 minutes befo...

Page 28: ...temperature 28 C Cool Return Setting Selecting the desired ventilation mode and pressing Menu Enter button enters the settings and takes you back to the basic screen Pressing the Cancel button takes y...

Page 29: ...be changed Press buttons to change the set temperature The set temperature will increase by 1 C when the button is pressed and decrease by 1 C when the button is pressed Pressing Menu Enter button ent...

Page 30: ...nter button enters the schedule timer settings and takes you back to the basic screen 01_EN_3P243520 1 indd 39 2 6 2009 5 50 08 PM 38 English 5 Return Setting Monday Schedule timer Time Operation 06 0...

Page 31: ...09 PM 40 English Holiday setting The schedule timer will be disabled for days that have been set as holiday Operation Method 1 Return Setting Schedule timer Enable Disable setting Condition setting Ho...

Page 32: ...ings Operation Method 1 Return Setting Schedule timer Disable Off reminder Timer Disable Timer setting Bring up the timer settings screen See page 34 Press buttons to select the Off reminder timer on...

Page 33: ...5 2 6 2009 5 50 10 PM 44 English Service Contact Model Information Display method for service contact and model information Operation Method 1 Return Setting MainMenu Set temp mode changeover Airflow...

Page 34: ...ed by factors such as the location of the unit if it is in direct sunlight for e g and unit operation during defrosting After setting press Menu Enter button to con rm settings and return to the basic...

Page 35: ...December 31 2099 Note 01_EN_3P243520 1 indd 49 2 6 2009 5 50 12 PM 48 English Setting Status List Manipulating the setting status list Operation Method 1 Return Setting MainMenu Convenient functions S...

Page 36: ...button The display shown in 1 will disappear from the basic screen when the lter sign is reset 01_EN_3P243520 1 indd 51 2 6 2009 5 50 13 PM 50 English 7 Return Setting Is it settled by setting Clock...

Page 37: ...ify your Daikin dealer of the Error code and Model name 01_EN_3P243520 1 indd 53 2 6 2009 5 50 14 PM 52 English Caution Do not wash the remote controller Doing so may cause electric leakage and result...

Page 38: ...ems Model name Date of installation Failure conditions As precise as possible Your address name and telephone number Relocation The relocation of the remote controller requires special technology Cons...

Page 39: ...eakage electric shocks or re Be sure to use only the speci ed accessories and parts for installation work Failure to use the speci ed parts may result in the unit falling water leaakage electric shock...

Page 40: ...mote controller with water as this may result in electric shocks or re Install the indoor and outdoor units power cord and connecting wires at least 1 meter away from televisions or radios to prevent...

Page 41: ...EMC Electromagnetic Compatibility Australian regulation NOTE 01_EN_3P243521 1 indd 6 2 3 2009 1 19 17 PM English 5 Determine the direction of controller wiring outlet back 3 4 outlet left outlet upper...

Page 42: ...y using attached small screws 2 pcs Small screws M4 16 Switch box field supply Use optional accessory KJB211A Switch box for two units with no cover 84 46 Installation pitch 01_EN_3P243521 1 indd 8 2...

Page 43: ...t temperature The next items on the lower side will be highlighted The highlighted items will be scrolled continuously when the button is kept pressed Used to change the item selected Right button 6 U...

Page 44: ...or longer the Operation mode selector button of sub remote controller side Connection under check Please wait for a moment Sub remote contrl Basic screen 2 5 Set temperature 28 C Fan Return Press the...

Page 45: ...screen 6 6 7 6 Return Setting Is it settled by setting Field setting list Yes No Press Menu Enter button Setting con rmation 01_EN_3P243521 1 indd 14 2 3 2009 1 19 21 PM English 13 Field setting meth...

Page 46: ...light lit Field setting menu screen 5 7 Return Setting Field setting Test operation ON OFF Register Service Contract Field setting list Group No setting Indoor unit Airnet No set Outdoor unit Airnet N...

Page 47: ...hin about 10 seconds The test operation starts Check operation condition for 3 minutes Note In the case of above men tioned procedures 7 5 and 7 6 in reverse order test operation can start as well Pre...

Page 48: ...nter button Field setting menu screen 01_EN_3P243521 1 indd 20 2 3 2009 1 19 25 PM English 19 Remote controller display Description No display Power outage power voltage error or open phase Wrong wiri...

Page 49: ...asic screen Main menu screen 1 11 Return Setting MainMenu Convenient functions Setting status list Clock setting Language changeover 2 2 Press Menu Enter button 2 11 3 11 Return Setting Clock setting...

Page 50: ...ED72 975 Printed in Japan 06 2009 K FS Specifications designs and other content appearing in this brochure are current as of April 2009 but subject to change without notice...

Reviews: