background image


7

N

AMES


AND


FUNCTIONS

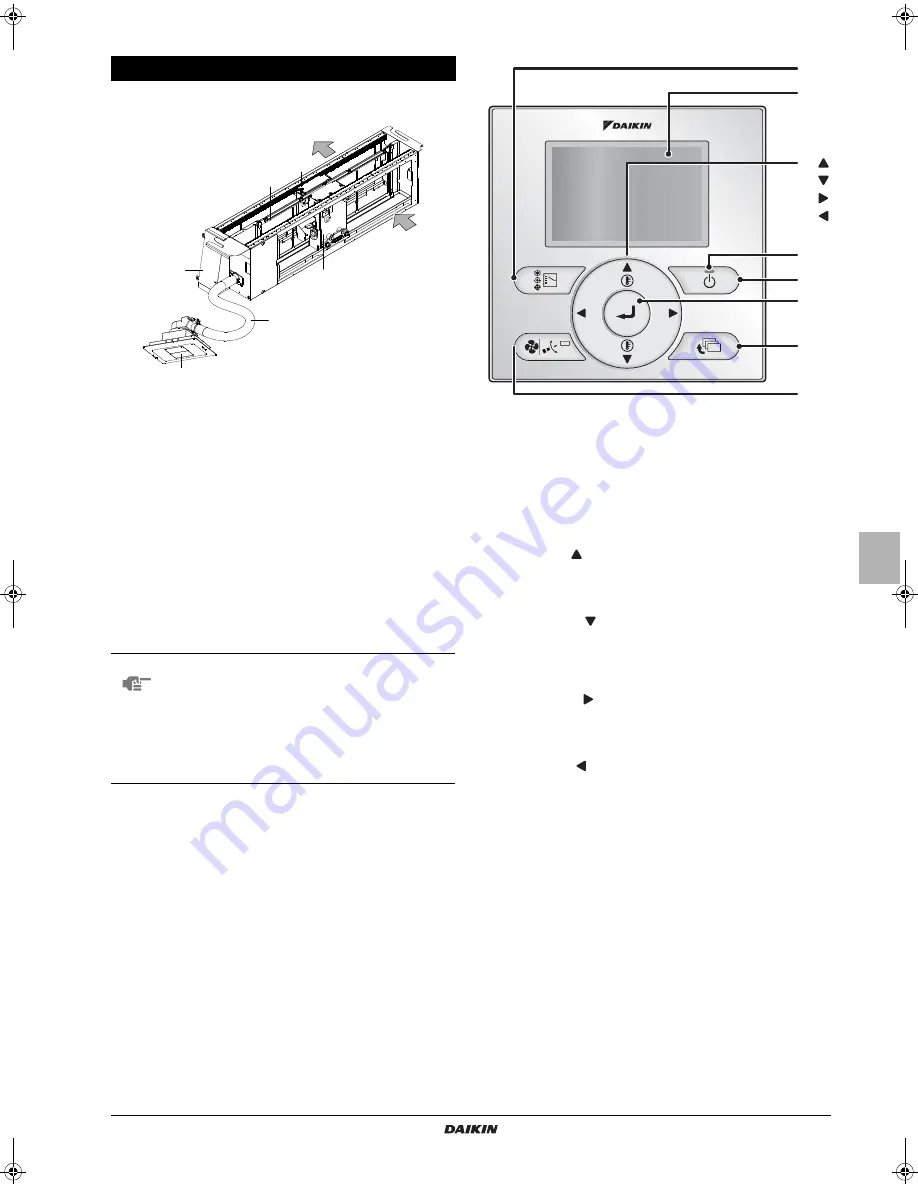
The illustration shows the Auto-Cleaning option kit with
transparent top plate.

Functions other than basic operation items (i.e., ON/OFF, Operation
mode selector, Fans speed control, and temperature settings) are set
from the menu screen.

Indicator

FOR THE USER

1

Filter

2

Cylinder unit

3

Brush unit with a dust box

4

Hose

5

Decoration panel

6

Switch box

7

Suction

8

Outlet

NOTE

Do not install the remote controller where it can be
directly exposed to sunlight. This may result in
discoloration or failure of the display.

Do not pull or twist the remote controller cord. 
Otherwise, the remote controller may error.

Do not press the buttons on the remote controllers
with sharp objects. This may result in damage or
faulty indications.

3

7

8

6

4

5

2

1

1

Operation mode selector button

-  Press this button to select the operation mode of your preference. 
(Available modes vary with the connecting model.)

2

Fan speed button

-  Used to indicate the Air Volume setting screen. (Available fan 
speed vary with the connection model.) For details, refer to operation 
manual of the controller.

3

Menu/Enter button

-  Used to indicate the main menu.
-  Used toenter the setting item selected.

4

Up button 

-  Used to raise the set temperature.
-  The next items on the upper side will highlight. The highlighted 
items will scroll continuously when the button is kept pressed.)
-  Used to change the item selected.

5

Down button 

-  Used to lower the set temperature.
-  The next items on the lower side will be highlighted.
(The highlighted items will scroll continuously when the button is kept 
pressed.)
-  Used to change the item selected.

6

Right button 

-  Used to highlight the next items on the right-hand side.
-  Each screen scrolls in the right-hand direction. 
-  Home leave settings are enabled with this button kept pressed for 
at least four seconds.

7

Left button 

-  Used to highlight the next items on the left-hand side.
-  Each screen scrolls in the left-hand direction. 
-  Home leave settings is enabled with this button kept pressed for at 
least four seconds.

8

ON/OFF button

-  Press this button and system will start.
-  Press this button again and system will stop.

9

Operation lamp (green)

-  This lamp lights up during operation.
-  This lamp blinks if an error occurs.

10

Cancel button

-  Used to return to the previous screen.

11

LCD (with backlight)

-  The backlight will be light for approximately 30 seconds by pressing 
any operation button.
Operate buttons excluding the ON/OFF button while the backlight is lit.
-  If two remote controllers are used to control a single indoor unit, the 
backlight of the remote controller operated earlier than the other one 
will be lit. (The backlights of the two remote controllers will not be lit 
simultaneously.)

 2

 3 

 8

10

 9

11

 4

 5

 6

 7

 1

4PEN470901-1B.book  Page 7  Thursday, September 7, 2017  3:17 PM

Summary of Contents for BAE20A102

Page 1: ...INSTALLATION AND OPERATION MANUAL BAE20A62 BAE20A82 BAE20A102 Auto Cleaning option kit...

Page 2: ...300 1 2 3 4 5 6 7 8 1 1 3 4 5 2 2 2 1 4 5 3 1 2 3 4 5 5 1 2 4 3 4 5 6 7 2 1 3 X70A X13A X1A X39A 1 2 3 4 5 6...

Page 3: ...e made by children without supervision This appliance is intended to be used by expert or trained users in shops in light industry and on farms or for commercial and household use by lay persons Sound...

Page 4: ...of the possibilities listed below 1 Factory installed hangers For a different way of installation the factory set hangers should be repositioned by an authorized installer 1 Remove 3 screws 2 Change...

Page 5: ...ounded head accessories Refer to figure 6 8 Connect the Auto Cleaning option kit with indoor unit using a wire harness accessories according to figure 7 and according to chapter Electric wiring work 9...

Page 6: ...ion of the indoor unit is finished The test operation of the Auto Cleaning option kit is not possible while the indoor unit is in operation Check that the Switch box lids of the indoor unit outdoor un...

Page 7: ...e interior 1 Remove protection net 2 Clean interior of the casing by vacuum cleaner or wet cloth 3 Perform a test operation 4 Use vacuum cleaner to remove remaining dirt from the dust box When trolley...

Page 8: ...DIP SWITCH R T THERMISTOR E H HEATER RC RECEIVER F U FU FOR CHARACTERISTICS REFER TOPCBINSIDE YOUR UNIT FUSE S C LIMIT SWITCH FG CONNECTOR FRAMEGROUND S L FLOAT SWITCH H HARNESS S NPH PRESSURESENSOR H...

Page 9: ...e will highlight The highlighted items will scroll continuously when the button is kept pressed Used to change the item selected 5 Down button Used to lower the set temperature The next items on the l...

Page 10: ...ttings are made NOTE The correct clock settings are necessary The product will perform filter auto cleaning from 12 00 to 15 00 as factory default if the period for filter auto cleaning is not specifi...

Page 11: ...ssage Set clock from menu appears make clock settings again so that the filter auto cleaning will be performed during the designated period CLOCK CALENDAR Setting the clock Operation method Operation...

Page 12: ...0 Day 07 Thursday 12 00 Return Setting Date Time Year 2011 Month 10 Day 07 Thursday 12 00 Return Setting Date Time Year 2011 Month 10 Day 07 Thursday 12 21 Return Setting Save the settings Date Time Y...

Page 13: ...east 10 seconds While vacuuming the dust take away the hose and put it back several times NOTE Dust collection with a vacuum cleaner is not possible during filter auto cleaning Make sure that is not d...

Page 14: ...confirm it on the remote controller See page 12 The dust collection sign appears soon after the dust is vacuumed Check the dust box cleaning interval Set preferred timing The product does not run acc...

Page 15: ...contact the installer or local authority for more information 1 If an error occurs either one of the following items will blink in the basic screen Error Push Menu Button The operation indicator will...

Page 16: ...4P470901 1B 2017 09 Copyright 2017 Daikin...

Reviews: