


8
Liquid crystal display
There are two display types, i.e., standard and detailed displays.
The standard display is by default set.
To go to the detailed display, select the detailed display in the
main menu.
For details, refer to the operation manual provided with the wired
remote controller.
Each of the following screens explains the state of the LCD
display regarding filter auto cleaning function.
For the contents of the LCD displays while the product is not in
filter auto cleaning operation, refer to the operation manual
provided with the wired remote controller.
F
ILTER
AUTO
CLEANING
SETTING
This product performs filter auto cleaning once a week as factory
default setting.
Auto cleaning is performed in case the unit is not operating and
specified time is reached. Only as a protection the cleaning function
may force the unit to stop an operation and perform a cleaning cycle.
For example
if an air-conditioner is running a certain amount of time
after sign clean dust box appears.
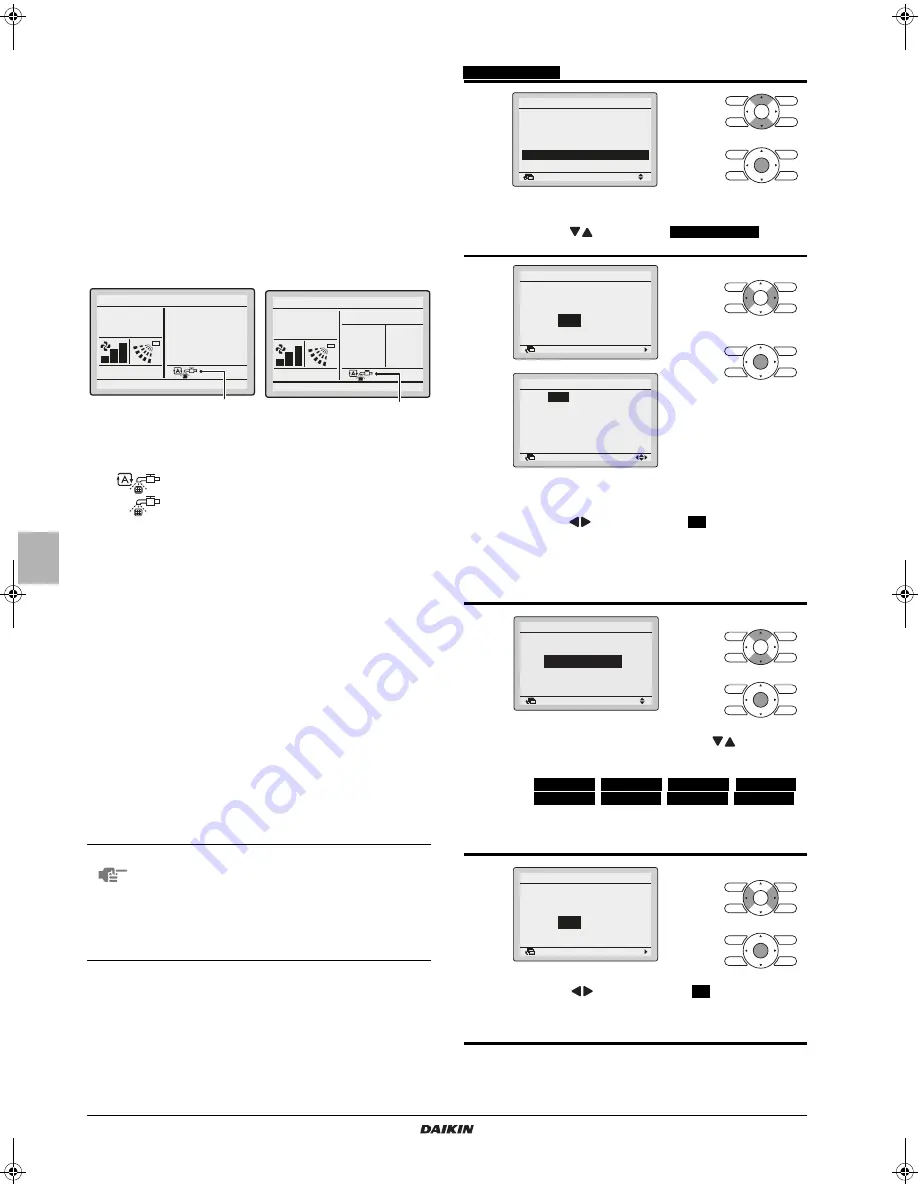
Method of specifying start time
Operation method
Standard display
Detailed display
1
"Cleaning" display
Displayed while the product is performing filter auto cleaning.
Collect dust from dust box. (See page 10.)
2
Message
The following message will appear:
"Error: Push Menu Button."
"Warning: Push Menu Button."
- Displayed if the error or warning is detected. (See page 13.)
"Set clock from menu"
- Displayed to inform that the clock needs setting. (See page 9.)
- The product will not start filter auto cleaning at the designated period
unless settings are made.
NOTE
The correct clock settings are necessary.
The product will perform filter auto cleaning from
12:00 to 15:00 (as factory default) if the period for
filter auto cleaning is not specified.
The product will perform filter auto cleaning at
non-prescribed time if clock settings are not
made.
Auto
1. "Cleaning" display
Set to
Cool
Heat
28
°C
20
°C
Room
20
°C
Auto
Cool
Heat
28
°C
20
°C
Setback
F r i
11:03
1. "Cleaning" display
1
Display the main menu screen.
Press
to select the
Filter Auto Clean
on the
main menu screen and press Menu/Enter button.
2
If the clock has not been set, a screen like the one on
the left will appear.
Press
buttons to select
Yes
and press Menu/
Enter button.
Set the current year, month, day, and time.
(See "Clock&Calendar" on page 9.)
* Clock setting are required to set the start time of filter auto
cleaning.
3
The period will change whenever
buttons are
pressed in the Clock setting screen for filter auto
cleaning.
00:00-03:00
,
03:00-06:00
,
06:00-09:00
,
09:00-12:00
,
12:00-15:00
,
15:00-18:00
,
18:00-21:00
,
21:00-00:00
Select the desired period from the ones displayed.
Press Menu/Enter button.
The setting confirmation screen will appear.
4
Press
button to select
Yes
on the settings
confirmation screen.
Press Menu/Enter button to set the filter auto clean
and return to the basic screen.
Setting
Main Menu
Quick Start
Ventilation
Energy Saving Options
Schedule
Filter Auto Clean
Maintenance Information
1/2
Return
Return
Setting
Clock setting is not carried
out. Do you want to set?
Filter Auto Clean
Yes
No
Date & Time
Year
2011
Month 01
Day 01
Thursday
12:00
Return
Setting
Return
Setting
Filter Auto Clean
Filter Auto Clean
0:00– 3:00
Return
Setting
Save the settings?
Filter Auto Clean
Yes
No
4PEN470901-1B.book Page 8 Thursday, September 7, 2017 3:17 PM