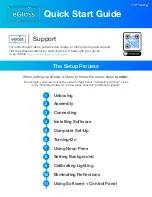
background image

Quick Start Guide 

III 

Important Safeguards and Warnings 

This section introduces content covering the proper handling of the whiteboard, hazard prevention, 
and prevention of property damage. Read carefully before using the whiteboard, and comply with 
the guidelines when using it. 

Storage Requirements 


  Stably put the whiteboard onto a support platform that is strong enough to prevent the 

whiteboard from falling. 

  Do not place the whiteboard in a place exposed to sunlight or near heat sources. 

  Store the whiteboard under allowed humidity and temperature (–20 °C to +60 °C, or–4 °F to 

+140 °F) conditions. 

Installation Requirements 


  Do not install the whiteboard in a place exposed to sunlight or near heat sources. 

  Keep the whiteboard away from dampness, dust, and soot. 

  Install the whiteboard on a stable surface to prevent it from falling. 

  Install the whiteboard in a well-ventilated place, and do not block its ventilation. 

  The power supply must conform to the requirements of ES1 in IEC 62368-1 standard and be no 

higher than PS2. Please note that the power supply requirements are subject to the device label. 

  The whiteboard is a class I electrical appliance. Make sure that the power supply of the 

whiteboard is connected to a power socket with protective earthing. 

  The appliance coupler is a disconnection device. Keep it at a convenient angle when using it. 

Operation Requirements 


  High voltage inside the whiteboard. Do not disassemble the whiteboard without a qualified 

professional present to avoid the risk of being exposed to danger. 

  Improper use of the battery might result in a fire or explosion. 

  Replace unwanted batteries with new batteries of the same type and model. 

  Use the standard power adapter. We will assume no responsibility for any problems caused by 

the use of a nonstandard power adapter. 

  Use the power cords that are recommended for the region and conform to the rated power 

specifications. 

  Make sure all cables are connected correctly before plugging the whiteboard into the power. Do 

not overload the power socket or pull the power code. Otherwise, it might cause fire or electric 
shock. 


  Do not drop or splash liquid onto the whiteboard, and make sure that there is no object filled 

Summary of Contents for D-LCH75-MC410-B

Page 1: ...Smart Interactive Whiteboard Quick Start Guide ZHEJIANG DAHUA VISION TECHNOLOGY CO LTD V1 1 0...

Page 2: ...March 2022 About the Manual The manual is for reference only Slight differences might be found between the manual and the product We are not liable for losses incurred due to operating the product in...

Page 3: ...marks and company names in the manual are properties of their respective owners Please visit our website contact the supplier or customer service if any problems occur while using the device If there...

Page 4: ...be no higher than PS2 Please note that the power supply requirements are subject to the device label The whiteboard is a class I electrical appliance Make sure that the power supply of the whiteboard...

Page 5: ...rical appliance Make sure that the power supply of the whiteboard is connected to a power socket with protective earthing The appliance coupler is a disconnection device Keep it at a convenient angle...

Page 6: ...Foreword I Important Safeguards and Warnings III 1 Introduction 1 2 Packing List 2 3 Installation 3 3 1 Preparation 3 3 2 Installation Accessories 4 3 3 Installation Procedure 4 4 Appearance 11 Append...

Page 7: ...io amplifier application and central control system The whiteboard supports the following functions and features 4K HD LCD display Switch between Android and Windows systems for Windows you need to in...

Page 8: ...mplete according to the packing list Table 2 1 Packing list Name Quantity Name Quantity Smart interactive whiteboard 1 Power cord 3 Stylus pen 2 Quick Start Guide 1 Wall mount bracket installed on whi...

Page 9: ...supply The power supply circuit for the whiteboard should be independent from lighting and other circuits to avoid unwanted interference Step 3 Make sure that the wall can bear a load of 160 kg or mor...

Page 10: ...0 wall mount screw 8 4 Plastic expansion plug for screw 8 5 Gasket 8 The brackets have been installed on the whiteboard when you receive it 3 3 Installation Procedure Step 1 Insert 2 M5 100 screws 2 1...

Page 11: ...5 Figure 3 2 Insert screws into vertical brackets Figure 3 3 Install gaskets Step 2 Mark screw locations on the wall and then drill holes 1 Identify a suitable installation position and then mark the...

Page 12: ...Quick Start Guide 6 Figure 3 4 Installation dimensions 55 65 inch series...

Page 13: ...Installation dimensions 75 86 inch series 2 Drill holes at the marked locations Figure 3 6 Required hole diameter and depth Step 3 Use 6 50 mm wall mount screws to attach the horizontal bracket onto t...

Page 14: ...f the whiteboard Install the hooks on the rear panel of the whiteboard with screws For 55 65 inch series you can use the first to the third hole from up to down with the maximum adjustment range of 30...

Page 15: ...Quick Start Guide 9 Figure 3 9 Attach the vertical brackets 65 inch series Figure 3 10 Attach the vertical brackets 75 inch series...

Page 16: ...3 11 Attach the vertical brackets 86 inch series Step 5 Tighten the screws at the bottom of the vertical brackets to secure the brackets Make sure that the appropriate screwdriver is used Figure 3 12...

Page 17: ...Quick Start Guide 11 4 Appearance Figure 4 1 Appearance 55 inch series Figure 4 2 Appearance 65 75 86 inch series Table 4 1 Appearance description No Description 1 LCD...

Page 18: ...brightness according to the ambient brightness 8 IR sensor Receives signals from the remote control 9 RS 232 port Transmits data between devices You can connect to central control devices with RS 232...

Page 19: ...e hard disk USB flash drive USB keyboard and USB mouse They are accessible both from the built in Android system and the optional OPS computer module 4 Touch Transmits touch signals The port is used t...

Page 20: ...formation of firmware updates released by the manufacturer We suggest that you download and use the latest version of client software Nice to have recommendations to improve your device network securi...

Page 21: ...audio and video data being stolen during transmission Reminder encrypted transmission will cause some loss in transmission efficiency 11 Secure Auditing Check online users we suggest that you check on...

Page 22: ...Quick Start Guide 16 device More information Please visit Dahua official website security emergency response center for security announcements and the latest security recommendations...

Page 23: ...Quick Start Guide...

Reviews: