background image

64

64

Troubleshooting

Troubleshooting

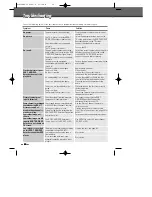
Check the following guide for the possible cause of a problem before contacting customer support.

Symptom

Cause

Solution

Plug the power cord into the wall outlet
securely.
Select the appropriate video input on the
TV so the picture from the DVB-T HDD/DVD
Recorder appears on the TV screen.
Connect the video cable securely.

Turn on the TV.
Select the correct input mode on the audio
receiver so you can listen to the sound
from the DVB-T HDD/DVD Recorder.
Connect the audio cables securely.

Turn on the equipment connected with the
audio cable.

Replace with new ones.
Clean the disc.
Insert a disc. (Check that the disc
indicator on the front panel display is lit.)
Insert a playable disc. (Check the disc
type, color system, and regional code.)
Place the disc with the playback side
down.
Place the disc on the disc tray correctly
inside the guide.
Clean the disc.
Cancel the Parental Control function or
change the rating level.
You cannot connect via the DVB-T
HDD/DVD Recorder. Connect the
component directly to your TV.
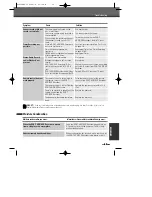
Use the ‘Adjust Channels’ feature to
restore channels. 
Tighten connections or replace cable.
Try all ‘Auto Tune options; see page 24 for
details.
Turn camcorder on and operate properly.

Use [INPUT] to select AV input channel
(AV, AVF, or DV).

Finalise the disc; see page 62.

No solution.

No solution.

The power cord is disconnected.

The TV is not set to receive DVB-T
HDD/DVD Recorder signal output.

The video cable is not connected
securely.
The TV power is turned off.
The equipment connected with the
audio cable is not set to receive DVB-
T HDD/DVD Recorder signal output.
The audio cables are not connected
securely.
The power on the equipment
connected with the audio cable is
turned off.
The audio cables are damaged.
The disc is dirty.
No disc is inserted.

An unplayable disc is inserted.

The disc is placed upside down.

The disc is not placed within the
guide.
The disc is dirty.
The Parental Control level is set.

The video signal from the external
component is copy-protected.

The skipped channels were deleted
with the ‘Adjust Channels’ feature.
Antenna or cables are loose.
Wrong Tuning Band is selected in the
DVB-T HDD/DVD Recorder Setup menu.
Camcorder is off.

The DVB-T HDD/DVD Recorder’s
source is not set to AV, AVF, or DV. 

The disc was not finalised (or not made
compatible if using a DVD+RW).
Some players will not play even a
finalised disc.
Discs recorded with copy-once
material cannot be played on other
players.

No power.

No picture.

No sound.

Playback picture is poor.
DVB-T HDD/DVD
Recorder does not start
playback.

Picture from external
input is distorted.

Some channels are skipped
over when using [PR+/–].
Picture or sound of
broadcasting channel is
weak or missing.
Camcorder image not
shown.
Camcorder image via A/V
input to DVB-T HDD/DVD
Recorder is not shown on
TV screen.
Can’t play disc recorded
on this DVB-T HDD/DVD
Recorder on another DVD
player.

0202DRHT-630 


2007.2.2 

9:19 

AM 


˘

`

64

Summary of Contents for DRHT-630

Page 1: ...DVB T HDD DVD RECORDER DRHT 630 HELPLINE NUMBER 0870 100 2525 P N 97P95600P0 64 0202DRHT 630 2007 2 29 19AM A...

Page 2: ...ch room temperature Make sure the product is placed at least 10 cm apart from other home appliances or obstacles to ensure sufficient ventilation The product should not be exposed to dripping or splas...

Page 3: ...ith arrowhead symbol within an equilateral triangle is intended to alert the user to the presence of uninsulated dangerous voltage within the product s enclosure that may be of sufficient magnitude to...

Page 4: ...t on a bed sofa rug or other similar surface This unit should never be placed near or over a radiator or heat radiator This unit should not be placed in a built in installation such as a bookcase or r...

Page 5: ...dition 22 WALL OR CEILING MOUNTING The product should be mounted to a wall or ceiling only as recommended by the manufacturer 23 HEAT The product should be situated away from heat sources such as radi...

Page 6: ..._____________________________5 Introduction____________________________________6 Overview Features ____________________________7 Identification of Controls ______________________11 Introduction Connec...

Page 7: ...channels with its new highly sensitive tuner DRHT 630 boasts the Electronic Program Guide EPG for even better program information on all channels and information that enables access to subtitles and t...

Page 8: ...Keyword Parental control with block on system all channels and programs by age limitation Multiple Connectivity to Hi Fi or Home Theatre Channel list mode in both all and favourite groups Channel sor...

Page 9: ...ed after a recording further recordings can be added to it Old recordings can be deleted but they can no longer be overwritten The deleted recordings titles are marked deleted title Before a DVD R can...

Page 10: ...ght Notice Audio and video recordings you make using the DVB T HDD DVD Recorder are for your personal use only You may not sell lend or rent them to other people This product incorporates copyright pr...

Page 11: ...epends on the operating environment For details please contact your nearest dealer Remote Control Operation Range Point the remote control at the remote sensor and press the buttons Distance Within 23...

Page 12: ...Front S video input Disc Tray DVD deck Insert a disc here OPEN CLOSE DVD Opens or closes the disc tray PLAY PAUSE OK Starts playback of a disc Pauses playback or recording temporarily STOP Stops play...

Page 13: ...Record mode Timer Recording is set FRONT DISPLAY MESSAGE Indicates clock channel current mode OTR time etc HDD DVD Recorder is recording HDD Record mode The current system time is normally displayed a...

Page 14: ...Cord Plug into a power outlet HDMI out HDMI output providing a high quality interface for digital audio and video COAXIAL OPTICAL Digital Audio Out Connect to an amplifier with a coaxial or optical di...

Page 15: ...Selects channels VOL Adjusts volume Displays a full list of searched channels or favourite list Returns to previous menu mode Selects numbered options in menus Selects TV channels Displays informatio...

Page 16: ...o Progressive Scart output is not equivalent to using the correct Component video cables for component video output As component outputs have their own Jacks on the back side change the TV input into...

Page 17: ...the connections described below Whichever TV connection you use will work with all input sources Please refer to the manuals for your TV VCR stereo system or other devices as necessary to make the bes...

Page 18: ...the HDMI output by setting the video output option in the setup menu RGB Interlace mode 576i Progressive mode 576p Changing the Progressive Scan mode when the recorder is connected with HDMI connecto...

Page 19: ...e audio format of the current DVD on the on screen display press AUDIO Rear of DVB T HDD DVD Recorder Amplifier Receiver Connecting an Amplifier Receiver Connecting to an amplifier equipped with two c...

Page 20: ...the front panel DV IN jack it is possible to connect a DV digital camcorder video deck or DVD R RW recorder and digitally transfer DV tapes or DVD R RW discs to DVD R or DVD RW Use a DV cable not sup...

Page 21: ...hing Auto Channel Search save the settings by pressing GREEN button 4 If you cancel the process during Initial Installation you should repeat this procedure You must follow the initial installation pr...

Page 22: ...ue to watch the current programme on a small TV picture of the current selelcted programme before the EPG was pressed in the bottom half of the screen 3 Press to move around the list If you press the...

Page 23: ...Interest Note If you want to go to the previous mode press BACK on the remote control This feature allows you to search for programmes related to particular words For example if you enter Mad about y...

Page 24: ...the displayed programme 3 When you have finished viewing the text service follow the on screen instructions to exit Information Service Information Service Digital text services may also be available...

Page 25: ...al factory settings Setup Menu Overview Setup menu Setup menu 1 Press SETUP The Setup menu appears 2 Use to select the desired category 3 While the desired category is selected press to move to the se...

Page 26: ...RED button to confirm it Reorder Channels After tuning TV or Radio stations into your DVB T HDD DVD Recorder you may wish to change the order of the stations you have in your set to your preference 1...

Page 27: ...he remote control 2 Channel List screen displays Use to select All Channels Radio Channels or Favourite List 3 Press OK to select the channels Set Clock You can set or modify the system clock 1 Follow...

Page 28: ...66hrs EP Extended Play 128hrs or SLP Super Long Play 195hrs Follow the same procedure as for DVD Record Quality however select HDD Quality in step 3 Auto Chapter During recording chapter markers are a...

Page 29: ...ve to move the cursor down by the up down button Off With this selection the DVB T HDD DVD Recorder will stop recording and prompt the user to erase some space and create more room on the HDD if the S...

Page 30: ...r Box Displays theatrical images with masking bars above and below the picture Centre Displays pictures cropped to fill your TV screen Both sides of the picture are cut off Auto Convert to the appropr...

Page 31: ...Analog Camcorder etc Off No signal will be output from the Digital Audio Out jacks PCM Select when connected to a 2 channel digital stereo amplifier The DVB T HDD DVD Recorder s digital audio signal w...

Page 32: ...lected press to select Video Output 4 Use to select the desired Video Output mode 5 Press SETUP to exit the menu Rating Level The Parental Settings feature allows you to prevent DVDs from being played...

Page 33: ...layback will stop You must enter the 4 digit password or change the rating level in order to play the disc There are 9 rating Levels including Kids U PG 12A 12 15 18 18R and Off 7 Press SETUP to exit...

Page 34: ...a 4 digit password using the 0 9 buttons 4 Use to select Country Code 5 Use to select the desired country code N B As the film classification ratings are slightly different in each country we recommen...

Page 35: ...ect Off the Lock feature is not active All titles in the HDD will play in full On If you select On the Parental Lock feature is active in HDD Edit menu To playback the title parental locked in HDD vid...

Page 36: ...and to select System Info 3 Use to select Firmware Info 4 Press OK to select the Firmware Info 5 Firmware Info screen appears as below HDD Info You can see HDD information you re using such as HDD mo...

Page 37: ...der to its original factory settings 1 Press SETUP The Setup menu appears 2 Use and to select Update Restore 3 While Update Restore is selected press to select Restore Default Settings 4 Press OK to s...

Page 38: ...ice during playback The on screen display appears on the TV screen 2 Use to select the Audio line on the on screen display 3 Use to select the desired audio language To display information about the c...

Page 39: ...on the on screen display You can see the elapsed playing time 3 Press OK to modify the time Use to change the time and use to move left or right 4 Press OK to confirm the start time Playback starts f...

Page 40: ...n the front panel display and playback starts automatically If playback does not start press MENU and select Play DVD by using the Then press OK In some cases the Disc menu may appear instead Playing...

Page 41: ...anguages and subtitle options as well as the chapters for the title The Zoom function may not work on some DVDs ex Jpg Repeat 1 To repeat the currently playing chapter press REPEAT CHAPTER appears on...

Page 42: ...rd Use PLAY PAUSE to pause playback while the title is playing 7 To stop playback at any time press STOP DivX Playback HDD Media DVD USB Playable DivX files are avi divx and playable DivX subtitles ar...

Page 43: ...peat 6 To stop playback at any time press STOP Audio CD Playback MP3 Playback HDD media Disc media USB media On the MP3 CD menu you can display the folders on the disc Use to select the folder icon on...

Page 44: ...nd Disc Media screen displays 3 Select the Audio Browser and go to music category 4 During playback of the MP3 files press BACK to return to the Filemedia menu screen The music playback will not stop...

Page 45: ...If you need to keep the video contained in this buffer for future usage you can Save all or part of the buffer During Time shifting a Timer recording may come up As you cannot watch one program in Tim...

Page 46: ...f the STOP is not pressed and the recording takes all the available space on the hard disk drive the HDD DVD Recorder will erase unprotected titles to the amount of about 10 hours in HQ mode approx 40...

Page 47: ...rtly and the recording will stop The maximum number of DVD titles per disc is 49 If the DVB T HDD DVD Recorder is powered off during DVD recording the recording will not be saved If a DVD RW or unfina...

Page 48: ...up to 1 year in advance Quality Choose a Record mode HQ SP SLP or EP Repeat Choose frequency of the recording Daily or Weekly 4 Enter the necessary information for your Timer Recording s Moves the cu...

Page 49: ...Stopping a Timer Recording in Progress The EPG application is a feature that simplifies setting the timer Just select the programme you wish to record in the EPG display The date time and channel of t...

Page 50: ...ecord The selected bar becomes red It means that a timer recording is associated to that programme Your recorder will automatically begin recording when the programme starts 6 Press RED once more to e...

Page 51: ...Recording continues until you press STOP or the disc is full To record for a fixed length of time see One Touch Record on page 46 6 Press STOP to stop recording Recording from External Components You...

Page 52: ...een the yellow highlight will be around the word Remove Press OK to remove this recording To remove all recordings from the dubbing list use the buttons on the remote control until the yellow highligh...

Page 53: ...7 Once you have chosen all the recordings you wish to Dub press OK The yellow highlight will now be around the word Remove Using the buttons on the remote move the yellow highlight down to Start Dub...

Page 54: ...t HDD Pictures HDD Music or HDD Divx then press OK The same method applies if DVD or USB Media is selected 3 If you want to edit a folder including copy select the folder you want to edit using and pr...

Page 55: ...Media Copy This will copy 4 title s Please note some of these files will be overwritten Continue HDD Media Copy HDD Media Copy finished 1 Press MENU to enter the Main menu browser 2 Select HDD Playli...

Page 56: ...name is complete press RED and select SAVE Then press OK HDD Playlist 00 00 Sun 07 Jan Ok Play Delete Edit Sort 001 BBC ONE 13 Sep 2006 13 44 HQ OHr 2Min 002 BBC News 21 Sep 2006 17 19 003 HDD Playli...

Page 57: ...press OK or press BACK HDD Playlist 00 00 Sun 07 Jan Ok Play Delete Edit Sort Dubbing 001 BBC ONE 13 Sep 2006 13 44 HQ OHr 2Min 002 BBC News 21 Sep 2006 17 19 HDD Playlist 00 00 Sun 07 Jan Name Prote...

Page 58: ...remove commercials during playback by inserting chapter markers at the start and end of a commercial interruption and hiding the chapter created Edit Thumbnail Creates a new Thumbnail at the point in...

Page 59: ...Protected 001 BBC ONE 13 Sep 2006 13 44 HQ OHr 2Min 002 BBC News 21 Sep 2006 17 19 HQ OHr 10Min HDD Playlist 00 00 Sun 07 Jan Ok Play Delete Edit Sort Dubbing 001 BBC ONE 13 Sep 2006 13 44 HQ OHr 2Min...

Page 60: ...D title Playing a DVD title DVD Playlist Select Return Ok Back No Yes Delete Title Are you sure you want to delete this title TITLE Date 13 Sep 2006 Time 07 20 Duration 0Hr 15Min Quality SP Follow the...

Page 61: ...es the current chapter marker Delete all when OK is pressed deletes all chapter markers within the title Hide Chapter Use to hide or unhide chapter markers in the title After hiding a chapter the chap...

Page 62: ...OHr 2Min As overwriting function may take several minutes to finish and save recording we recommend to delete the title and record manually Usage of DISC OP button for Disc Media Operation RW 16 41 N...

Page 63: ...ocess takes a few seconds 5 After the process is finished the recorder goes to the Information menu automatically Edit Disc Name You can rename your disc to any name you choose The default disc name i...

Page 64: ...for a DVD RW Then press or 3 Use to select Yes and press OK to make the disc compatible 4 After the process is finished the recorder goes to the Information menu automatically Once you have finalised...

Page 65: ...ected The TV is not set to receive DVB T HDD DVD Recorder signal output The video cable is not connected securely The TV power is turned off The equipment connected with the audio cable is not set to...

Page 66: ...TV input Point the remote control at the remote sensor of the DVB T HDD DVD Recorder Operate the remote control within 23 ft 7m Remove the obstacle Replace the batteries The remaining blank space on t...

Page 67: ...r SP 5 1 Mbps 33Hr EP 2 5 Mbps 64Hr SLP 1 7 Mbps 97Hr Frequency range 20Hz to 20 KHz Video S N Over 60 dB Audio S N Over 90 dB Resolution Over 500 lines HQ Recording DVD Specifications Frequency respo...

Page 68: ...ce is needed on this product during the guarantee period KEEP THIS SECTION FOR FUTURE REFERENCE On the expiry date of the manufacturer s guarantee you will be sent details of our annual insurance plan...

Page 69: ...in the manual It must be used solely for domestic purposes For further information regarding your guarantee please see the section at the rear of your user manual The guarantee will be rendered invali...

Reviews: